My new 11’ MacBook Air was having problems streaming Netflix video this evening. Every time I tried to stream a video, I would receive a Netflix error code 8156-6013 followed by a “call technical support” message. It also stated that this was usually the result of migrating system settings from another Mac.

Boy, they nailed that one. I had in fact used the Migration Assistant to setup my new MacBook Air by importing an account from my MacBook Pro. The error message then suggested that I contact their technical support team. Me? Wait on the phone? I think not. I’ll figure this one out myself. Read below how to fix this error without calling the Netflix Technical support team. Not that they are bad people mind you.
Are you a Windows user having the same issue? Check out Mike Thomson’s post instead. Hit the link below for the Mac solution.
This is a three step process. The first step is to install the latest version of the Mac Silverlight plugin. The second is to delete the Silverlight DRM file. The third and final step is to reinstall a new DRM file. Let’s get started.
Install the latest version of Silverlight
Quick caveat. These steps may not be necessary, but why take the chance. You should be running the latest version anyway for both performance and security reasons.
- Open a browser (Chrome, Safari, Firefox, etc).
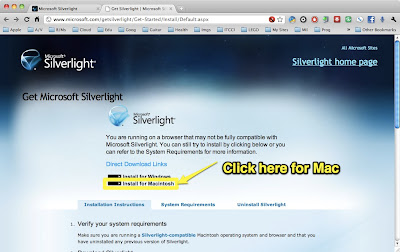
- Pound www.microsoft.com/getsilverlight in the address bar and hit the return key - the Silverlight download page will appear.
- Select the Mac download link as highlighted in the image below.
- After the download is complete, double-click the Silverlight.dmg file to open the disk image - a window with the Silverlight.pkg file should appear as shown in the image below.

- Double-click the Silverlight.pkg and follow the normal file install procedures.
- Eject the Silverlight disk image.
- Trash the Silverlight disk image.
Remove the Silverlight DRM File
This is probably the step they really don’t want to publish.
- Open a Finder window (double-click on the Macintosh HD icon on the desktop).
- Navigate to /Library/Application Support/Microsoft/PlayReady .
- Locate the mspr.hds file as shown in the image below.

- Drag the mspr.hds file to the trash {Update July 17th, 2011} Reader Vic said…:
To all the people saying you have no PlayReady folder–I don’t see one either. It’s just invisible. Go to it from Terminal. user@zed:~ $ cd /Library/Application\ Support/Microsoft/PlayReady/ user@zed:/Library/Application Support/Microsoft/PlayReady $ ls mspr.hds user@zed:/Library/Application Support/Microsoft/PlayReady $ rm mspr.hds
Reinstall a new Silverlight DRM file
This step is easy and is probably pretty self-evident, but I’ll include just to round out the instructions.
- Open a browser (this time it must be a Netflix supported browser).
- Visit the Netflix web site.
- Log into your account.
- Visit your instant queue and load a title - it should take a bit longer than normal to begin the stream since this step revalidates your computer and creates a new DRM file on your Mac.
- Begin watching your favorite 80s films!
That wasn’t so bad was it? And why would that require a phone call to Netflix Technical Support? I am at a loss why this isn’t simply on the Netflix support site. Maybe I missed it, but I don’t think so. It’s a simple process and one that every Mac/Netflix user needs to know. Well, the secret is out of the bag. No more phone calls.
Comments
Comments use GitHub Discussions; sign in with GitHub to join in.