Retro computing with a touch of modern and the home for all things, retroCombs (aka Steven Combs).
Disclosure Statement: When you click on links to various merchants on this site and make a purchase, this can result in this site earning a commission. Affiliate programs and affiliations include, but are not limited to Amazon, the eBay Partner Network, and/or others.

A Mac user’s guide to the Chromebook
by Steven B. Combs, Ph.D.
I like technology and gadgets. I can’t help myself. Budget permitting, I try them all and one of the products I didn’t own was a Chromebook. I am unsure why the Google laptop fascinates me. Is it the simplicity? Is it the synchronization with the Chrome browser on my Mac? Is it the Linux underpinnings? I’m really not sure, but I wanted one!

I tried Chrome OS on an old Acer netbook roughly two years ago; however, the installation was a hack and so was the performance. I wanted to experience a “real” Chromebook - one with the logo on the case and one created exclusively for the current version of Chrome OS. I choose the inexpensive Acer C720.
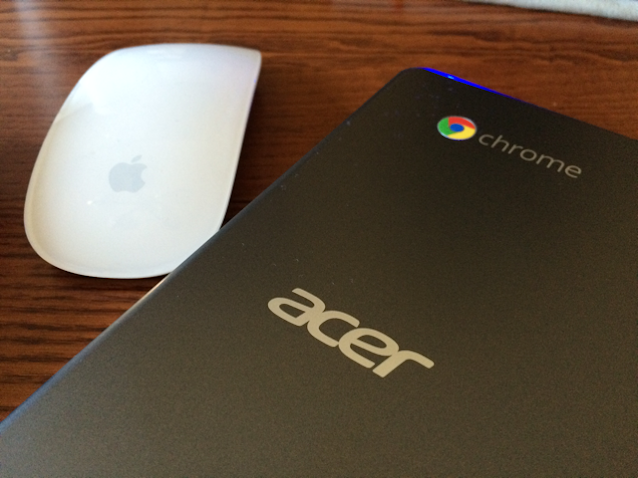
During Black Friday 2014, Amazon sold the Acer C720 Chromebook for $150. Amazon reviews were excellent (4.5 stars). This was a comfortable price-point so I pulled the trigger. I’m really glad I did! I have learned much about Chrome OS.
This blog post will not be a review of this particular Chromebook. That may come later. What this post provides is a look at Chrome OS from a Mac user’s perspective. It will contain my observations as well as some tips and tricks to make the transition a bit easier for Mac users considering a purchase.
UPDATE: Thanks to the folks in the Google+ Chromebook Community!. Several of them helped me work out some technical issues and shared some new tips. Thanks to their input, I’ve added several new sections and additional information.
In my post, I will cover the following high-level features:
TOC
- Performance
- Keyboard
- Touchpad - Magic Track Pad / Track Pad
- Files - Finder
- Search - Spotlight
- Chrome - Safari
- Applications
- Shelf - Dock
- Overview - Mission Control
- Miscellaneous
- Conclusion
Let’s get started…
Performance
The most important feature of any computer is performance. All the apps in app store don’t matter if performance is sluggish and frustrating. Luckily, at least on the Acer C720, performance is excellent. My Chromebook boots up and connects to my Wi-Fi network in about 10 secs. Not a single Mac I own can claim those speeds.
Responsiveness is similar to an iPad. Click on the Chrome browser icon and Chrome loads almost immediately. Search results appear as quickly as your internet connection provides. Shutdown is quick. Given the Chrome OS Linux underpinnings combined with the on board solid state drive (SSD), this level of performance is expected.
All-in-all, performance and battery life on a modern Chromebook is very similar to the current crop of entry level Mac laptops. My Acer doesn’t include the newer Bay Trail chipset, but rather the older Haswell chipset; however, I still get about 5 hours of battery life. Newer Chromebooks with the Bay Trail chipset claim about 8-10 hours.
Keyboard
When you take a quick look at the keyboard on a Chromebook, the differences between it and the Mac are visibly noticeable. There is no command key (⌘), no shift lock, and functions keys are tied to the Chromebook and Chrome OS features. On my particular Acer C720 Chromebook, keys were large, comfortable and easy to read. Keyboard feel is similar to that of the Apple MacBook Air keyboard. This made the transition a bit easier.
Keyboard shortcuts are very different from the Mac. My muscle memory was confused during the transition. The control key is used in lieu of the missing command (⌘) key and that key is far to the left. Using my pinky finger to activate the search box was a change from my command key double-tap Alfred activation. Helpful is the onscreen keyboard shortcut tool shown below:
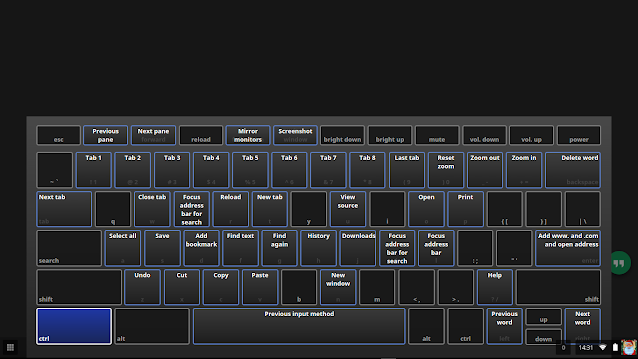
You activate they keyboard overlay using the ctrl + alt + ? keystroke.
For keyboard shortcut users, this is a fabulous tool that I wish were integrated into OS X. I strongly recommend that Mac users take a good look at the options available. Most likely, any of the keyboard shortcuts you use on a Mac are available in another combination on the Chromebook.
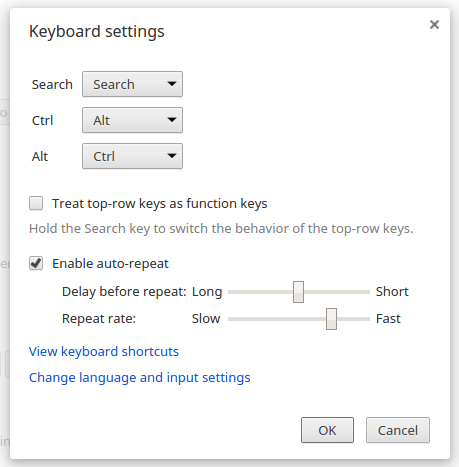
Here’s quick tip to help restore your muscle memory from your Mac keystrokes. Switch the ctrl and alt keys. Chrome OS makes this easy:
- Select the Chrome OS Status area (where your account picture appears)
- Select the Settings icon
- Select keyboard settings
The dialog box below will appear. Here you can switch their function. This makes the use of the Chrome OS keyboard a bit more familiar to Mac users.
Touchpad
The Chromebook touchpad is very similar to the trackpad found on a Mac laptop sans a few features. There is a single button underneath the touchpad and no other buttons. The scrolling direction default mimics traditional Windows scrolling. If you want the modern Apple approach to scrolling, select the Australian scrolling option in the Chrome OS touchpad settings.
Current track pad functions include:
- tap to select
- two-finger tap right-click
- two-finger scroll
- two-finger right and left to browse back and forward
- three-finger up to activate Overview mode, similar to Mac’s Expose feature, and three down to deactivate
- three-finger tap on tab to close
- three finger left and right to change tab focus in chrome browser
- tap-dragging available as an option in accessibilities settings
Currently, there is no pinch to zoom option; however, the experimental features page (enter chrome:flags in the URL box) does list pinch-to-zoom options so there is hope that these features are on the way.
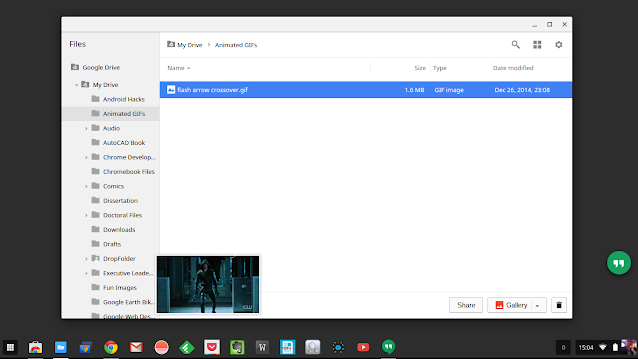
Files
File management is bare bones. The Files app, shown in the image below, is a stripped down version of the Finder found on a Mac. You won’t find handy items like tabs or shortcuts.

There are two areas within the left-hand files area of the app: Google Drive files at the top and local files at the bottom (found in the Downloads folder). Local files are files stored on the Chromebook only. They do not automatically sync to Google Drive. This is important to understand. If you want access to the files on your Mac, you need to save files to Google Drive. This is not the default. You can change the default in Chrome OS Settings using these steps:
- Select the Chrome OS Status area (where your account picture appears)
- Select the Settings icon
- Click Show advanced settings at the bottom of the page.
- In the “Downloads” section, click the Change… button to pick a default download location.
I use a folder on Google Drive named Downloads. Any download on my Chromebook will copy to my Mac when using the Google Drive for Mac app. This location also becomes the default location for all new files created by other apps on the Chromebook.
You can perform basic file management with the Chrome OS Files app such as:
- search local and Google Drive files
- move files
- copy files
- create folders
- rename files/folders
- delete files/folders
- share Google Drive files
You can also view thumbnail previews of files. Think of this as a scaled down version of Quick Look on the Mac. Move the cursor over the thumbnail at the bottom of the Files app as shown in the image below and a mini version of the document appears.
If you require a larger preview, double-click to load the image in the default Chrome OS viewer (Gallery app) as shown below.
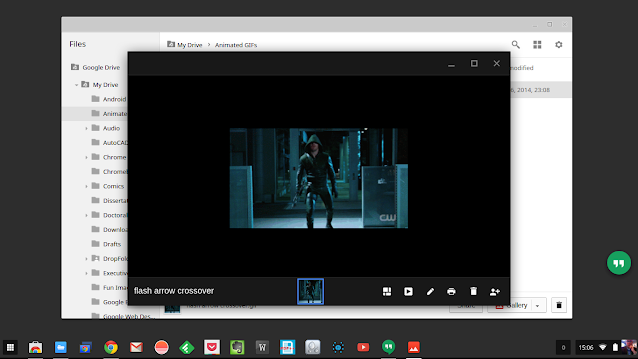
The Gallery app loads quickly and almost a fast as Quick Look on the Mac. Think of Gallery as the Preview app on the Mac, without all the wonderful annotation and PDF features.
Search
Similar to Spotlight, Chrome OS includes Google Search integration within the operating system. A simple tap of the magnifier button found above the left shift key will display the Chrome OS app launcher as shown in the image below.
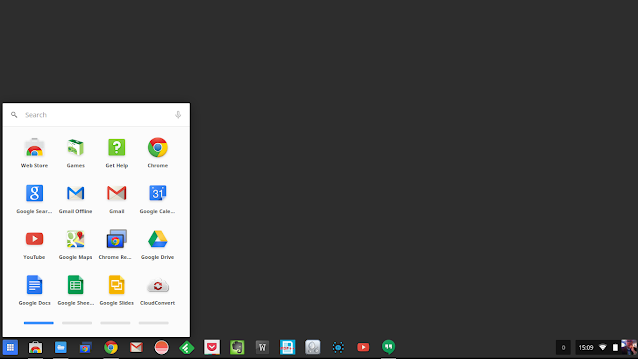
At the top of the launcher is the search box. It is active by default so you can immediately type a search request. Search results include:
- installed Chrome OS applications
- relevant and personalized Google search results
- Chrome OS app store results
To select a search result, use the arrow up/down keys to highlight and press return.
Like Spotlight, you can also use the search box to make quick calculations and conversions. Instead of a search query, just enter your calculation or conversion such as:
- 2+2*7
- tablespoons in a 1/4 cup
- 25m to feet
- 15% of 150
The results will appear as the second result. The first result will perform a Google search for the query. Very handy!
Missing from the results are items such as showtimes, weather, stocks, etc. I use these search query’s frequently on the iPhone Google App. Inclusion of these results would make the search box more useful and on par with other Mac launch/search tools such as Spotlight, Alfred and LaunchBar.
Chrome
If you use the Chrome browser on your Mac, the transition to a Chromebook will be smooth. As long as you log into your Google account while using Chrome on the Mac, with data sync on, all your bookmarks, passwords, cross-compatible apps, etc. will sync to your new Chromebook. Adding additional items to your Chromebook will then transfer back to your Mac Chrome browser almost instantaneously, and vice versa. So if you need a tool from your Chromebook, you will find it on your Mac as well.
If you are a Safari user and have a bright shiny new Chromebook, now would be the time to make the switch to Chrome on your Mac. You will want to do the following:
- Download Chrome for Mac
- Install Chrome
- After the installation, and when prompted, import your Safari Bookmarks and make Chrome your default browser
- Open Chrome settings (⌘ + ,)
- Select Advanced sync settings… within the Sign in area at the top of the page
- At a minimum, choose to sync autofill, bookmarks, extensions and open tabs (you can later decide if the other items are beneficial - personally, I sync everything!)
If your Chromebook is already configured, you will find that your Safari bookmarks have now merged with your Chromebook bookmarks. You will also begin to notice immediately that your extensions from your Chromebook begin to automatically install within Chrome on your Mac.
If you haven’t set up your Chromebook just yet and anticipate a purchase, you can almost completely configure your Chromebook before your first boot-up by configuring and installing apps and extensions for Chrome on your Mac. Once you boot your Chromebook for the first time and enter your Google account credentials, Chrome on the Chromebook will begin to automatically install and sync with your Mac Chrome installation.
Applications
Chromebook now has “real” applications. Before, applications lived online and required a Wi-Fi connection. While most apps found in the Web Store are nothing more than bookmarks to online apps/sites, more of them are now true native apps. The Web Store even has a new area devoted to these offline apps.
Apps are easy to install and the experience is very similar to the Mac App Store. Search for an app and hit the Free or Cost button. The app installs immediately. A password is not required for free apps as they are on the Mac App Store. After installation, the app icon appears on the shelf’s Apps launcher. This is similar to the Applications icon found on the OS X Dock. A simple click of the icon will load the app.
Shelf
The Shelf is similar to the OS X Dock. As mentioned above, it contains the App launcher and app shortcuts. Like the Mac Dock, it can auto-hide and move to either the bottom, left or right of the screen. Unfortunately, it cannot contain bookmarks and that’s probably why many of the apps found in the Web Store are primarily bookmarks. But there is an advantage to these bookmarks to online apps.
Once an app is on the shelf, or in the launcher, you can choose app launch options by right-clicking on the shelf icon. Options available include:
- Open as regular tab
- Open as pinned tab
- Open as window
- Open maximized
For the apps on my shelf, I have the open maximized option enabled for most. The app opens in its own window and maximized to take full advantage of the screen. Opening apps this way allows me to use the task switcher, alt + tab (⇥), rather than navigate via tabs. This workflow more closely mimics my Mac workflow.
Overview
Another advantage to using Chrome Web Store app shortcuts is that I can use the Chrome OS Overview mode, see image below, to quickly display thumbnails of all my open applications and websites. If apps only open in the Chrome browser, Overview mode will only display Chrome’s active tab rather than all tabs. Having apps and webpages open individually provides a quick visual of all open apps and sites.
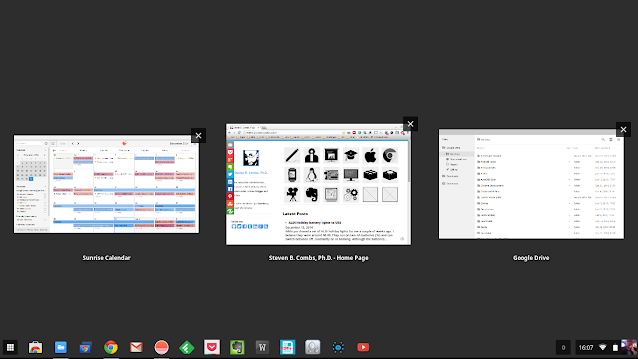
Overview is similar to Mission Control on a Mac. You activate Overview mode by tapping the following Chromebook key found on the top row:

As mentioned early, you can also activate Overview with a three-finger down swipe on the trackpad.
Miscellaneous
Below are some features that may or may not be a part of your Mac workflow. The observations below are for utilities and features that I use that may be of interest to others.
iCloud
If you want access to your iWork files, the online version of iWork works well on a Chromebook. Given the cloud nature of the Chromebook, the two are a perfect fit. I receive a browser not supported message, but have yet to find a feature that does not work. iCloud also provides the Find my iPhone tool. So the next time you misplace your iPhone, fire up your Chromebook.
Screenshots
Macs make it easy to take capture a screen. Chromebooks contain the same feature with these keyboard combinations:

The Chromebook displays a notification after each capture. This notification provides an option to copy the recently captured image to the clipboard or to display in the Files app. Actual files are saved in your default file location. See the Files section above.
Dropbox
Many Mac users rely on Dropbox to keep their files in sync across devices. Unfortunately, Dropbox support on Chrome OS is app specific. The Dropbox app on the Web App store is simply a link to the Dropbox web page. It does not provide access to Dropbox files within the Chrome OS Files app. In order for an app to utilize Dropbox storage, the developer must bake it in. In the apps I’ve tried, the syncing is not instantaneous and the user must initiate a file save. This will be a bit of an inconvenience for Mac users who rely heavily on Dropbox.
TextExpander
Many Mac users use text expansion utilities such as TextExpander. Sadly, I am not able to locate a viable substitute. This is a utility I utilize often and even a rudimentary app to provide this function would significantly enhance usability.
Dictation
Dictation is relatively new to OS X, so it stands to reason that the Chromebook may not have this capability built-in. I found no viable alternative in the Chrome Web Store. Given Google’s powerful voice search, it would be a nice addition to include this feature for both normal and assistive device users.
Voice
While dictation is not available, voice search is making its way into Chrome OS. It is not activated by default and as of now is only working on the beta channel (Google that if you don’t understand this reference).
Conclusion
In later posts I’ll likely share more specific Chromebook tips and tricks. This post simply covers the basics of Chrome OS and how to best make a transition from a Mac to a Chromebook or Chromebox.
In short, I’ve found my little $150 device to be an excellent device to throw in my bag for meetings, travel or Internet browsing. It often sits on my bed stand or next to the living room sofa. If I need to type, I always reach for the Chromebook rather than my iPad. Even with my bluetooth iOS keyboard, I find the typing experience on my Chromebook to be much better.
Except for some heavy work tasks that include Microsoft Office documents, there’s really not much I cannot do with my Chromebook. I would highly recommend a Chromebook for K-12 students, grandparents or anyone who simply uses a laptop to browse the web. Chrome OS has come a long way and is very capable. I’m excited to see what new features roll out in the near and distant future and I am glad I have a device where I can discover these new features going forward.