Retro computing with a touch of modern and the home for all things, retroCombs (aka Steven Combs).
Disclosure Statement: When you click on links to various merchants on this site and make a purchase, this can result in this site earning a commission. Affiliate programs and affiliations include, but are not limited to Amazon, the eBay Partner Network, and/or others.

HOWTO: Create an ssh connection to a headless Raspberry Pi
by Steven B. Combs, Ph.D.
You finally receive that Raspberry Pi you’ve been waiting for only to find that you don’t have an extra keyboard, mouse or monitor laying around. Yeah, you should have taken care of that prior to the purchase (or maybe you did and those items are on their way in a separate order), but does that mean you can’t fiddle with your new Raspberry Pi? Of course not. While waiting on the other devices, you can have a ton of fun learning about the new device while at the same time, learning a bit about Linux and remote connections.

“Remote connection you ask?” Yep! You can run the Raspberry Pi headless. “Headless. What’s that? Something out of a zombie show?” Uh, no. Find out more about “headless mode” after the break and then read my step-by-step guide on how to setup this mode using a Mac and OS X. Warning, Terminal; commands ahead.
Stuff you need
Before we get started, let’s make sure you have everything you need. Gather all the items below:
- Mac computer connected to home network.
- Raspberry Pi (any model, although model B gives you a bit more head room).
- Raspberry Pi power supply (I do not recommend using USB power from computer, but this will work in a pinch).
- 4GB or larger SD card (class 4 or better).
- USB or internal SD card reader (Internal found on some MacBook Pros, Mac minis and iMacs).
- RJ45/Ethernet cable.
You will also need a Raspberry Pi OS distribution (or distro), I’ll recommend one a bit later. Before we dive in, below is the list of tasks we will perform. Each task will be described in detail.
- Select an OS distro for the Raspberry Pi.
- Install an OS on SD card.
- Connect the Raspberry Pi to a network.
- Boot up the Raspberry Pi.
- Determine the address of the Raspberry Pi.
- Connect to the Raspberry Pi via secure socket shell (ssh).
- Poke around the Raspberry Pi using ssh.
It sounds complicated, but if you follow closely, and I haven’t botched up my directions, you should be able to hack around with your Raspberry Pi until the keyboard, mouse, and monitor arrive. You may even decide that you really don’t need these additional peripherals once you see what you can do without them. Alright, let’s get started.
Select an OS distro for the Raspberry Pi
You may not be aware of this, but there are several operating system (OS) distributions (distros) available that work with the Raspberry Pi. For readers new to this whole concept, the OS is the software that allows the hardware to function and do “things.” Think Windows, OS X or Linux. A distro is simply a variation or flavor of the OS.
Proprietary OSs like Windows or OS X do not have distros available. Linux, on the other hand, has several. Linux is free and open source (all the programming code is open for review and modification) and there are many groups of programmers/foundations that create specialized distros for specific applications on the desktop, servers and embedded controllers. These features make Linux OS the perfect candidate for the Raspberry Pi.
Raspberry Pi distros must be lightweight given the small amount of random access memory (RAM) available (256MB on the Model A and 512 MB on the Model B). We are also looking for a distro that supports all of the onboard components of the Raspberry Pi as well as a healthy list of external USB devices that you may want to connect later.
Fortunately for us, we don’t need to go hunting for an OS. The Raspberry Pi download page provides a list of compatible distros that we can use. As good as this list is though, I am going to use and recommend a distro from another source; Adafruit. Without getting into the entirety of Adafruit’s business, they are simply a provider of electronic devices, tutorials and software designed to teach electronics and provide the tools Makers and Hackers need to create amazing things.
Of particular interest to us is the Adafruit Raspberry Pi Educational Linux Distro (as of this writing named Occidentalis and at version 0.2). Here’s how Adafruit describes their distro:
Our distro is based on “Wheezy” but comes with hardware SPI, I2C, one wire, and WiFi support for our wifi adapters. It also has some things to make overall hacking easier such sshd on startup (with key generation on first boot) and Bonjour (so you can simply ssh raspberrypi.local from any computer on the local network)
It’s that last line that makes this distro perfect for our project. I’ll explain this a bit later.
Install an OS on an SD card
We have a distro identified and we now need to install it on an SD card. There are many ways to do this. One of the more popular ways is to use Terminal commands. I have a very popular post that describes this process in detail but it can be quite daunting for someone new to Linux and terminal commands.
To make this task easier, we are going to use the RPi-sd card builder v1.2. This application makes it easy to install a distro (in .img format) on an SD. Let’s get started:
This file is 2.6GB so be prepared to wait a bit. I was unable to locate a torrent of the file. A torrent would speed the download significantly so it might be worth checking before you download.
- Place the SD card into the internal or external USB SD card reader on your Mac.
- If asked to format your SD card, do nothing.
- Launch RPi-sd – RPi-sd will prompt you to choose the Occidentalis.img file downloaded earlier as shown in the image below:

- Locate and select the distro image file.
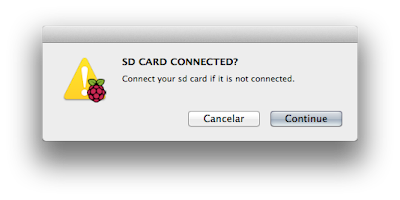
- Click the Choose button – RPi-sd will ask you to verify that the SD Card is connected as shown in the image below:

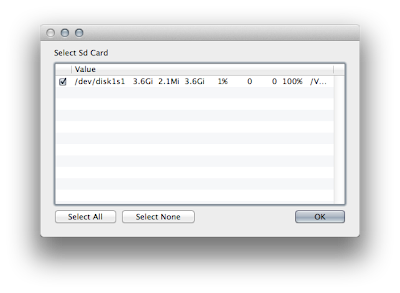
- RPi-sd will display a selection window as shown below– choose the SD card (if you only have one SD card attached, it will be the only listed option).

- Enter the Mac’s administrators password when prompted and select the OK button - RPi-sd will eject the SD Card automatically and then prompt you to wait.
- Click Continue - RPi-sd will display a gear, but no status, in the menu bar to indicate that the process is underway.
- Once RPi-sd install process is complete, it will remount the SD card indicating the SD card is ready.
I received a script error and worried my distro did not install on the SD card; however, when I tried the SD card in the Raspberry Pi, it worked fine so ignore this error if it appears and give it a try.
Connect the Raspberry Pi to a network
Now that we have an OS on the SD card, we are about ready to fire up our new Raspberry Pi. Before we do, we need to connect it to our home network:
- Ensure the Raspberry Pi is NOT connected to a power source.
- Insert the SD card into the Raspberry Pi - the slot is on the bottom and may not be readily apparent to new users (there’s an image below to guide new users).
- Connect an RJ45 cable to the Raspberry Pi.
- Connect the other end of the RJ45 cable to your home router - if you don’t have convenient access to your home router, follow these directions to connect the ethernet cable to your Mac’s available ethernet port instead.

You are now ready to boot up the Raspberry Pi.
Boot up the Raspberry Pi
The Raspberry Pi does not include a power button. You plug it in, it’s on. Let’s cross our fingers and do this now.
- Connect a USB power cable to the micro USB port on the Raspberry Pi Once you connect the power cable, you should see a series of lights blinking (their location is indicated in the previous image).
Since no monitor is connected, you will not have an indication that the Raspberry Pi boot process is complete. The normal boot time for this distribution is about 30 seconds, but wait 60 seconds for this first boot. In some cases you may notice that the lights cease to blink, however; this is not a clear indication the boot process is complete; so stick to time rather than blinking lights.
The only clear way to know if the Raspberry Pi is operational is to hook up a monitor, but that would defeat the purpose of what we are trying to do. Don’t worry, you’ll know if everything works in the next step.
Determine the address of the Raspberry Pi
I chose the Adafruit linux distro for the Raspberry Pi for a specific reason. Below is a salient line from the distro description:
It also has some things to make overall hacking easier such sshd on startup (with key generation on first boot) and Bonjour (so you can simply ssh raspberrypi.local from any computer on the local network).
Normally to connect via ssh, you need an IP address. This isn’t too difficult to determine; however, the Adafruit distro removes this requirement. As soon as the Raspberry Pi starts up, a service built into the distro, called Bonjour, obtains the IP address from a router and announces the computer on the network as:
raspberrypi.local
No matter what IP address the router assigns the Raspberry Pi, as long as you are on the same local network (attached to the same router in our case), you can use the raspberrypi.local address to connect rather than an IP address. Slick and very convenient.
Connect to the Raspberry Pi via secure socket shell (ssh)
Let’s try and connect to our Raspberry Pi.
- On the Mac, launch Terminal. The Terminal app is in Applications / Utilities folder.
- Terminal will present you with a bit of text and a flashing cursor.
- Type
ssh pi@raspberrypi.localand follow it with a tap of the key (or ↩) - you will be prompted for the Raspberry Pi password (Don’t panic, just keep following along). - Type
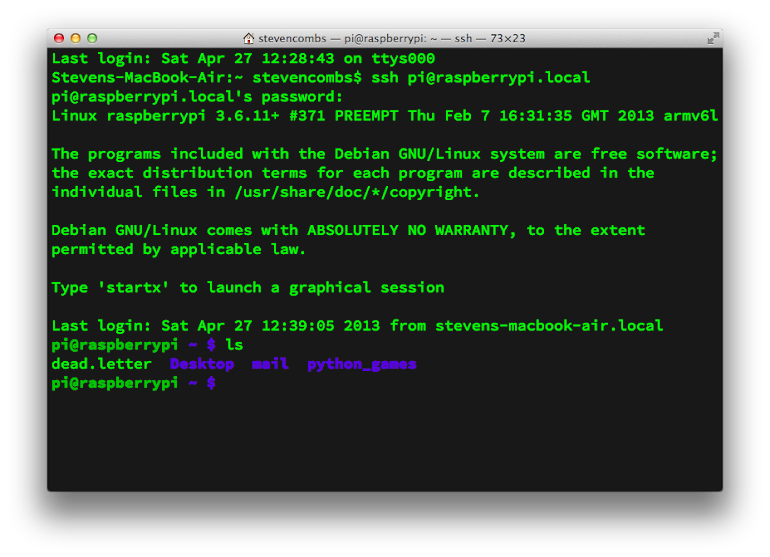
raspberryfollowed by ↩ and if the password is correct, you will receive text similar to the following:
Linux raspberrypi 3.6.11+ #371 PREEMPT Thu Feb 7 16:31:35 GMT 2013 armv6l

The programs included with the Debian GNU/Linux system are free software; the exact distribution terms for each program are described in the individual files in /usr/share/doc/copyright.

Debian GNU/Linux comes with ABSOLUTELY NO WARRANTY, to the extent permitted by applicable law.

Type 'startx' to launch a graphical session

Last login: Wed Apr 24 16:16:48 2013 from imac.local

pi@raspberrypi $_
You’re in! You now have access to your Raspberry Pi via the Terminal app and ssh. With this access there’s a whole bunch of fun you can have. In fact there is too much fun to describe in this blog post, but I’ll give you a couple of quick commands in the next section to get you going.
Poke Around the Raspberry Pi Using ssh
After your connection to the Raspberry Pi via ssh, you probably thought to yourself, “now what?” Here are a few Terminal commands you can use to hack around a bit. Type these commands and then follow each with a quick tap of ↩.
HEADS UP: After you have made a successful connection to your headless Raspberry Pi, you will notice a prompt encouraging you to load a graphical user interface using the terminal command startx. This will not work using ssh so don’t attempt it.
ls – List the contents of the current directory. Give it a try and you will see the following listing (that is, if you haven’t gone off on your own at this point).
Desktop python_games
cd – Changes the current directory. For instance, try cd Desktop and now use the ls command. You can now view the contents of the Desktop folder. It should be very similar to the listing below:
debian-reference-common.desktop lxterminal.desktop scratch.desktop

idle3.desktop midori.desktop

idle.desktop python-games.desktop
cd.. – Changes the directory back up one level. Try this now and you will move out of the Desktop folder and back to the original location. You can verify this using the ls command again.
sudo raspi-config – Loads the Raspi-Config program as shown in the image below:

The first thing you will notice after hitting ↩ is that you must enter a password. This is a requirement of the sudo; command that prefaces the raspi-config command. Think of this as Linux’s way of ensuring that you really want to mess around with configuration files that could cause your Raspberry Pi to become inoperable. You already know the password. It is the same password you use to log into the Raspberry Pi. As a reminder, the password is raspberry. After you enter he password hit ↩ again.
As you can see in the listing above, this app is used to modify things such as keyboard layout, timezone, and overscan. You can poke around in this a bit, but I recommend that you only modify those things you understand. Other options will make sense as you become more familiar with your Raspberry Pi.
Let’s stop there for now, but this is just the beginning of the fun and exciting world of the command line. Seriously, there is some really cool stuff you can do. We’ve become entirely too reliant on a graphical user interface and there’s a since of freedom when you know you can simply hack into a terminal window and make some pretty interesting things happen.
Conclusion
See, getting a Raspberry Pi running headless isn’t as painful as you might have thought and I guarantee is was more fun than you thought it would be. If you were like me, you got a warm fuzzy feeling the first time you realized you were actually connected to your little Raspberry Pi and that you could control the device without a physical keyboard or mouse connected.
I think this may win the prize for my longest blog post, although my blog post Create a bootable USB drive is awfully close. Given the length, and my inability to edit my own writing, please drop a comment below if you find errors. I would also love to read about your experiences, so drop those too. Happy ssh’ing!