Retro computing with a touch of modern and the home for all things, retroCombs (aka Steven Combs).
Disclosure Statement: When you click on links to various merchants on this site and make a purchase, this can result in this site earning a commission. Affiliate programs and affiliations include, but are not limited to Amazon, the eBay Partner Network, and/or others.

retroCombs: The Combian pi/400 Project. Use Combian 64 and a Raspberry Pi 400 to create the ulitmate Commodre computer emulator
by Steven B. Combs, Ph.D.
There’s a lot of excitement around the Raspberry Pi 400. I mean look at this thing (see image below). It’s a self contained Raspberry Pi with a keyboard and a form factor reminiscent of the original 1980s 8-bit computers; albeit, much thinner and lighter. Since I first learned about the 400, I had one project in mind and I’m happy to finally reveal that project in this post and the companion YouTube video.
UPDATES: Last updated {2021-01-12} (date stamp next to changes)
As readers and viewers know, I’ve taken a look at several devices this past year that promise to bring back the early days 8-bit computing. When the Raspberry Pi 400 was released, my first thought was, “I wonder if it will work with Combian 64?” In this post and companion video, we’ll find out as I show you how to open the box, configure, brand, and change the key caps on a Raspberry Pi 400 to make it the ultimate VICE emulator.
NOTE: Welcome to 2021 and I couldn’t be happier about my very first post. This one has been a long time coming and I’m so glad I had time over the 2020 Christmas vacation to work on this project.
This companion blog post will roughly outline the steps needed to turn the Raspberry Pi 400 into a Commodore VICE emulator extraordinaire! Since I use a Manjaro Linux, the step-by-step might not be helpful for Mac and Windows users; however, a broad outline of the process should suffice for most reasonably tech savvy readers.
☕ If you find this blog post and/or video valuable, please consider buying me a coffee? The caffeine will keep the blog posts and video coming your way!
Below, I include a table of contents so you can jump around to various sections. If there’s something missing that you need to complete your own project, drop comments below this post or in the YouTube video.
Table of Contents
- Watch the Video
- Video Errata
- Links Mentioned in this Episode:
- Download Combian 64 V3.0
- Extract Combian 64
- Install Combian 64 on an SD Card
- Upgrade Combian 64 on another Raspberry Pi
- Raspberry Pi 400 Open the Box
- Install the Combian 64 micro SD Card
- Plug in the Raspberry Pi 400
- Startup the Combian 64 computer
- Configure Combian 64
- Configure the keyboard
- Keyboard Stickers
- Design, print, and apply a logo and serial number plate
- Configure the joystick from THEC64 maxi or mini
- Game Demo
- Final Thoughts
- Join the Fun
Watch the Video: Raspberry Pi 400 + Combian 64 distro = Combian pi/400 | The Ultimate Commodore Computer Emulator?
In the video below, I demonstrate the process to convert a Raspi 400 into a full functioning Commodore 8-bit computer emulator.
Video Errata
- {2021-01-12} - Facebook commenter Lonnie added that in order for him to get a full screen display (with black on the sides only) he had to use the
rasps-configutility to turn overscan compensation OFF.
Links Mentioned in this Episode:
Below are the links I mention in the video. All Amazon links are affiliate links. Thanks for supporting the blog and the YouTube channel!
- Combian 64
- Raspberry Pi 400
- Raspberry Pi 4
- Raspberry Pi USB-C Power Adapter
- Micro HDMI to HDMI Cable
- Lepow Portable HDMI monitor
- SanDisk Ultra for only $5
- X-Acto Knife
- Straight Cutter
- Cutting Mat
- 4Keyboard brand, Commodore 64 keyboard stickers
- AVIA Vinyl Laser Printer Sheets
- THEC64 Joystick
Did I miss one? Drop a comment and let me know.
Download Combian 64 V3.0
What is Combian 64? Here’s how Carmelo, the developer, describes it:
Combian 64 is Raspberry Pi distribution able to boot your Raspberry Pi Commodore machine in just few seconds. It uses the brand new compiled version of Vice 3.4 to emulate all the Commodore Machines set. By default, Combian 64 boots the Commodore 64 emulator, but it’s not the only one included in the distro…”
While the default Commodore machine is the C64, VICE version 3.4 includes the following emulators:
x64, the fast C64 emulatorx64sc, the accurate C64 emulatorx64dtv, the C64DTV emulatorx128, the C128 emulatorxvic, the VIC-20 emulatorxpet, the PET emulatorxplus4, the PLUS/4 emulatorxcbm2, the CBM-II emulator (CRTC models)xcbm5x0, the CBM-II emulator (VIC-II models)xscpu64, the SCPU64 emulator
Within each of those emulators are more settings and models of each machine including, displays, memory expansions, kernals, VICs, drives, etc. The number of options can overwhelm; however, these options lead to some pretty sophisticated emulated hardware configurations that were beyond the pocketbooks of most users in the 1980s. With VICE you have access on your personal computer (Mac, Linux, and Windows) to about any Commodore computer operating system ever made. Since VICE is available on Linux, it’s perfectly matched for the Raspberry Pi and especially the Raspberry Pi 400 with it’s built-in keyboard.
Before you download Combian V3.0, you need to support the project. {UPDATE: 2021-01-11} Support for all versions no longer require “project support,” but I still recommend you “tip” Carmelo (see Final Thoughts number 2). Versions prior to 3.0 are free to download but won’t work with the Raspberry Pi 4 or 400. No specific amount is required; however, I recommend you tip Carmelo at least $10 to $20 to keep this amazing project alive.
Extract Combian 64
The Combian 64 image is compressed using (7-Zip). Depending on the OS, you may or may not need additional software to extract the archive. Check out the 7-Zip downloads page.
Once you extract the image file, install it on a micro SD card. Anything larger than an 8GBs will suffice; however, currently 16Gb is the most affordable and available like this SanDisk Ultra for only $5.
Install Combian 64 on an SD Card
Etcher is the best way to flash an image to an SD card and it’s available for Linux, Mac, and Windows. Download, install, and then follow the steps as shown in the animated GIF below. First select the image. Second, select the SD card. And third, flash the SD card.

The hardest part of this process is selecting proper drive. WARNING!!! Check it once, check it twice, to ensure you flash the correct drive.
Upgrade Combian 64 on another Raspberry Pi
Unfortunately, the Combian 64 image does not include the hardware support necessary for the Raspberry Pi 400 (Carmelo plans to include these in future versions). The good news is the image is ready for a Raspberry Pi 4. Grab yours or a friends. Honestly, if you don’t have one, you should go ahead and get one. You are sure to use it for other projects.
Grab a $100 4GB model if you have some light computing projects such as emulators and browsing; however, grab a $120 8GB model if you want to replace a computer in the home, set up a light PC for a child, or build media server.
Time to upgrade the Combian 64 distribution.
- Setup the Raspberry Pi 4 with a keyboard/mouse combination.
- Connect an HDMI monitor.
- Plug in the prepared micro Combian 64 SD card.
- Plug in the Raspberry Pi 4 to the USB-C power cable.
-
Once the Raspberry Pi boots, load the Terminal and type the following commands:
sudo apt update/ A password prompt will appear. It israspberrysudo apt dist-upgrade/ This will apply the updates and takes some time. Grab a coffee, or better yet, buy me one too so we can sip together! - With the update complete, use the Raspian OS menu and shutdown the Raspberry Pi.
- Once the Raspberry Pi 4 lights shuts off, unplug the Raspberry Pi 4.
- Remove the micro SD card from the Raspberry Pi.
It’s now time to grab the Raspberry Pi 400.
Raspberry Pi 400 Open the Box
There are two boxes you can purchase that include a Raspberry Pi 400. The $100 complete starter kit or the $70 Raspberry Pi 400 only. I choose the later since I didn’t need an SD card, mouse, HDMI cable, manual, or cables. My open the box in the video is short and sweet (for once!), but I do cover the basics included with the $70 box; which isn’t much.
Install the Combian 64 micro SD Card
This is the easiest step. Insert the Combian 64 micro SD card into the Raspberry Pi 400. Unlike the Raspberry Pi 4, the Raspberry Pi 400 includes a spring loaded and eject micro SD card slot. No more “scrapping” the SD card from the Pi using your fingernail or a screwdriver.
Plug in the Raspberry Pi 400
- Connect the Raspberry Pi 400 to the USB-C power cable but do not plug it into the wall yet.
- Connect an HDMI monitor.
- If you plan to play games, go ahead and plug in a THEC64 Joystick. It works out of the box with Combian 64! No configuration necessary if the games conforms to the normal joystick port selection.
That’s it. We don’t need a mouse since those weren’t “really a thing” in the 1980s on Commodore computers.” However, I do eventually plan to give GEOS a try and see if a USB mouse will work. If you know the answer, drop a comment below!
Startup the Combian 64 computer
- Plug in the the USB-C power cable to the wall. Depending on the power supply, you may need to flip a switch on the cable.
- The Raspberry Pi will boot up the Combian 64 distribution and by default, into Commodore 64 mode. The first boot will take longer than subsequent boots. Afterward, Combian will boot in about 10-15 seconds.
Configure Combian 64
Now that we have a working Combian 64 distribution working on the Raspberry Pi 400, it is time to make quick modifications. Modify the settings within the VICE emulator and in the raspi-config utility that comes with every Raspbian OS distribution. Instead of a long list of commands, I’ve created a PDF with Combian 64 screenshots to provide the configuration settings and help you navigate the menus. Use the link below to download.
Combian pi/400 configuration settings
REMEMBER: While in the C64 emulator (or any other emulator), hit the F8 key. This will open the emulator configuration menu.
One last thing to REMEMBER: you must makes these changes in EACH emulator you plan to use (in my case ALL OF THEM!). The majority of the settings I share are available in all emulators. A few color specific options are not available on the PET emulator since it was a monochrome system.
Configure the keyboard
The keyboard configuration for the C64 mode works with a standard keyboard; however, PET, PLUS/4, and VIC-20 reverts back to original key locations. That’s what I want so the Combian pi/400 feels more like an original Commodore computer. Let’s revert the C64 keyboard back to the defaults. Hit the F8 key and work your way through the settings below:
Settings Management / Active Keymap / Symbolic to Positional
See the PDF above for screenshots of the menu system.
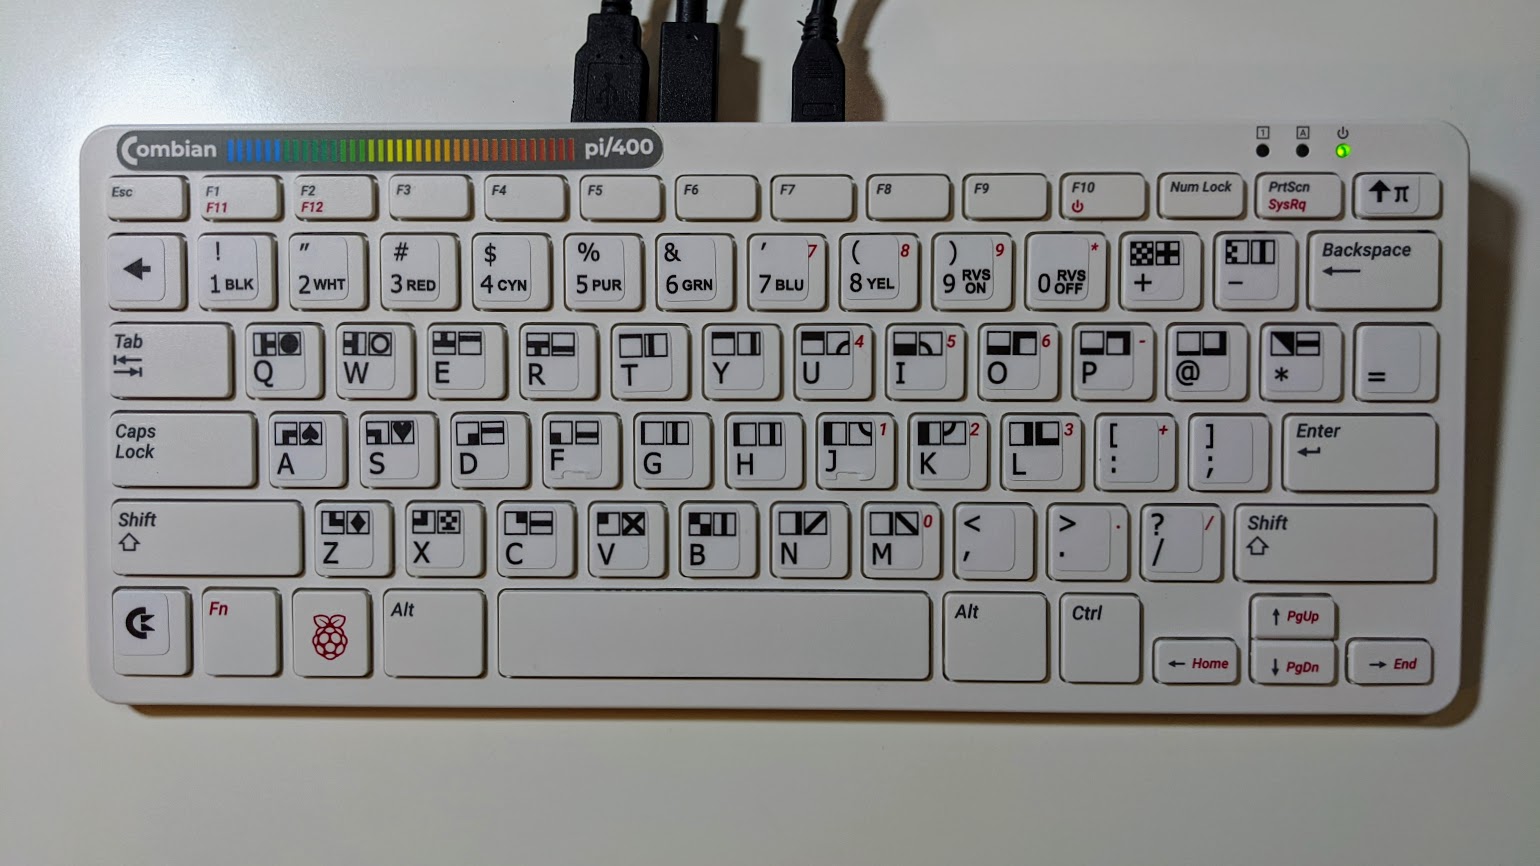
Keyboard Stickers
I’ve explained that I want to the keyboard to resemble original Commodore computer keyboards; however, on the Raspberry Pi’s modern keyboard, typing can be a bit frustrating as you try and remember which keys do what. That’s where the 4Keyboard brand, Commodore 64 key cap stickers come into play. Available in white or black, I use the white to remind me which keys produce which PETSCII characters. Each sheet is about $4. I purchased two black sheets and two white sheets since I could get all for a standard shipping rate of $4. I’m really pleased with the keyboard and it looks pretty good, as shown in the image below:
Design, print, and apply a logo and serial number plate
I’ve chosen to name this build the Combian pi/400. I like the name since it combines the Combian distribution with the Raspberry Pi while at the same time, harkens back to my last name, Combs. The /400 aligns perfectly with my love the Commodore Plus/4. Once I had the project name, it was time to develop a design for a logo. I choose to keep something Commodore and retroCombs inspired and again, drew inspiration from the Plus/4 as shown below:
![]()
I’m sure I’m unique in this regard; however, I do 90% of my design work in Google Slides for the blog and the YouTube channel. Every graphic I use in this video I create and export from Google Slides. That will seem odd to many professional, and even amateur, graphic designers; however, I find Google Slides provides me with just the tools I need while at the same time gives me free and anywhere access to my files and the tools to make modifications; on almost any PC or mobile device I own. I do wish slides included features like layers, Boolean geometry creations, and custom fonts; however, I now know how to work my way around these limitations for most of my projects.
Another feature of Slides is the ability to share and collaborate; as is evidenced below where I share my original slides so you can see my design process and even copy the file to modify and use for your own project.
All I ask is that you link back to this post, or the YouTube video, and provide attribution. If you share your build online, please tag it with #retrocombs.
With the design complete and a single sheet with multiple and properly sized logos and serial number labels prepared, it was time to print. I found Aiva Printable Vinyl Sticker Paper for Laser Printer and I was anxious to try these in a new Brother HL-L8360CDW Color Laser printer (which are hard to find due to the pandemic). I sent the print job from my Mac and used the Mac print dialog box, rather than the Chrome print controls, since they provide more refined printer control. The logos and serial number plate were beautiful and the colors brighter on vinyl than they were on a piece of paper.
![]()
Cutting out the logo and serial number plate was the final step before application. I print a paper sheet first to practice my technique before I commit to vinyl. The final vinyl sheet includes many copies so I can recover from eventual cut mistakes, and there were many. Finally, with a good logo and serial number plate vinyl cut, I use my X-Acto knife to place each one; being careful not to touch them directly and soil the vinyl with the oils from my skin.
I’m thrilled with the results, as shown in the images below:
![]()
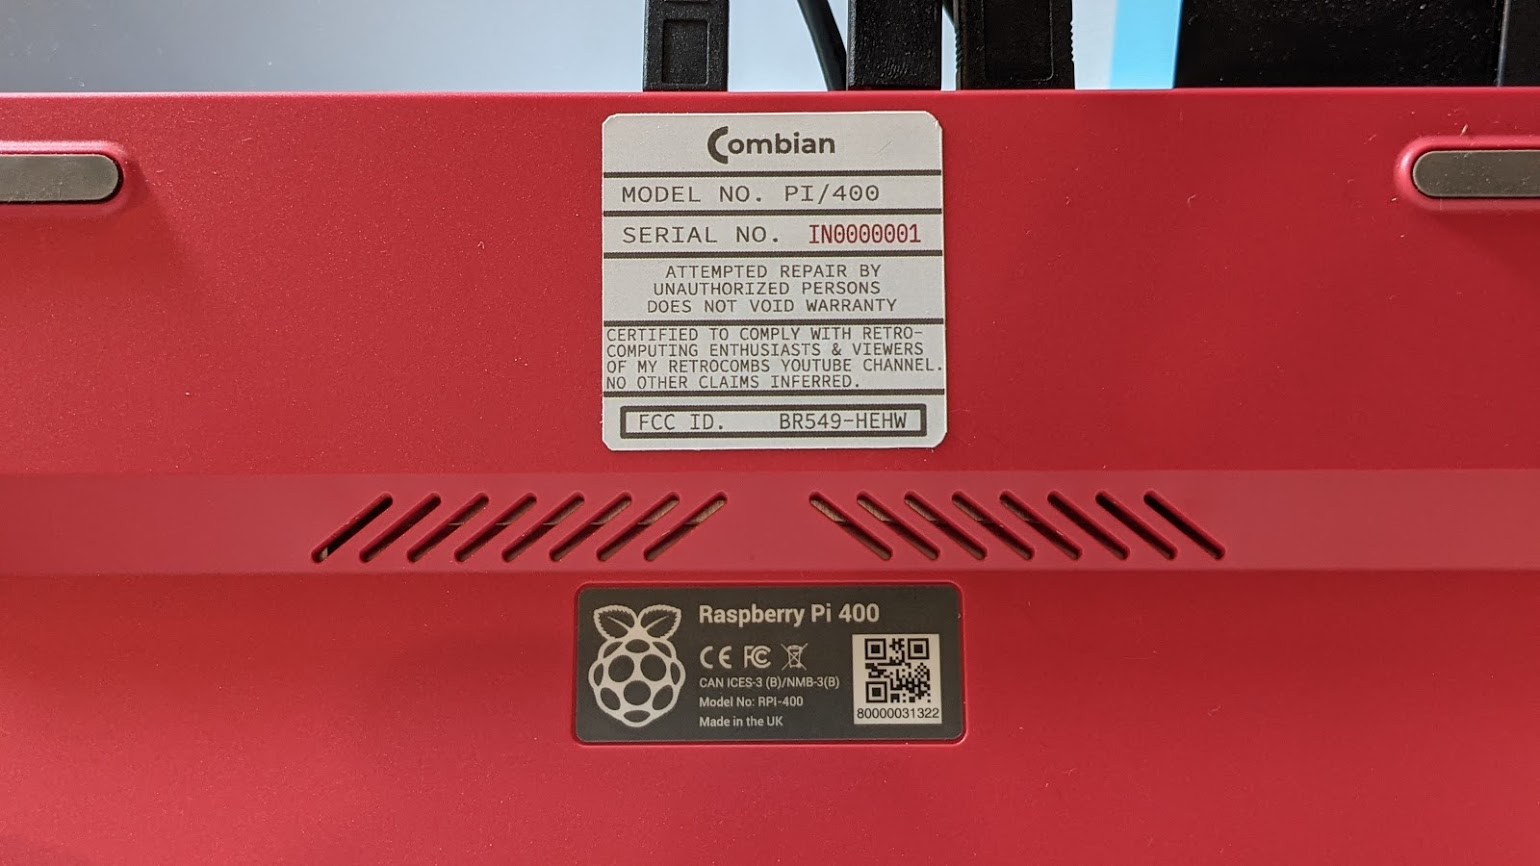
I had some fun with verbiage on the serial number and FCC plate. Notice anything? Leave a comment below and let me know. What would you add to your serial number plates?
Configure the joystick from THEC64 maxi or mini
Good news! Plug in a THEC64(VIC-20) maxi or mini USB joystick and it just works! No configuration necessary. You can purchase these joysticks individually for around $30. They make the perfect VICE joystick for an old school gaming experience.
Game Demo
To demo the new Combian Pi/400, I choose to play the the homebrew shooter, Valkyrie 3 - The Night Witch. I turn on the disk drive access emulation sounds (directions in configuration PDF above), mount the .d64 disk image in the VICE menu, boot the emulated C64, and the experience was awesome!
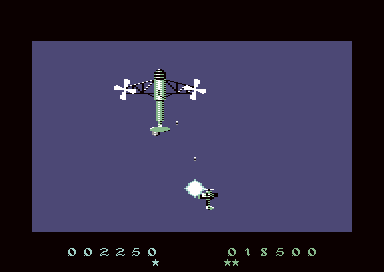
I demonstrate playing this game in the video and am using THEC64 joystick. It really was fun and felt true to the original gaming experience on a C64.
Final Thoughts
- While the Combian pi/400 is perfect for the home or office, it’s also the perfect travel size! Imagine packing this in your bag and connecting it that HDMI monitor in a hotel? What about sharing your love of 8-bit Commodore computing with your family? This is that machine.
- This project, as Brian Joyce on Facebook commented, “Very nice man! As both a Commodore and a Raspberry Pi fan, this ticks every box for me!” Same here, Brian!
- There are several things I plan to do with the Combian pi/400. I hope to find time to document them here and in video. I mention GEOS, but I’m also interested in performance. What about you? Have something you think I should try with the Combian pi/400? Drop a comment and let me know. If I can scrape up the time, I’ll see what I can do.
- {UPDATE: 2021-01-11} There’s been some, and when I write some I mean a couple of individuals, controversy about whether Combian V3.0 should be behind a support/tip me firewall. Carmelo was quick to react and has now made V3.0 available as a direct download; however, I still contend that you should “tip” Carmelo for his work to package everything up and create the wonderful menu.
- {2021-01-11} This is one of my most viewed videos within a 24-hour video (
350+420+). While that’s not impressive for YouTubers, it’s just fine for me! I love this hobby and that small group who continues to support my journey as I reconnect with my Commodore computing roots. I can say this without hesitation; Commodore computers changed my life-path and allowed me to become who I am today. If you think back, you will probably agree.
Join the Fun
That’s it for this post. You won’t want to miss the fun, so make sure you SUBSCRIBE to my YouTube channel. Also make sure you subscribe to the RSS feed. You won’t want to miss future projects.
I also update many posts regularly with new information. I’ll time stamp those changes when I do so if you return, you know where the modifications are made.
Help make this video better! Post feedback, questions, and ideas. Leave your comments and thoughts below or in the comments under the YouTube video.
Thanks for watching and if you are so inclined, please let other Commodore fans know about this video and blog post and share using #retroCombs.
🕹️ retroCombs, OUT!