Retro computing with a touch of modern and the home for all things, retroCombs (aka Steven Combs).
Disclosure Statement: When you click on links to various merchants on this site and make a purchase, this can result in this site earning a commission. Affiliate programs and affiliations include, but are not limited to Amazon, the eBay Partner Network, and/or others.

Build MEGA65 Tools on Mac OS X (Intel and M1) | And an intro to the MEGA65 community
by Steven B. Combs, Ph.D.
Before I begin, I want to send out a huge thank you to Gurce Isikyildiz for his assistance with these instructions. My first attempts to build these tools were unsuccessful. I posted a comment on the MEGA65 Discord channel about my struggles. Gurce responded; however, after several Discord interactions, it became apparent, I needed help (on many levels but in this case; help with Terminal commands). The mega65-tools are meant to build on an Intel Mac, but not on a newer M1 Mac.
MEMBERSHIP: I now offer retroCombs memberships from $1 (PET level membership) to $20 (MEGA65 level membership) that include levels in between for all budgets (VIC-20, C64, Plus/4, and C128). If you’d like to support my content and get access to my Discord server along with other cool freebies, check out each level at https://www.buymeacoffee.com/retroCombs.
Gurce sent me a Discord direct message with a Zoom link. I joined the Zoom meeting and was met by Gurce and his young daughter who was enjoying a tasty chocolate morsel! After a quick introduction, we began to troubleshoot. 10 minutes later, Gurce determined the Makefile changes necessary to build on the M1 Mac. I was off to the races. I’ll share those M1 modifications in this post.
Afterward, we chatted and I learned Gurce contributes his time to the project voluntarily in between his work and family life. His thoughts echoed my own, “How cool it was to be a part of the MEGA65 developer community”; although, Gurce’s contributions are far more substantial to the project than my occasional blog post and video! With each minute of my chat with Gurce, I thought to myself, he has taken time to help me, someone on the other side of the globe, who has no idea what he is doing. And as I stated in the Discord channel, Gurce has the patience of a saint!
I share this story to demonstrate the vibrant and welcoming MEGA65 community. Followers know, I was able to snag one of the 100 MEGA65 Dev Kits and I am not a developer. I felt a tad guilty snagging a Dev Kit knowing there was someone out there who could contribute more to the MEGA65 development; however, I’ve never felt like a second class citizen in the MEGA65 Discord channel.
While there may be slaps on the forehead when they read my questions, their responses are always kind, helpful, and understanding. The opportunity to watch this device unfold, try new things, and be a part of the community was worth my investment. I’ve not had this much fun with a computer since my first Commodore VIC-20 in 1982. This is the type of community you will want to be a part of once you own the, soon to be available, MEGA65. And you don’t have to wait. Drop into the Discord channel now. Someone is waiting to greet you and answer MEGA65 questions.
Now, on to the mega65-tools build instructions…
Table of Contents
{UPDATES 2021-08-29}: How to update the build files when changes are made and the addition of a
m65.osxuse example. Search for a date to find the changes.
- Build Instructions
- Update and build repository
- Determine which USB serial device connection
- Use
mega65_ftp.osxandm65.osx - Gurce recommends…
- Final Thoughts
- Join the Fun
Build Instructions
This process requires several build steps. Along the way, you will learn more about your Mac, GitHub, and the MEGA65. The instructions are in sections. Skip steps if have experience in different sections. The first step is to create a GitHub account.
Create a GitHub account
My instructions assume you have a free GitHub account. If not, follow the steps below:
There are ways to accomplish this without GitHub, but trust me, you want an account. All the cool kids have one.
-
Visit https://github.com/. The GitHub homepage will appear as shown below:

- Enter an email address in the Email address text edit box as shown in the image above.
- Click the green Sign Up for GitHub button. GitHub will present an animated and enjoyable account creation page.
- Follow the prompts and once complete, login to GitHub.
Install Homebrew
Mac OS X includes the Terminal application and a *nix (short for Linix/Unix variant OSs) BSD-based back-end; however, there are several standard *nix tools missing. You can install these tools manually, but a better method uses Homebrew to install and manage these packages. Luckily, Homebrew installation is a single command line as shown in the steps below:
-
Load the Terminal app or preferably iTerm which I’ve customized with my own cool C64 inspired theme as shown in the image below.
- In a browser, visit https://brew.sh/. On the center of the page is the terminal command necessary to install Homebrew.
-
Copy the command. The command below is current as of this writing:
/bin/bash -c "$(curl -fsSL https://raw.githubusercontent.com/Homebrew/install/HEAD/install.sh)" - Paste it into the terminal and press
⏎. Thecurlcommand will download, install, and configure several packages. This will take time. Grab a beverage or play a MEGA65 game while you wait. - When complete, verify installation with the command,
brew -v. Brew will display the current version. For example,Homebrew 3.2.9.
Install git and gh on the Mac
With a GitHub account and access to brew packages, prepare the Mac to clone the mega65-tools following the steps below:
- In the browser, open the mega65-tools repository at https://github.com/MEGA65/mega65-tools. The page includes information to clone the tools on your local computer but we must first use Homebrew to install
gitandgh. - Install
gitandghusing the command;brew install git gh. The packages will install on the Mac. -
Grant
ghaccess to your GitHub account using the commandgh auth login. The prompt below will appear:? What account do you want to log into? [Use arrows to move, type to filter] > GitHub.com GitHub Enterprise Server -
Select the default option;
GitHub.com.ghwill display the prompt below:? What is your preferred protocol for Git operations? [Use arrows to move, type to filter] > HTTPS SSH -
Select the default option;
HTTPS.ghwill display the prompt below:? Authenticate Git with your GitHub credentials? (Y/n) -
Select the default option;
Y.ghwill display the prompt below:? How would you like to authenticate GitHub CLI? [Use arrows to move, type to filter] > Login with a web browser Paste an authentication token -
Select the default option;
Login with a web browser.ghwill display the prompt below:! First copy your one-time code: AAAA-0000 - Press Enter to open github.com in your browser... -
Copy the eight digit code or write it down. Press
⏎to open the browser and display the Device Activation Page as shown in the image below: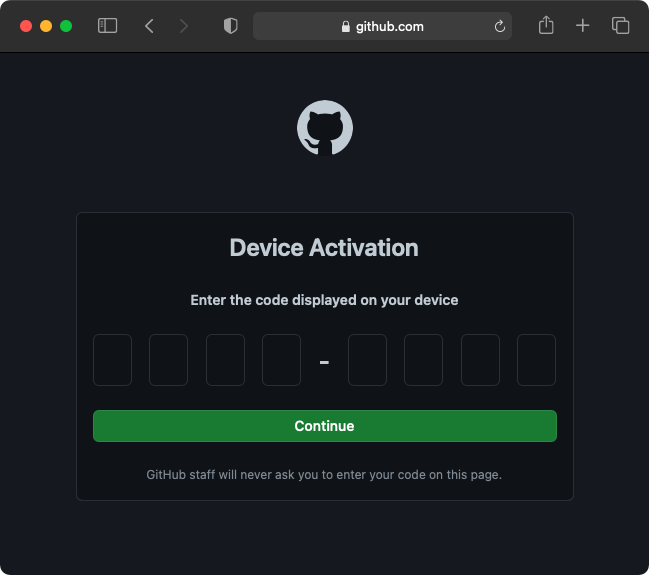
-
Paste or type your activation code and click the green Continue button. The Authorize GitHub CLI page will appear as shown in the image below:
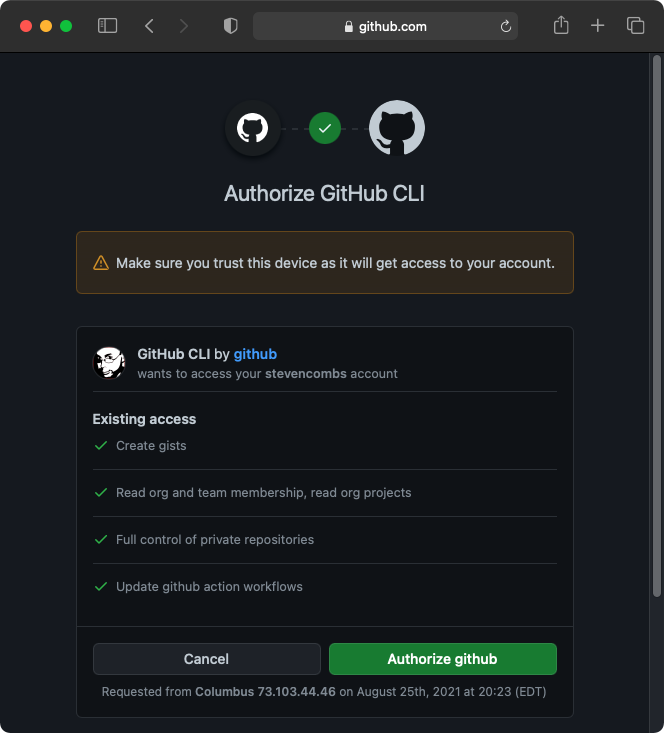
- Click the green Authorize github button. The Congratulations, you’re all set! Your device is now connected prompt will appear and the Terminal will display,
✓ Authentication complete. Press Enter to continue... -
Press
⏎to return to the terminal prompt.ghwill display the prompt below and release the prompt:- gh config set -h github.com git_protocol https ✓ Configured git protocol ✓ Logged in as {user-name} mac-mini-basement:~ retrocombs$ █
Clone the mega65-tools repository
Your GitHub account is now associated with your local Mac and the gh command. You will use this new setup to clone the mega65-tools repository.
- In the Terminal app, navigate to a directory to contain the clone of the repository. I recommend your home folder. You can quickly navigate to this location using the command:
cd ~ -
Type
gh repo clone MEGA65/mega65-tools. The prompts below appear and a clone of the repository is copied to the Mac.Cloning into 'mega65-tools'... remote: Enumerating objects: 5396, done. remote: Counting objects: 100% (1076/1076), done. remote: Compressing objects: 100% (452/452), done. remote: Total 5396 (delta 781), reused 881 (delta 623), pack-reused 4320 Receiving objects: 100% (5396/5396), 11.82 MiB | 9.08 MiB/s, done. Resolving deltas: 100% (2797/2797), done. - Type
ls. You will find a new directory namemega65-tools. - Type
cd mega65-toolsto enter the directory. You can explore the contents with thelscommand; however, you must always return to the root of the mega65-tools directory afterward.
TIP: If you want to explore the files in the repository, I recommend you use the Finder. Be careful not to move, delete, or copy files. Keep the repository intact.
-
To use the tools, the
libusblibrary is necessary. This library provides the Mac command line with the libraries necessary to connect to the MEGA65 via a USB connection. More on this later. DO NOT SKIP THIS STEP or the tools will not build. Install thelibusblibrary with command below:brew install libusb-compatNOTE: If you have a Mac with a M1 Processor, stop here, drop down to the Mac M1 Instructions Modification section, complete the steps, and then return here.
- To build
m65.osx, typemake bin/m65.osx. You may receive warnings; however, ignore them. - To build
mega65_ftp.osx, typemake bin/mega65_ftp.osx. This build will take more time thanm65.osxand will generate warnings. Ignore them. - To view the new commands, type
cd bin. The command builds are located in this directory. -
List the contents of the directory using the command:
ls -l. A directory listing similar to the following will appear:-rw-r--r-- 1 stevencombs staff 44 Aug 25 20:34 README.md -rwxr-xr-x 1 stevencombs staff 174640 Aug 25 20:46 m65.osx drwxr-xr-x 3 stevencombs staff 96 Aug 25 20:46 m65.osx.dSYM -rwxr-xr-x 1 stevencombs staff 150260 Aug 25 20:50 mega65_ftp.osx drwxr-xr-x 3 stevencombs staff 96 Aug 25 20:50 mega65_ftp.osx.dSYM
Two new commands, m65.osx and mega65_ftp.osx are now ready to use. We will use them from this directory for this tutorial; however, you can move and execute them from any folder. Seasoned *nix and Mac users will have a preference. If you’d like to share your preference, place it in the comments below. Let’s give one of these new commands a try but before we do, we need to determine which USB device the Mac uses to connect to the MEGA65.
Mac M1 Instructions Modification (Skip if you have an Intel Mac)
The GitHub repository includes a Makefile designed for Intel Macs. To build on an M1 Mac, perform these steps and then return to step 19 above.
- Verify the Terminal is in the
mega65-toolsdirectory. - In the directory, use your favorite command line editor (
vi,vim,nano, etc.) to edit the file named,Makefile. -
{UPDATE 2021-08-31} Replace line #5 that begins with
COPT=, not line #3 that begins with remark statement#COPT=, with the line below:COPT= -Wall -g -std=gnu99 -I/opt/local/include -I/opt/homebrew/Cellar/libpng/1.6.37/include/libpng16 -L/opt/homebrew/Cellar/libpng/1.6.37/lib -lpng16 -lz -I/opt/homebrew/Cellar/libusb/1.0.24/include/libusb-1.0 -L/opt/homebrew/Cellar/libusb/1.0.24/lib -I/usr/local/include/libusb-1.0 -L/usr/local/lib -mno-sse3 -mcpu=native - Save the file.
- Return to step #19 in the previous section.
Update and build repository
{UPDATE: 2021-08-29} It is not necessary delete the entire folder and execute these steps when an update is available. Thanks again to Gurce, below are the instructions for both an Intel and M1 Mac.
- Return to the
mega65-toolsdirectory using the command:cd ~/mega65-tools. - For M1 Macs, use the command,
git stash. Git will preserve (stash) the M1Makefiletweaks and revert to originalMakefile. - Use the command,
git pullto pull the latest source files. - {UPDATE: 2021-09-15 This step inadvertently put the local branch to
fixesinstead ofmaster.}Use the commandgit checkout fixesto switch to the ‘fixes’ branch. - For M1 Macs, use the command
git stash popto re-apply theMakefilemodifications. - Build the commands using:
make bin/mega65_ftp.osxandmake bin/m65.osx.
Once complete, the most recent versions of the mega65-tools are ready to use.
Determine which USB serial device connection
There are two ways to determine the USB serial port that connects the MEGA65 to the Mac. The first way is to use the command line and the second way is to open the user friendly M65 Connect application.
Command line
- Connect the MEGA65 to the Mac.
- Ensure the MEGA65 is turned off.
-
Use the terminal commands below:
 cd /dev
 ls -l *usb*
TIP: If the
ls -l *usb*search does not provide a list of devices, tryls -l *tty*. - This will be a small list. Note or copy the list of devices.
- Turn on the MEGA65 and wait for a complete boot.
-
In the Terminal app, type
ls -l *usb*and compare the new listing to the listing from step #2. Capture the name of the new device in this list that was not found in the previous list. In my use case, the device was listed as/dev/cu.usbserial-251633005A3B1.TIP: The
/devfolder, know as the device folder, provides *nix OSs, and users, a list of connected devices identified by devices files. This is a unique and valuable feature of *nix OSs. Without a wildcard,*usb*, this list is long. Read more. -
Copy this device name and store it somewhere for later use. We will use it later to connect the Mac to the MEGA65 via the command line.
TIP: Mac users will want to use TextExpander to create a snippet for this long USB device file. Use this link for 20% off your first year!
M65 Connect
If the command line version looks daunting, you can use M65 Connect (available for Mac, Linux, and Windows) to identify the device file using a more familiar application download, install, and user experience (thus the truncated instructions below).
- Download M65 Connect from the MEGA65 Files Host.
- Install M65 Connect.
- Load the M65 Connect application.
- Press
⌘+O. The Connection Settings dialog box will appear. - Click the Autodetect COM Port button. The Connection Wizard will appear.
- Follow the prompts closely as the wizard guides you through the steps necessary for M65 Connect to identify a new serial device, not dissimilar from the command line process in the previous section.
- Once M65 Connect identifies the new device, copy the address.
Use mega65_ftp.osx and m65.osx
With the serial device file identified, you are ready to use the new command line tools. In this post, I don’t go into details beyond a quick connection and view of the SD card contents. At the end is a list command recommendations by developer Gurce.
mega65_ftp.osx example
In the example below, you will use mega65_ftp.osx to view the contents of the MEGA65 SD card:
- Ensure the MEGA65 USB cable is connected to the Mac.
- Turn on the MEGA65.
-
Use the the terminal command below to connect the Mac to the MEGA65:
./mega65_ftp.osx -l /dev/cu.usbserial-251633005A3B1NOTE: Replace my /dev device with the device file name you identified on your Mac.
-
Several lines will appear and the prompt,
MEGA65 SD-Card:/will appear as shown below:Setting serial speed to 2000000 bps using OSX method. Failed to set OSX terminal parameters: Invalid argument Checking if MEGA65 has RX buffer [T+0sec] RX buffer detected. Latency will be reduced. [T+0sec] RX buffer detected. Latency will be reduced. [T+0sec] Stopping CPU i=0, bytes=25, strlen=11 i=13, bytes=25, strlen=11 [T+1sec] In C65 Mode. [T+1sec] Starting CPU Trying to switch to C64 mode... [T+1sec] Injecting string into key buffer at $02B0 : GO64[$0d]Y[$0d] [T+1sec] Waiting for MEGA65 KERNAL/OS to settle... Screen is at $0400 Port $01 contains $e7 [T+1sec] In C64 Mode. [T+1sec] Stopping CPU Helper in memory NOTE: Fast SD card access routine installed. SD card is SDHC Found FAT32 partition in partition slot 0 : start sector=$800, size=27494 MB Found MEGA65 system partition in partition slot 1 : start sector=$35b3ffe, size=2048 MB FAT32 file system has 27494MB formatted capacity, first cluster = 2, 54883 sectors per FAT FATs begin at sector 0x238 and 0xd89b MEGA65 SD-Card:/> █ - Use the
dircommand to list the contents of the SD Card.
m65.osx example
{UPDATE: 2021-08-29} Use the steps below for an example of the use of m65.osx that’s pretty cool:
- Ensure the MEGA65 USB cable is connected to the Mac.
- Turn on the MEGA65.
-
Use the terminal command below:
./m65.osx -l /dev/cu.usbserial-251633005A3B1 -T "10 print" - Press
⏎. The text10 PRINTwill transfer from the Mac to the MEGA65 on character at a time as if a ghost was using the MEGA65 keyboard.
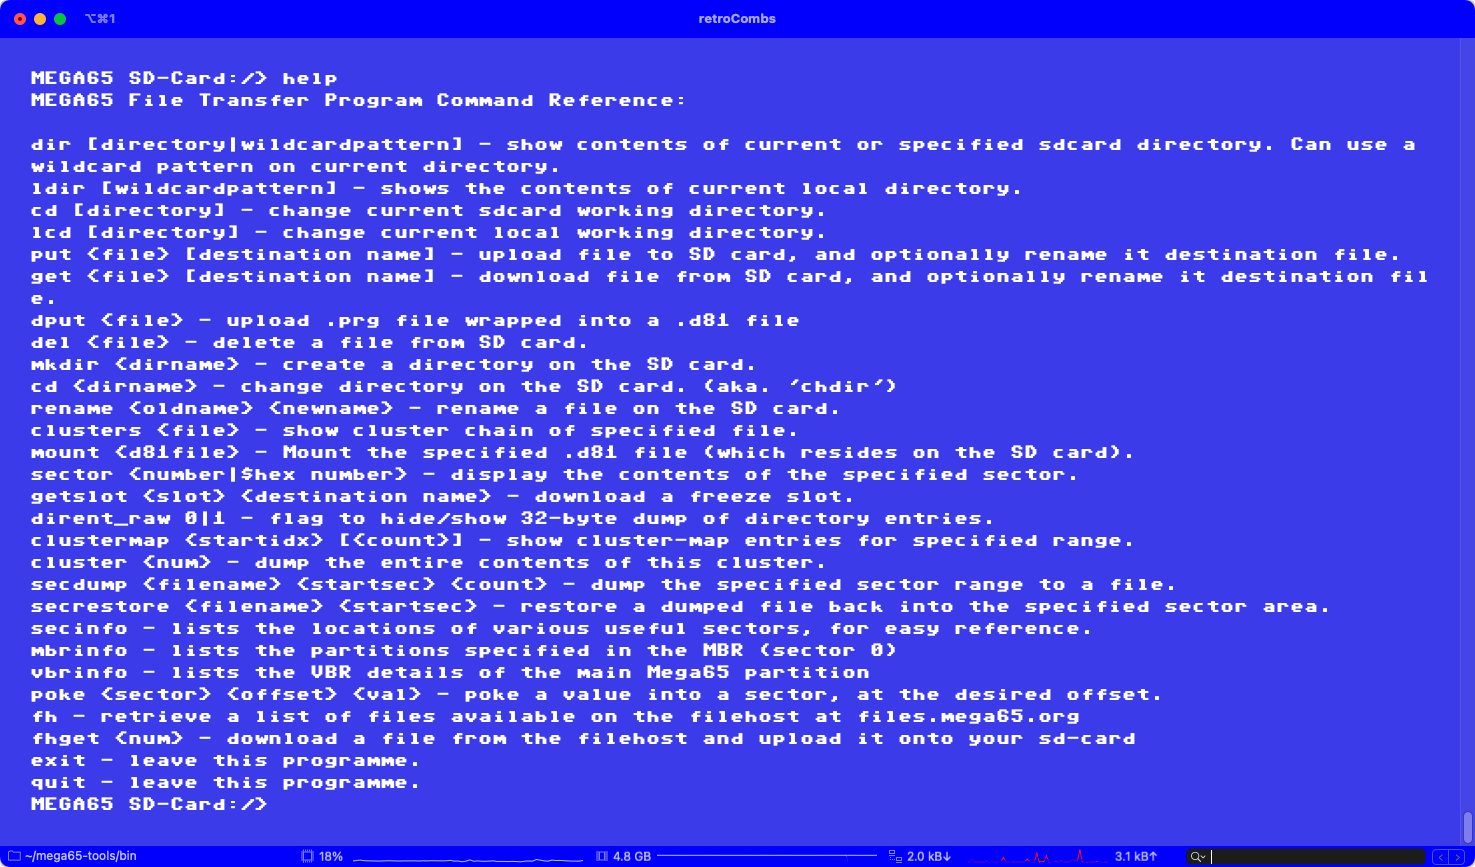
With a connection from the Mac to the MEGA65, explore the commands in the next section to find out what is possible with the mega65_ftp.osx command.
MEGA65 File Transfer Program Command Reference:
dir[directory\wildcardpattern] - show contents of current or specified sdcard directory. Can use a wildcard pattern on current directory.ldir[wildcardpattern] - shows the contents of current local directory.cd[directory] - change current sdcard working directory.lcd[directory] - change current local working directory.put[destination name] - upload file to SD card, and optionally rename it destination file. get[destination name] - download file from SD card, and optionally rename it destination file. dput- upload .prg file wrapped into a .d81 file del- delete a file from SD card. mkdir- create a directory on the SD card. cd- change directory on the SD card. (aka. 'chdir') rename- rename a file on the SD card. clusters- show cluster chain of specified file. mount- Mount the specified .d81 file (which resides on the SD card). sector<number$hex number> - display the contents of the specified sector.getslot- download a freeze slot. - dirent_raw 0/1 - flag to hide/show 32-byte dump of directory entries.
clustermap[ ] - show cluster-map entries for specified range. cluster- dump the entire contents of this cluster. secdump- dump the specified sector range to a file. secrestore- restore a dumped file back into the specified sector area. secinfo- lists the locations of various useful sectors, for easy reference.mbrinfo- lists the partitions specified in the MBR (sector 0)vbrinfo- lists the VBR details of the main Mega65 partitionpoke- poke a value into a sector, at the desired offset. fh- retrieve a list of files available on the filehost at files.mega65.orgfhget- download a file from the filehost and upload it onto your sd-card exit- leave this programme.quit- leave this programme.
Gurce recommends…
I put a call out the Discord Channel for some cool things you can do with these new commands. Once again, Gurce to the rescue! He recommends the following:
For mega65_ftp.osx:
-
fh- retrieve a list of files from https://files.mega65.org/. -
fhget <num>- Download the file and place on SD card. -
dput <FILE.PRJ>- Place a .PRJ file into a .D81.
For m65.osx, common use-cases include:
NOTE: replace
comxwith the device file name identified.
-
Restart (-F), upload and run (-r) a C65 .PRJ file:
m65 -l comx -Fr myc65.prg -
Restart (-F), switch to C64-mode (-4) and run a C64 .PRJ file:
m65 -l comx -F4r myc64.prg -
Take a screenshot to .png file:
m65 -l comx -S -
Remote type a fixed string (with carriage-return):
m65 -l comx -T 'print 1+1' -
Continuously remote type stuff:
m65 -l comx -t -
Final Thoughts
While I’ve not spent a whole lot of time with these command line tools, here are a few things I’d like to see :
- Use the Ethernet port on a network instead of the USB cable.
- The mega65-tools needs a Mac universal binary installer. The process I document above is not for the faint of heart or new Mac users. To make the MEGA65 accessible to everyone, at least on a Mac, these tools must be packaged. If you are a Mac developer and want to do this work, reach out to me and I’ll connect you to the right folks. I wish I had the knowledge, and time, to learn how to make the package myself.
- The
m65tools need a GUI for mass use. As with #2, I wish I had the time for this and I’m sending out another call to a Mac developer for help. - M65 Connect uses
mega65_ftp.osxas its connection backend; however, it does not reveal all the tools. I’m sure updates to the application will include these in the future.
Interacting with the community to write this post, and the writing itself, was a blast. Throughout this project, I not only learned how to connect the MEGA65 to my Mac but I learned more about my Mac, the MEGA65, and the development process. Every new interaction with the MEGA65 and the community makes me feel like a member of a thriving developer community dedicated to the release of something special. As I’ve said before, start saving those pennies Commodore and 8-bit computer fans.
Join the Fun
Don’t miss the MEGA fun, SUBSCRIBE to my YouTube channel and check out my other MEGA65 related posts.
Help make this content better! Leave your comments, corrections, additions, and thoughts in the comments below. You can also email me at retrocombs@icloud.com. Thanks for reading and if you are inclined, please let others know about the blog using the hashtag #retroCombs.
🕹️ retroCombs, OUT!