Retro computing with a touch of modern and the home for all things, retroCombs (aka Steven Combs).
Disclosure Statement: When you click on links to various merchants on this site and make a purchase, this can result in this site earning a commission. Affiliate programs and affiliations include, but are not limited to Amazon, the eBay Partner Network, and/or others.

TEDuino: An Arduino based TED (264) Series Commodore Datasette
by Steven B. Combs, Ph.D.
As part of my Commodore Plus/4 series, chapter three of the user’s manual includes a section on using a Commodore Datasette and a 1541 Diskette Drive. In a previous post, I assembled the modern replacement for the Datasettdisk drivepi1541); now it’s time to build a complete Datasette replacement called, the TEDuino.
“What’s a TEDuino,” you ask? It’s an Arduino-based replacement for the Commodore Datasette with a Plus/4 industrial design inspired case.
For this project I use an Arduino, in this case the inexpensive Arduino Nano version, along with easy to source electronic components, and a 3D printer to create a Commodore 264 series inspired Datasette replacement I call, the TEDuino.
The TEDuino is powered by the Tapuino project. You can learn all about the Tapuino on the Sweetlilmre’s 1337 beef: Building the Tapuino R2 blog post.
After building the Tapuino and using it with my Commodore Plus/4, I felt it should have a proper case with Plus/4 design aesthetics. I grabbed my sketch pad and began brainstorming (see video). You can learn all about the Tapuino on the Sweetlilmre’s 1337 beef: Building the Tapuino R2 blog post.
NOTE: While this post focuses on the Tapuino for a Commodore Plus/4, this build works with a C16 or other 264 series Commodore computers. If you want to use the TEDuino with a VIC-20, C64, or C128, replace the 7 pin DIN connector with this C2N Power Adapter that allows you to tap power from those computers for other projects.
This post and the companion video includes the updates to build materials, layout, imagery, parts sourcing, and processes used to create the case and build the Tapuino system for the TEDuino. Before you read this blog post, watch the video below where I share a reveal of my TEDuino case design. Before you read this blog post, watch the video below. It shares my build process and first use of the Tapuino.
YouTube Video
Title: An Arduino based replacement for a Commodore Plus/4 Datasette, the TEDuino
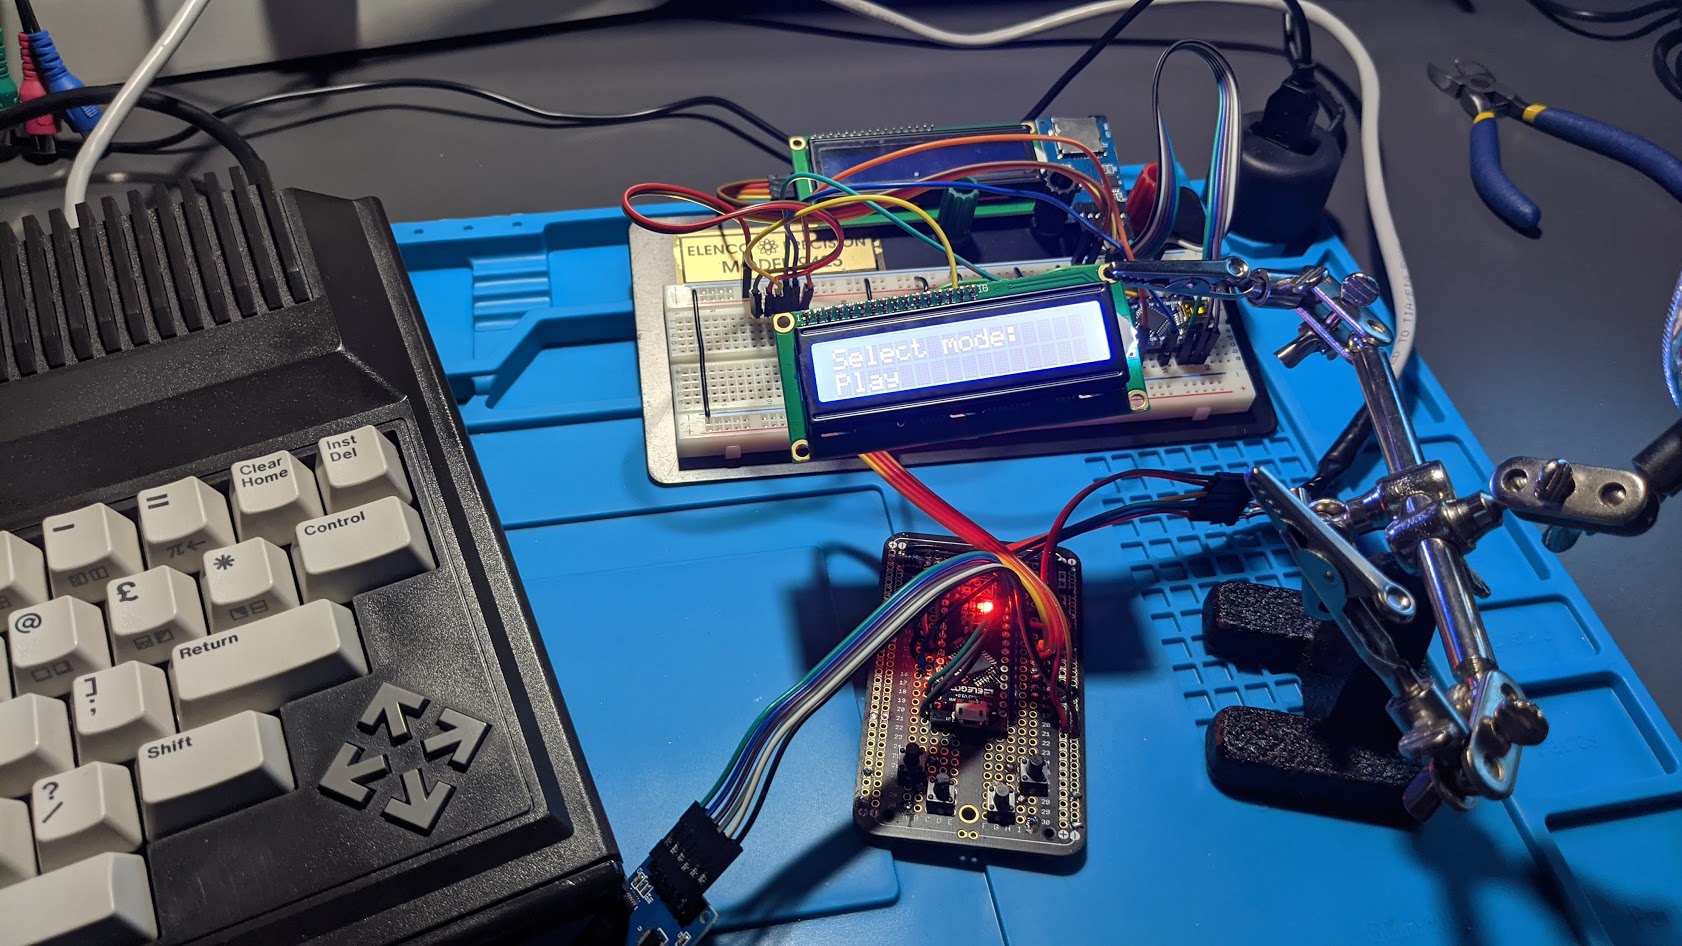
In the video below, I breadboard and operate a Tapuino connected to a Commodore Plus/4:
Let’s start the project by listing all the materials necessary.
Bill of Materials
The list below includes everything you need and the most inexpensive/convenient way to source them.
Below is my list of materials (using Amazon Affiliate links):
- 1 - Arduino Nano V3 - This is the second Nano I use in the video and not the first!
- 1 - 16x2 LCD with I2C backpack - The Tapuino can use other displays, but these are the most cost effective.
- 1 - SD Card module with built-in level conversion - This unit differs from the one Sweetlilmre specifies.
- 1 - ElectroCookie Prototype PCB Solderable Breadboard for Arduino and DIY Electronics Projects, Gold-Plated (5 Pack + 1 Mini Board, Matte Black) - You get five; in case you make a mistake!
- 1 - 430 Ohm resistor - If you want to try this project and don’t have this resistor, for the cost of a SASE, I’ll send you one.
- 1 - Breadboard - One that works.
- 4 - Momentary Switches with Color Caps - I didn’t use the color caps.
- 1 - 4n25 Optocoupler - Same as resistor notes.
- 1 - Spool of solid core breadboard wire: Multicolor will assist in wire tracking.
- 1 - Spool of soldering iIron - In case you are low.
- 1 - 7 Pin DIN plug connector - Plan accordingly if you live in the U.S. because these take a while get across the pond.
- 1 - Spool FilaCube PLA filament (Coffee/Chocolate)
- 1 - Creality Ender 3 3D Printer
Makers or electronic hobbyist will have many of these items. When I made similar purchases for my original Tapuino project, I had duplicate items. I think I even have enough parts to build one more of these.
Tools
- Wire Stripper - Love these and it makes a good clean strip.
- Soldering Iron/Station - This is the inexpensive station that I recommend.
- Rosen Core Solder wire - In case you are running low.
Designing the TEDuino
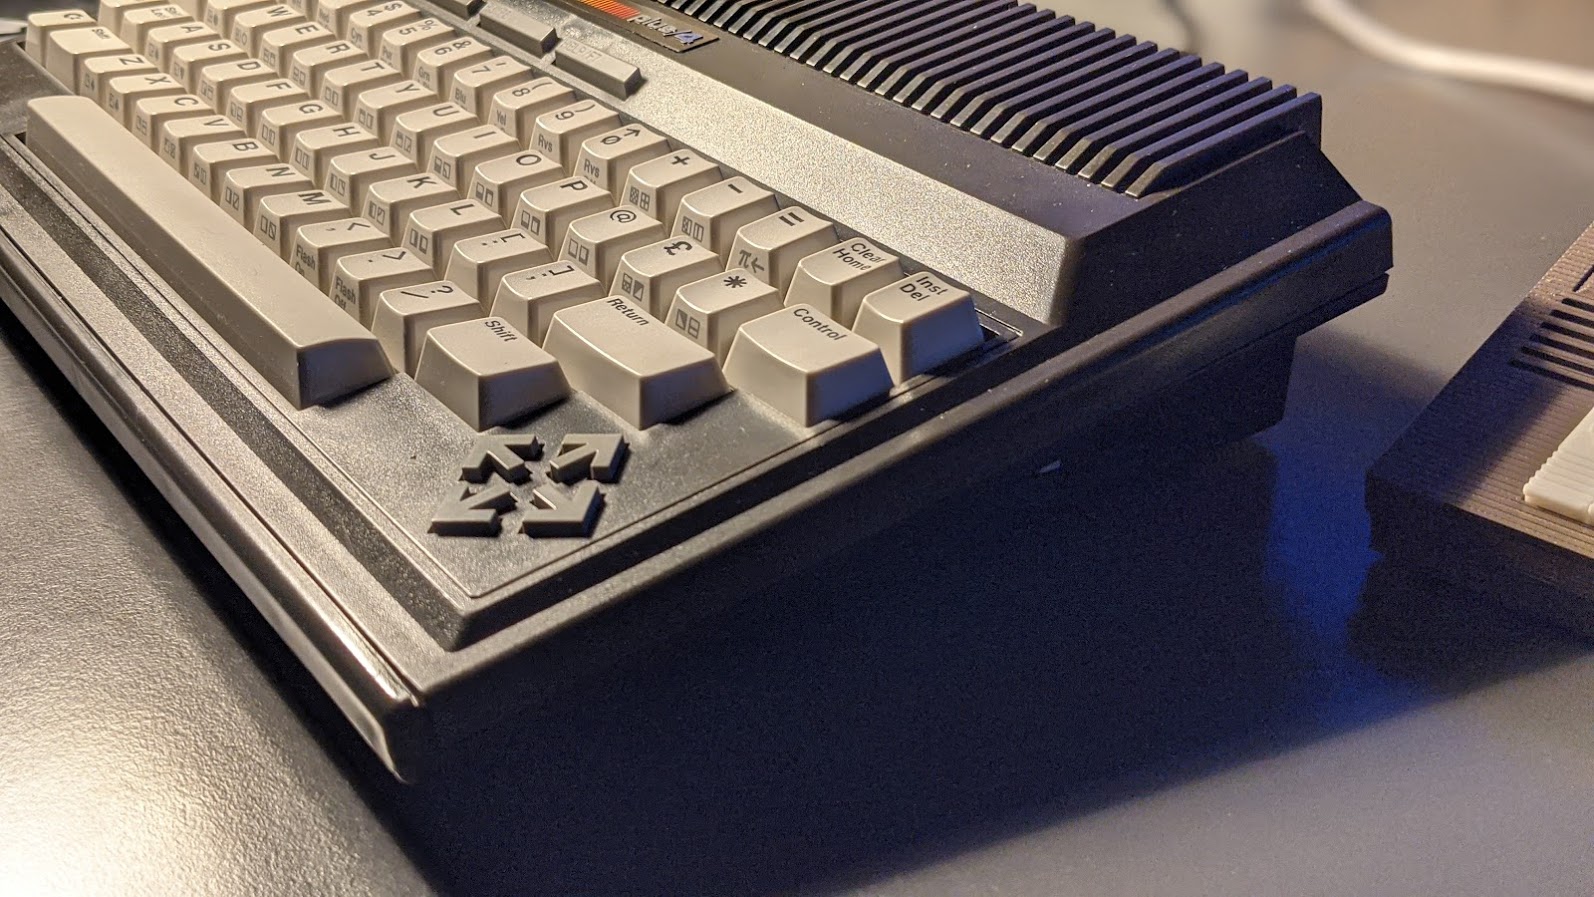
The most iconic design of the Commodore Plus/4 (and the C116) are the fins on the back of the computer, as shown in the image below:
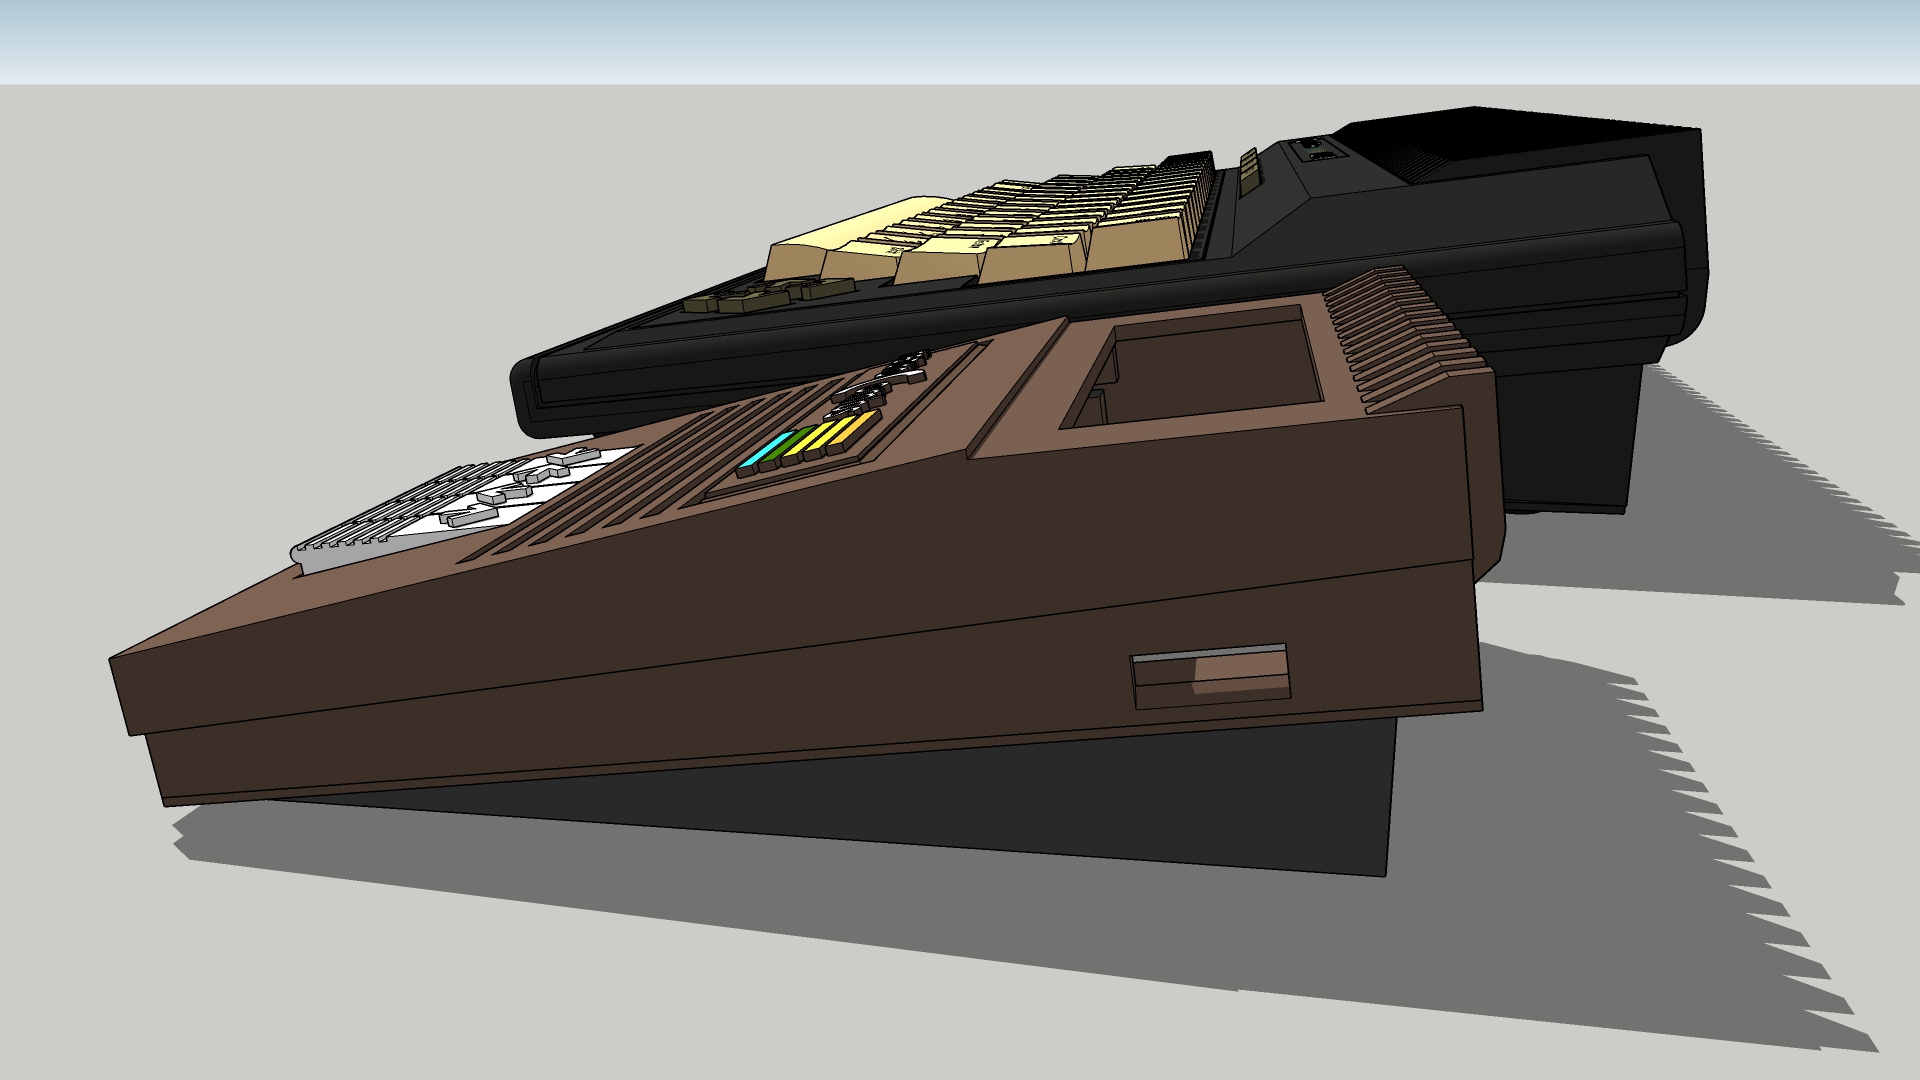
It was important for me to include those along with faux vents that add interest to the design as shown in the image below:

Originally, the TEDuino sat flat on the table; however, during design it became apparent that the unit should sit at an angle to meet the profile of the Plus/4 and to allow a better view of the LCD screen as shown in the image below:
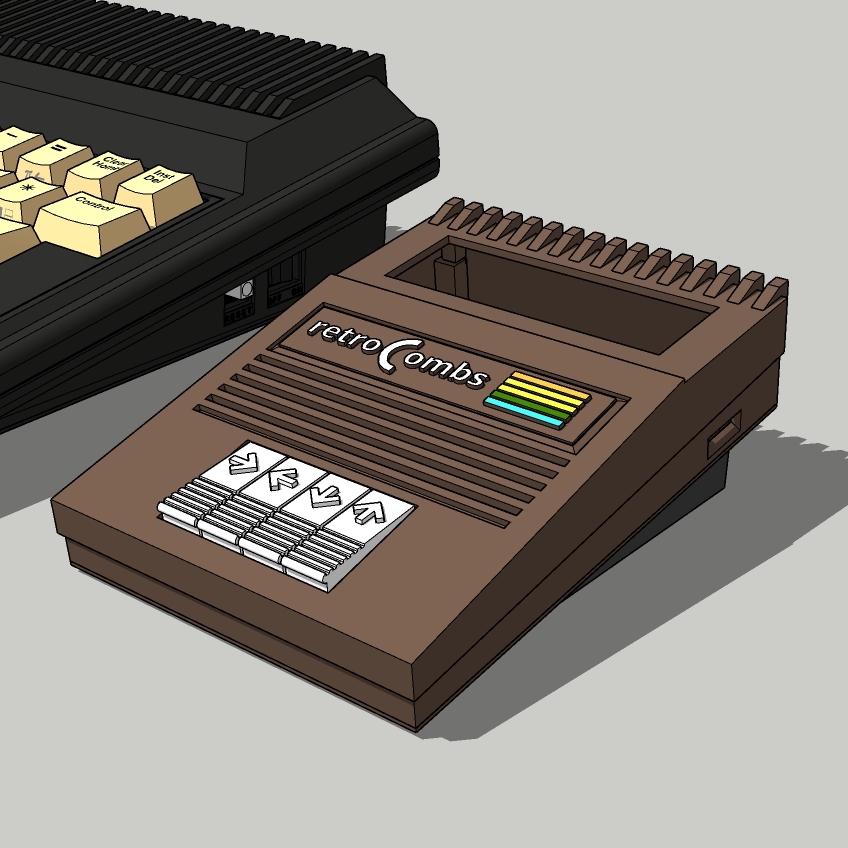
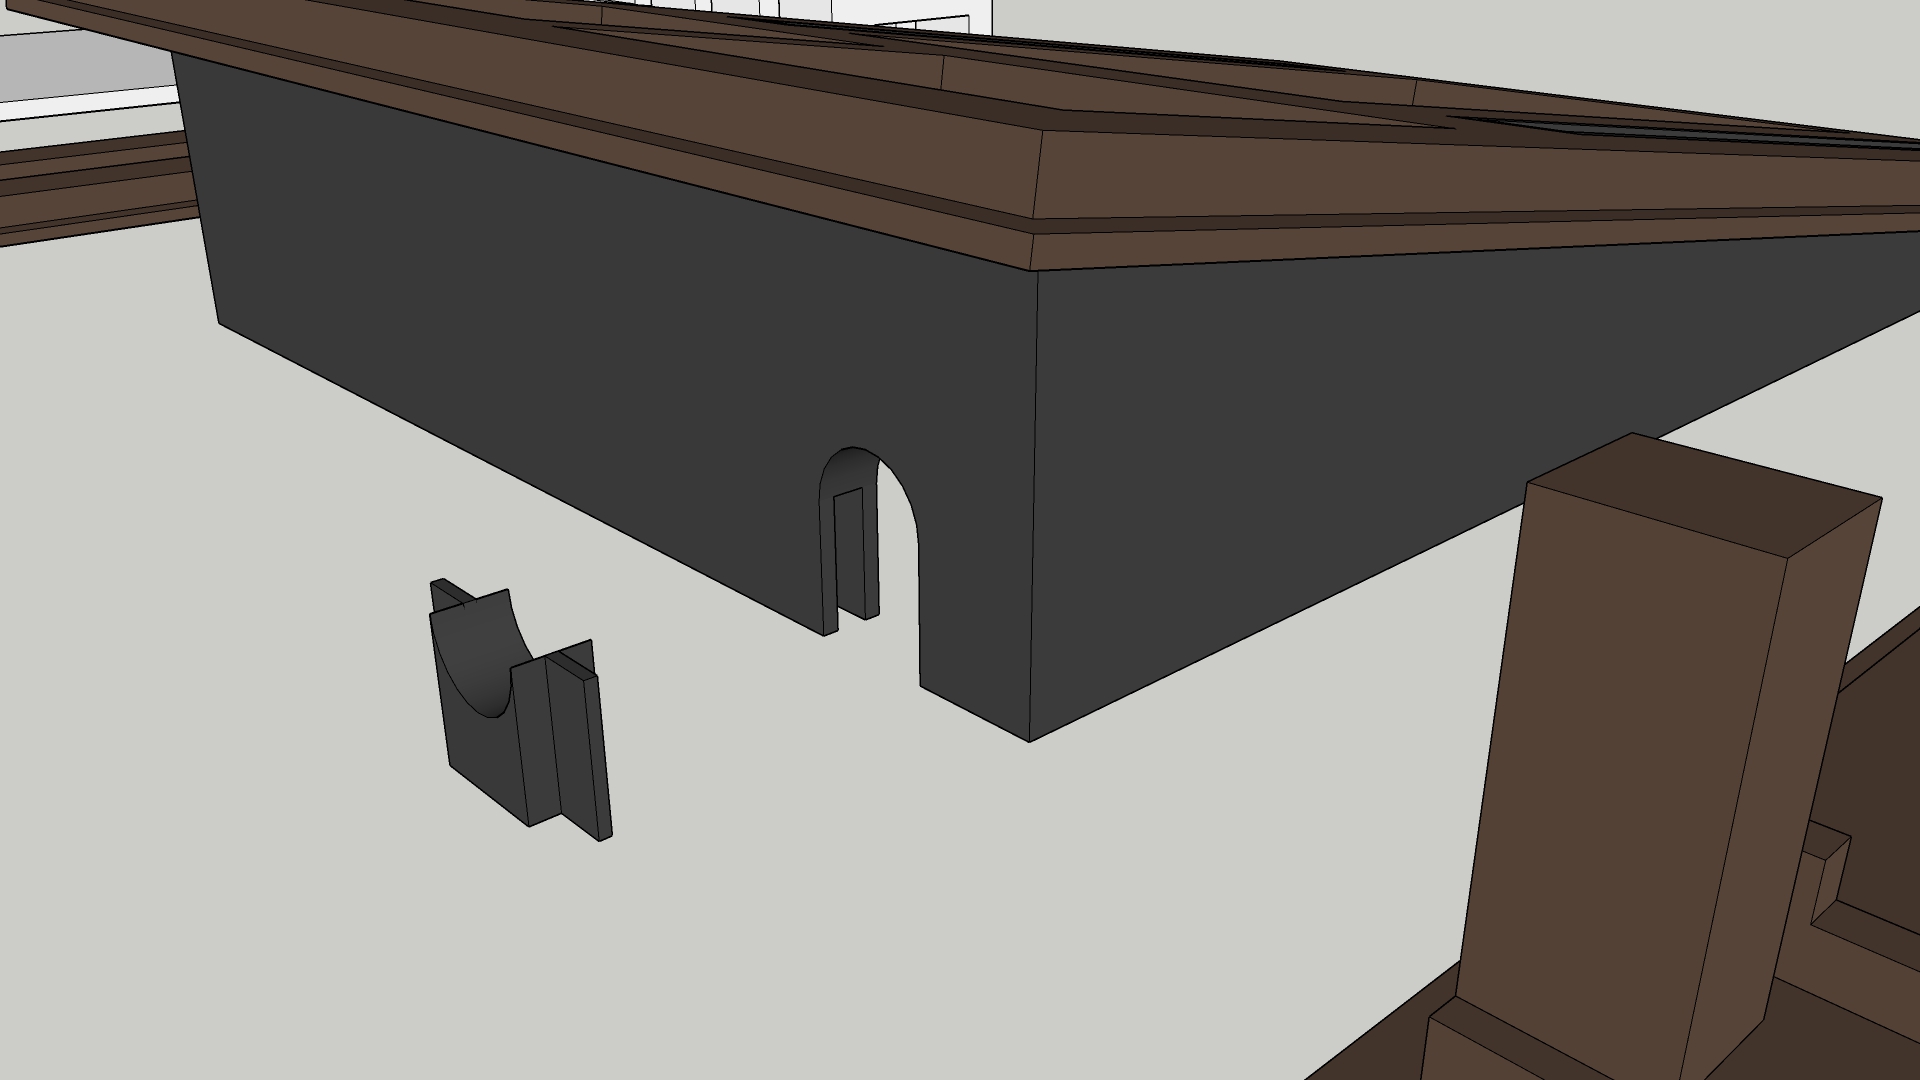
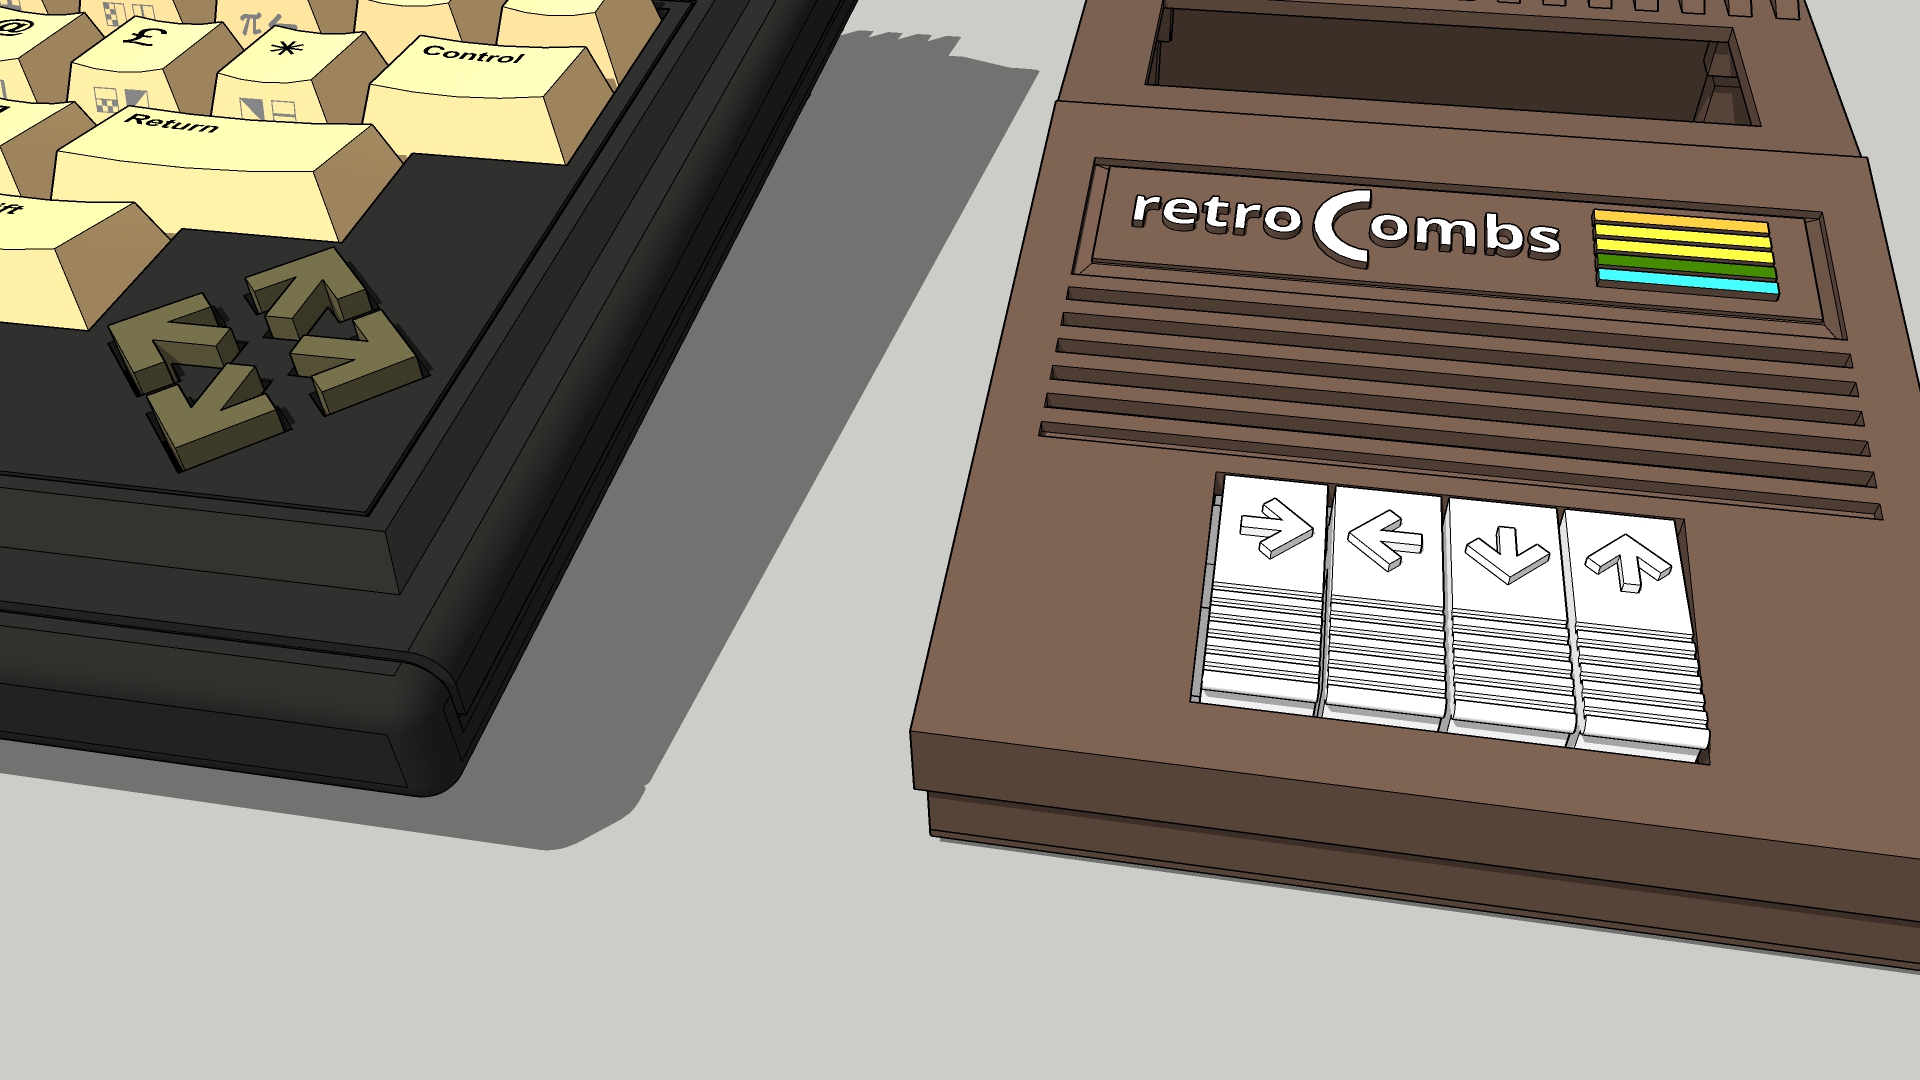
I’d like to think I added nice touches to the design such as the cable management system, the electronics holder, and the button design which is based, in part, on the keys from the original Commodore Datasette and uses arrows similar to the cursor keys on the Plus/4 as shown in the images below:
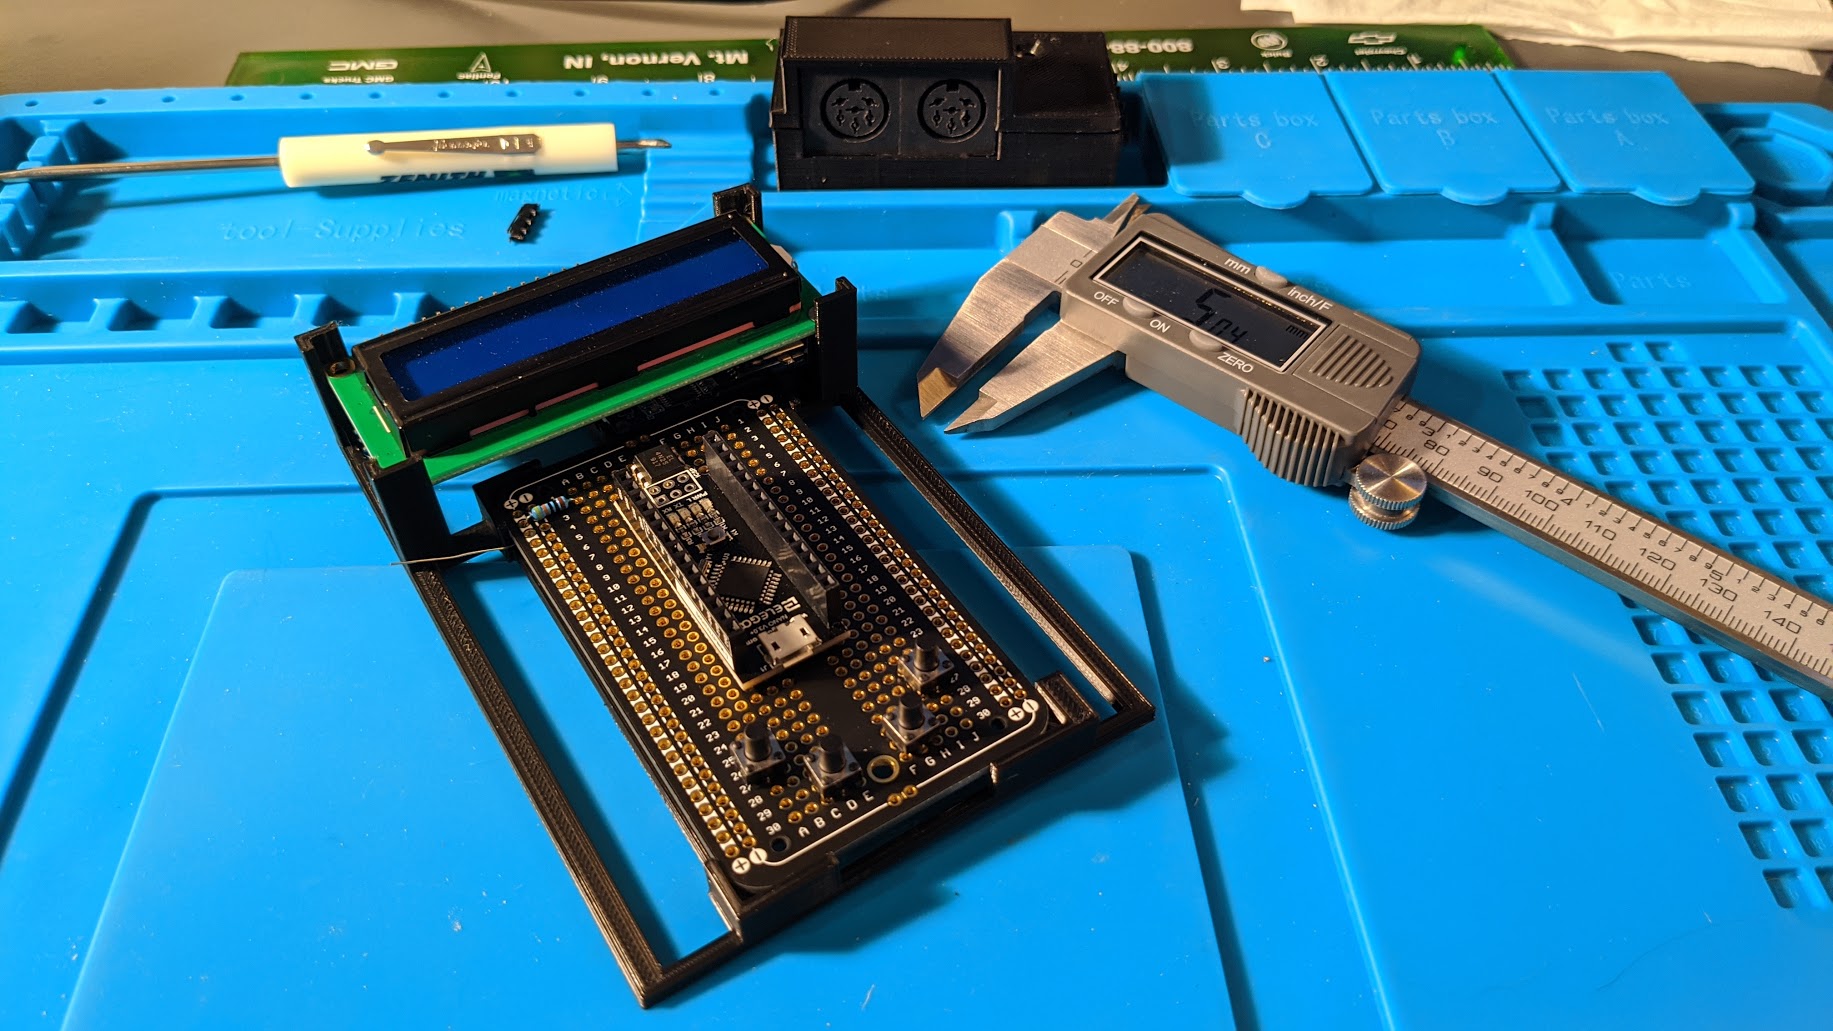
I was pleased how all the components fit or snapped together. I learned much about 3D printing; such as leaving a gap of .125mm between parts. That was the spot on my Creality Ender 3 using normal resolution and the Cura slicer software. That distance will change based on use case but for standard parts, such as the case fitting over the electronics holder, it is a good start point.
STL Files
STL files are posted to my Thingaverse account page. Click here for a direct link to the project.
Fritzing Time
Below is my original Fritzing for the Tapuino. The first goal of the TEDuino project was to transfer these components to a solderable breadboard and then design a case that would contain these components:

I’m glad I created a Fritzing diagram with the earlier project. It improved my familiarity with the project and informed me during the layout of the components for## Designing the TEDduino.
Preparing and Uploading Software
Once the TapEDuino electronic system is built, it’s a simple matter to download and install the software. In my video, you will note that I installed the software before assembling.
- Download the zip archive - you can download directly to a microSD if you want to save a step later; however, I always download to my computer first, make any changes, and then keep a local copy in case I run into problems.
- Extract the file - the archive includes several files. You need them all!
- Rename the extracted folder; Tapuino - This is required or the
tapuino.inofile won’t be able to find and upload the support files. - Rename, or copy, the
config-user.h.exampleconfiguration file toconfig-user.h. -
Modify the configuration file to match the hardware and language. Below is my file:
//*****************************************/ // User selectable configuration settings // /******************************************/ /******************************************/ // LCD Definitions /******************************************/ // uncomment one of these sets for your specific LCD #define LCD_USE_1602_LCD_MODULE #define LCD_I2C_ADDR 0x27 // I2C address for the LCD // #define LCD_USE_SSD1306_OLED_MODULE // #define LCD_I2C_ADDR 0x3C // I2C address for the OLED // #define LCD_SSD1306_BIG_FONTS // define this for ... bigger fonts... // choose one of these depending on your display // #define LCD_SSD1306_128x64 // #define LCD_SSD1306_128x32 // #define LCD_USE_SSD131X_OLED_MODULE // #define LCD_I2C_ADDR 0x3C // I2C address for the OLED /********************************************/ // Language Definitions /********************************************/ // uncomment one of these for your language #define TAPUINO_LANGUAGE_EN // #define TAPUINO_LANGUAGE_IT // #define TAPUINO_LANGUAGE_TR // #define TAPUINO_LANGUAGE_ES // #define TAPUINO_LANGUAGE_DE - Start the Arduino IDE - I use Linux but this process should be similar on other platforms.
- Navigate into the tapuino folder and load the
tapuino.inofile - the Arduino IDE will load all associated project files. - In the Tools menu, select Arduino Nano and the correct serial port - this is done in the Board and Ports menu items.
Once done, it is a simple matter of connecting the Arduino to your PC and clicking on the Upload (→) button in the toolbar.
Prepare the microSD Card
You will need the smallest microSD card you can find. I had a 32Gb card and this is overkill! If you can find a 1, 2, 4, or 8Gb that be a better use but those sizes are harder to find.
Format the card as FAT32 and place directories on the microSD. Keep directory names 16 characters or less. I have a games folder with three .tap files with long names. The Tapuino will scroll longer file and folder names.
UPDATE 2020-07-22: The animated .gif below is a short “copying .tap files to the microSD card” demonstration:
When you save a file from a Commodore computer using the SAVE command, the Tapuino will create its own recordings folder. You cannot delete these files using a Commodore computer. You will need to remove the microSD and perform that function on a modern computer.
Finding .tap Files
I recommend you check out Plus4world’s tape index. I imagine any program released on cassette is archived but be careful; you have to select the right video version (PAL or NTSC). PAL specific programs will not work on an NTSC computer and vice-versa. If you own an NTSC Plus/4, like I do, you will find that you can’t enjoy the majority of Plus/4 games. Many titles were PAL since the computer was more popular in Europe.
Once the microSD is prepared, ensure the Tapuino power is off and place the microSD into the card reader. You can now turn on power to the Plus/4. The Plus/4 will provide power for the Tapuino.
TEDuino Menu Usage
The TEDuino includes four white front buttons used to navigate the Tapuino interface. The button functions are as shown in the table below:
| Button | Usage |
|---|---|
| → | Select |
| ← | Abort/Back |
| ↓ | Down |
| ↑ | Up |
To display the contents of a directory, navigate to the directory name on the Tapuino display and push button 1 (Select). If you need to stop a program from saving or loading, push button 2 (Abort). The navigation is intuitive after a few uses.
NOTE: There is one menu item on the Tapuino you must select in order to use with a TED series Commodore computer. Select Options / Machine / C16. This configures the Tapuino to act as a 1531 Datasette. I do not understand what this option does to make the Tapuino operate differently. If anyone knows, please drop a comment below.
Final Thoughts and What’s Next
This project was a blast! I’m not sure how often I will use the TEDuino since the Pi1541 is faster, but if there is a random .tap file out there, at least I know I can load it. For pure nostalgia though, this is as close as you can get to a Datasette and much more reliable than cassette tapes. The only thing that would make it better was if the Tapuino software allowed connection of a small speaker and the hum from an original Datasette.
As I mention in the video, I’m not done with this project. There are a few more things I plan to add:
- A custom, and colorful, logo plate
- A 1980s style magazine advertisement
- Non-slip feet on base
- Explore a professionally printed 3D case (let me know if you know an inexpensive way to source one)
I will continue to document this projects on this website and on the YouTube channel.
MORE PHOTOS!
Need more pics? Check out my TEDuino Google Photos album.
Conclusion
I hope you enjoyed this reveal of the TEDuino. If you have questions, please post them below.
References
Huge thanks to Sweetlilmre for the original instructions. This would not have been possible with our their amazing original work. I hope I have added something to the build instructions that makes this project even easier for someone else.
Here’s the list of references:
- 1337 beef: Building the Tapuino R2
- GITHUB: sweetlilmre/tapuino: tapuino
- Build your own 1530 to C16,C116,Plus/4 adapter and make an C64 SD2IEC work on your 264 computer – awsm
Join the Fun
Don’t miss the retro-computing fun. SUBSCRIBE to my YouTube channel and check out my other posts.
Help make this content better! Leave your comments, corrections, additions, and thoughts in the comments below. You can email me at retrocombs@icloud.com. Thanks for reading and if you are inclined, please let others know about the blog using the hashtag #retroCombs.
🕹️ retroCombs, OUT!