Retro computing with a touch of modern and the home for all things, retroCombs (aka Steven Combs).
Disclosure Statement: When you click on links to various merchants on this site and make a purchase, this can result in this site earning a commission. Affiliate programs and affiliations include, but are not limited to Amazon, the eBay Partner Network, and/or others.

Install the MEGA65 on a Nexys4 or A7 FPGA | Build your own MEGA65!
by Steven B. Combs, Ph.D.
The MEGA65 is AVAILABLE! That was the virtual shout during early October 2021. The first 400, of which I snagged one, will ship late December, while another batch of 1000 will ship during Q2 of next year. As of this writing, there are a few available. At around $850 USD, these pre-orders may be out of reach of some early adopters. If that’s the case, there are two ways you can begin your MEGA65 journey while production increases and costs decrease during the next couple of years.
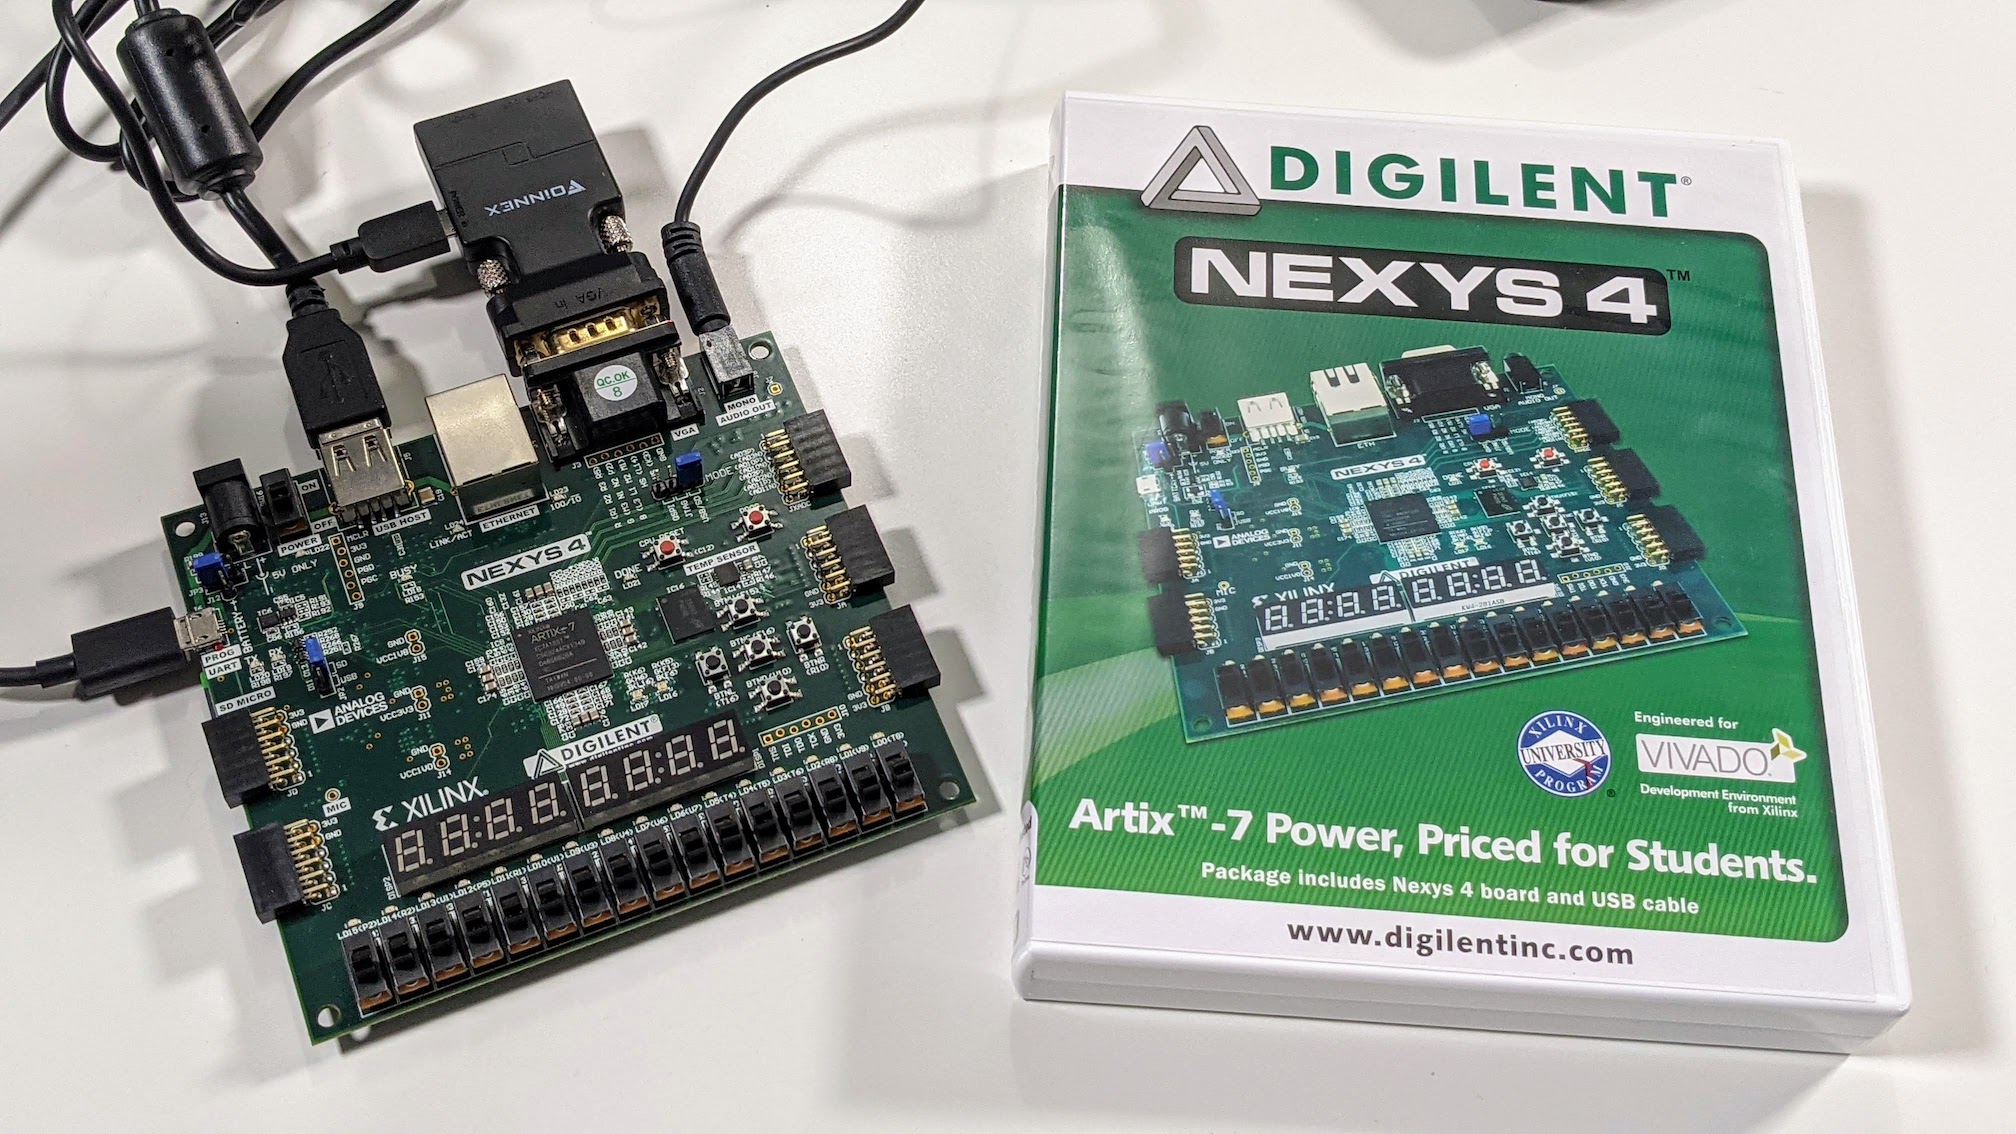
The first option I’ve covered; Run a MEGA65 on your Mac using Xemu (or Linux/PC). This software solution has the advantage of being a free solution and I recommend it for anyone curious about the MEGA65 project. It is a great way to get started; however, if you want to build a hardware solution that costs less than a Dev Kit or original release models, you can purchase a Nexys A7-100T FPGA Trainer Board for ≈$270; or less if you are a student or educator. Once you have this FPGA training board in hand, what’s next? I’ll cover that in this post and show you how to configure and use the board as a MEGA65.
Before you read the rest of this post, look at my companion video below.
** Table of Contents **
- YouTube Video: Install a MEGA65 Bitstream on a Digilent Nexys4 FPGA
- Video Errata
- Links Mentioned in this Episode:
- MEGA65 Developer’s Guide
- Summary of Build Steps
- Nexys FPGA Versions
- Unbox the Nexys4
- Nexys4 A7 Anatomy Primer
- Input/Output (I/O) Devices
- Use the Nexys4 Self-Test
- Prepare a microSD Card
- Operating the MEGA65 on the Nexys4
- Basic Nexys4 Use
- Final Thoughts
- Join the Fun
YouTube Video: Install a MEGA65 Bitstream on a Digilent Nexys4 FPGA | Build your own MEGA65!
In the video below, I show the process to install and use a MEGA65 bitstream on a Digilent Nexys4 FPGA.
Read the blog post below for detailed information.
Video Errata
None as of 2021-11-09.
Links Mentioned in this Episode:
Below are the links I mention in the video. All Amazon links are affiliate links.
- Run a MEGA65 on your Mac using Xemu
- MEGA65 FileHost
- MEGA65 Developer’s Guide
- Purchase a MEGA65
- The MEGA65 Project
- Purchase a Nexys A7-100T FPGA Trainer Board
- MEGA65 Command Line Tools
- Inexpensive micro SD Card
- Blackmagic Design ATEM Mini
- FOINNEX Active Male VGA in Female HDMI
MEGA65 Developer’s Guide
The MEGA65 Developer Guide is part of a series of MEGA65 user guides. With a focus on the tools and techniques programmers need to develop MEGA65 software, Chapter 16 includes instructions to build a MEGA65 using a Nexys Field Programmable Gate Array (FPGA). Prior to the MEGA65 Dev Kit and the MEGA65, bitstream development occurred on FPGA boards. These boards share a Xilinx™ Artix A7 found in the Dev Kit and the MEGA65.
Because of the similarities, bitstream releases are concurrent with the Dev Kit and the MEGA65. You can purchase a Nexys, load a bitstream and files on a SD card, and build your own MEGA65; albeit without a case, floppy drive, and ports. There are other limitations, but if you want a hardware device to play on while you wait for your MEGA65 to arrive, this is an option. Let’s build a MEGA65 by selecting an appropriate FPGA board.
Summary of Build Steps
This blog post has significant detail. Below are the summarized steps to the process:
- Purchase Nexys hardware.
- Acquire a compatible keyboard (Dell LT100).
- Format an 8Gb microSD card to FAT32.
- Download the Nexys bitstream from the FileHost.
- Copy the bitstream to the root directory of the microSD card.
- Insert the microSD card into the Nexys.
- Connect the keyboard, video, audio, and power supply (either 9V barrel or microUSB port).
- Boot the bitstream to test the system and the MEGA65 onboarding screen will appear if operational.
- Turn off the Nexys.
- Turn on the computer while holding the
⌥(ALT) key on the keyboard until the MEGA65 Utility Menu Displays. - Select the SD CARD FDISK+FORMAT UTILITY option and follow the prompts.
- Eject the microSD card.
- Download a
.ROMfile (rename the fileMEGA65.ROM), SD Card Essentials (extract the.rarfile), and theBASIC.D81file from the FileHost. - Place the files above and the bitstream on the root directory of the microSD card.
- Boot the Nexys with the SD card.
Those steps outline a high-level summary. Below are the details.
Nexys FPGA Versions
There are three Nexys FPGA boards that support the MEGA65 bitstream (more on bitstreams later):
- Nexys4 - discontinued and available in limited numbers.
- Nexys4DDR - discontinued and available in limited numbers.
- Nexys A7 - readily available, updated, and rebranded version of #1.
I’ll demonstrate install on the Nexys4 that I was able to buy from Digilent for ≈$200. Setup for all three versions is identical.
Unbox the Nexys4
The Nexys4 comes in a plastic case similar to a DVD case but thicker. The case includes the Nexys4 and a micro USB cable. It does not include instructions. Those are available online as I discuss in the section below.
Nexys4 A7 Anatomy Primer
Before using the MEGA65 bitstream on the Nexys4, it is important to understand the input/output (I/O) features of the hardware necessary for this project. These components are as shown in the image below.
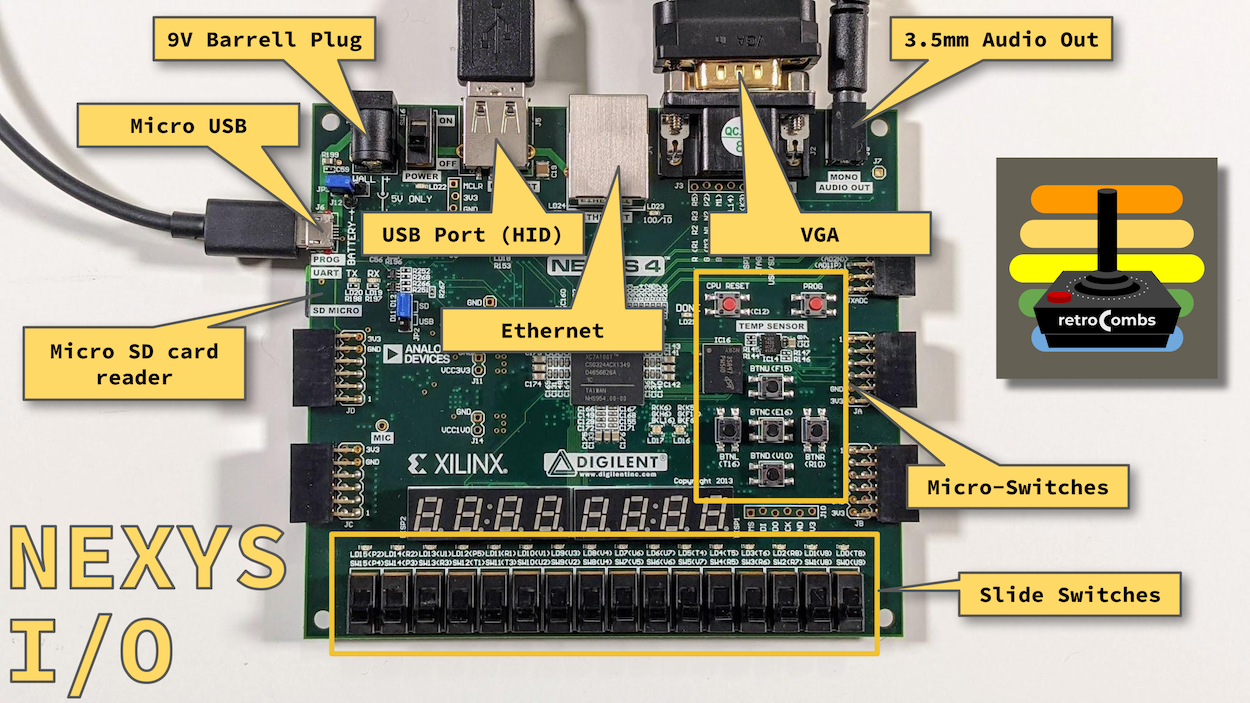
I will not cover every hardware feature. See the Nexys A7 Reference Manual, which I used as a reference.
Micro USB
The micro USB port provides two functions: power and a serial connection. This project will use the micro USB port to provide power to the Nexys4 since I don’t have an external power supply. I won’t cover the serial connection; however, this port can connect the Nexys4 to a Mac or PC using M65 Connect or the MEGA65 command-line tools to manage and control the MEGA65.
Power Supply
You can provide power to the board using a micro USB port, a barrel jack, or a battery:
- Micro USB port - Use a USB power supply that provides 4.5VDC to 5.5VDC and at least 1A. For this project, use 2 to 3A as reading the SD card may require additional power to operate reliably.
- Barrel Jack - Use a power supply with a coax, center-positive 2.1mm internal-diameter plug that delivers 4.5VDC to 5.5VDC and at least 1A.
- Battery - Maximum voltage is 5.5VDC. The minimum voltage depends on the application. USB host function (J5) requires at least 4.6V. Other applications may require the minimum voltage of 3.6V.
I used the micro USB port with a Kano Kit wall wart. The specifications are below:
- Input: 100-240 VAC 50/60Hz 0.6A Max
- Output: 5.25V 2.5A
- Model: 16445001-02B
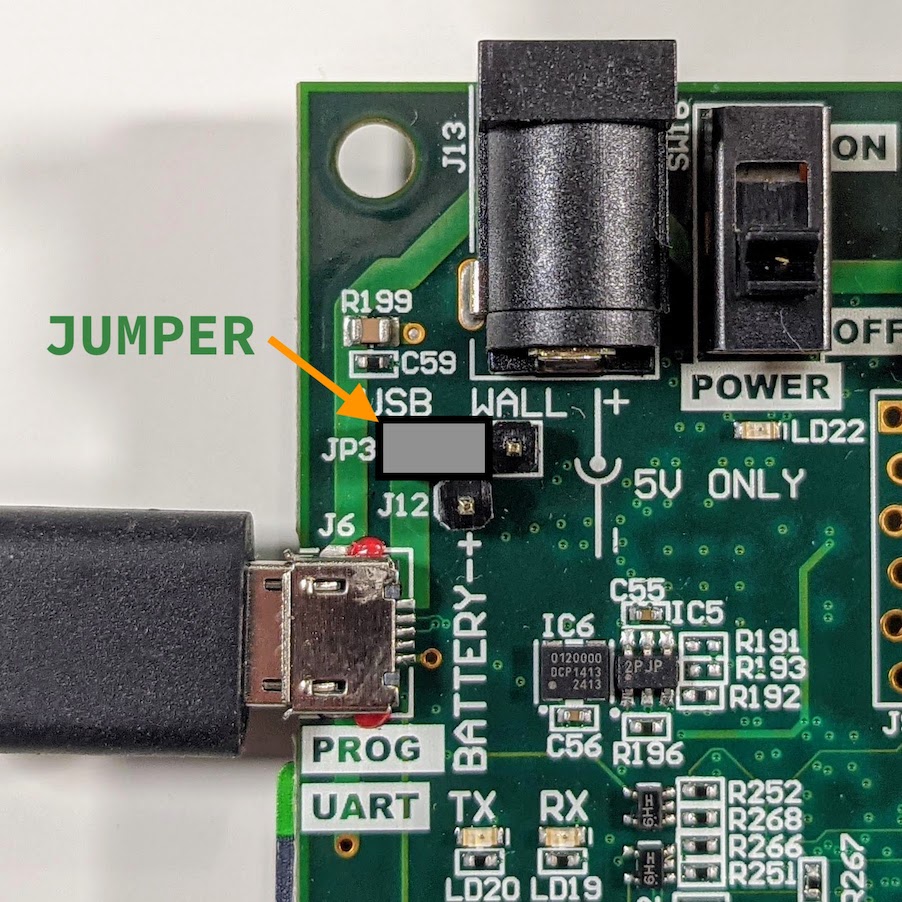
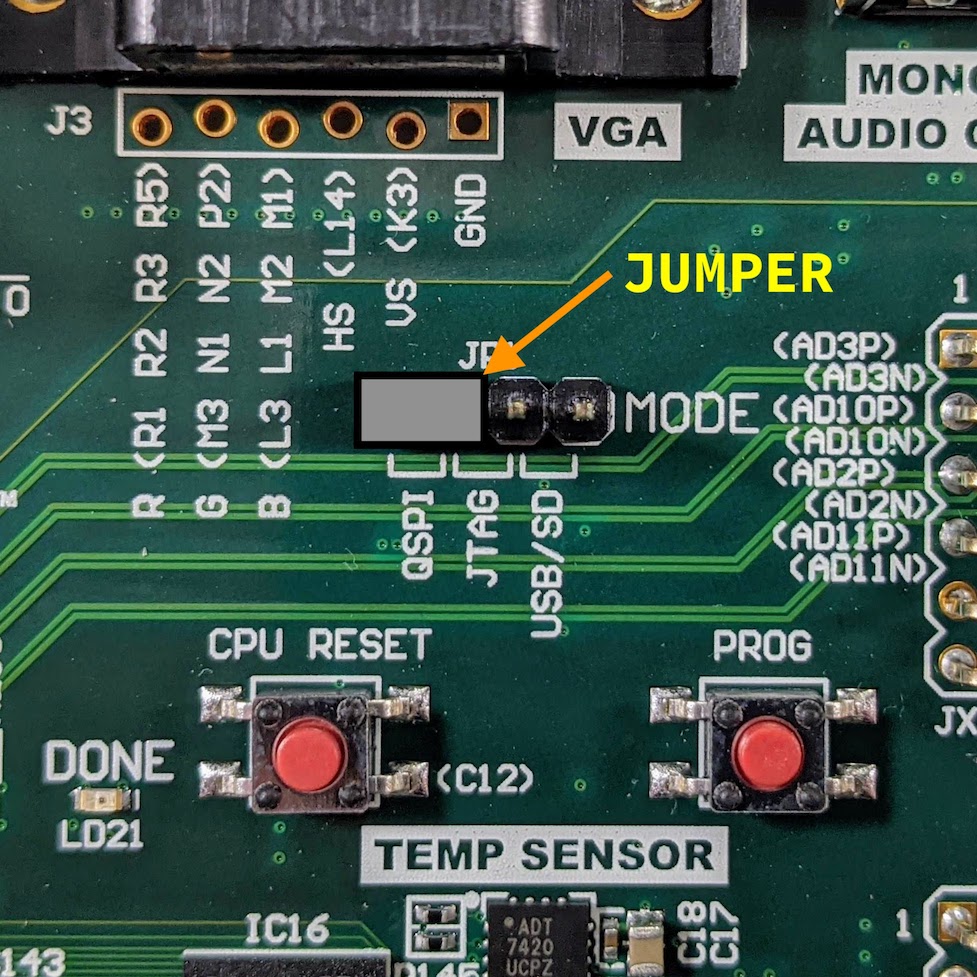
Jumper JP3 selects USB as the power source as shown below:
Input/Output (I/O) Devices
The Nexys4 includes a slide switches, a USB port for HID keyboard/mouse devices, VGA for video out, and a 3.5mm jack for audio.
Slide Switches
This project does not require the use of slide switches at the bottom of the board; however, ensure all switches are in the down position, or away from the LED display as shown in the image below:
USB Keyboard
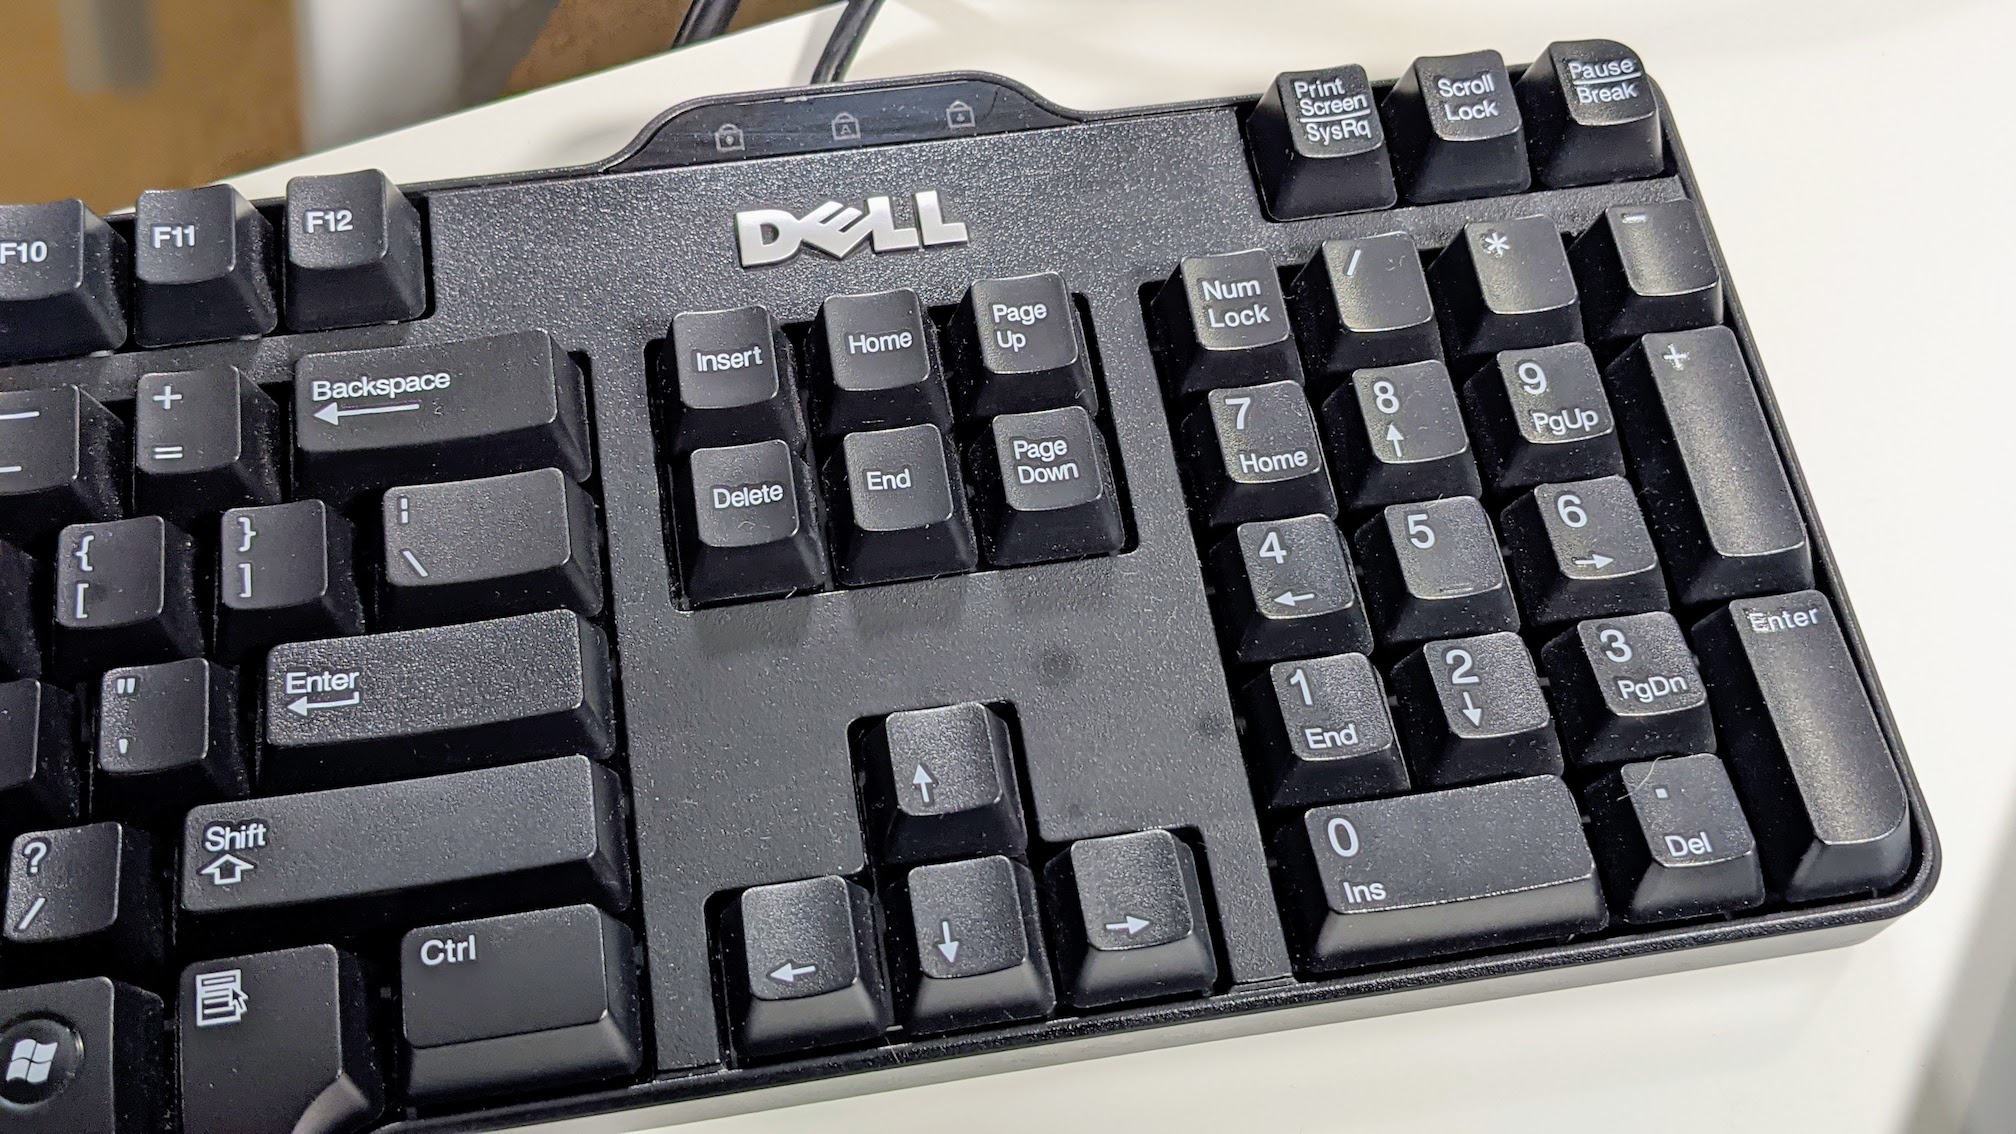
Finding a USB keyboard that works with the Nexys4 is the hardest part of this project. While researching this project on the MEGA65 Discord, the recommendation was to use the “cheapest,” “dirtiest,” “nastiest” Dell keyboard I could find. Mechanical keyboards do not work, nor do keyboards with track pads or USB hub ports. The following keyboards did NOT work:
- Monoprice MP-M10B
- Unicomp M
- KeyChron K2
- Aukey KM-G9
- Kano KC-KBR101
- Generic Handheld RT-MWK01
My penchant for mechanical keyboards was a detriment to this project. Searching through a recycle bin, I found two Dell keyboards:
- L100
- KB216t
The Dell L100, shown below, worked while the KB216t provided the same non-working result of the previous six make and models.
NOTE: Discord user Lydon is asking everyone to share the keyboards that work, or don’t, to compile a list. The process is simple, but you will need a *NIX OS and use the
lsusbcommand. Lydon describes the process in his post.
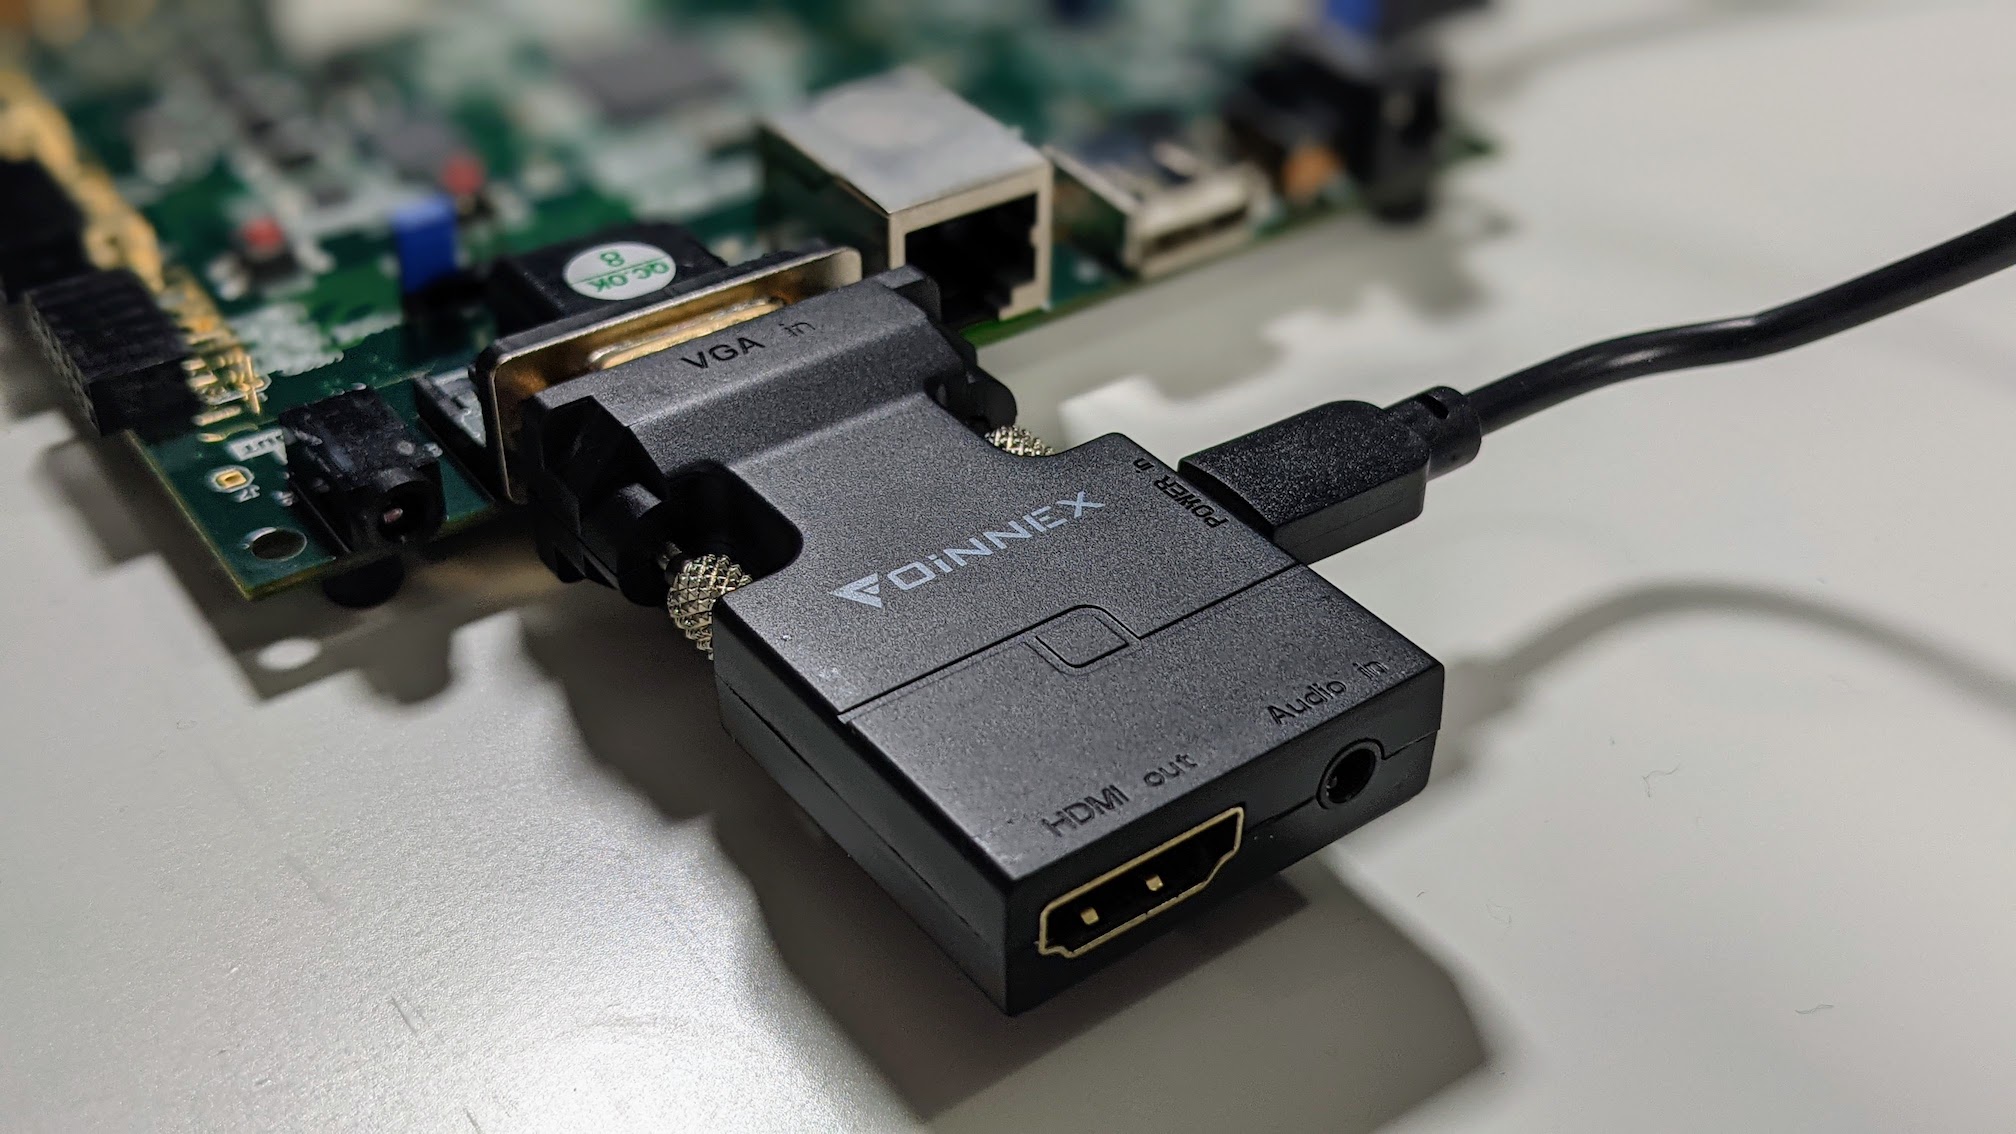
VGA Device
A VGA port provides video out. You can connect this port to a VGA monitor or a capture device. I used a Black Magic Design ATEM Mini with VGA to HDMI adapter to capture video for the companion blog post as shown in the image below:
Audio
A 3.5 mm audio jack provides audio out. This can be a headphone, powered speaker, or capture device. I can use either the ATEM mini or my VGA to HDMI adapter to capture the audio.
Use the Nexys4 Self-Test
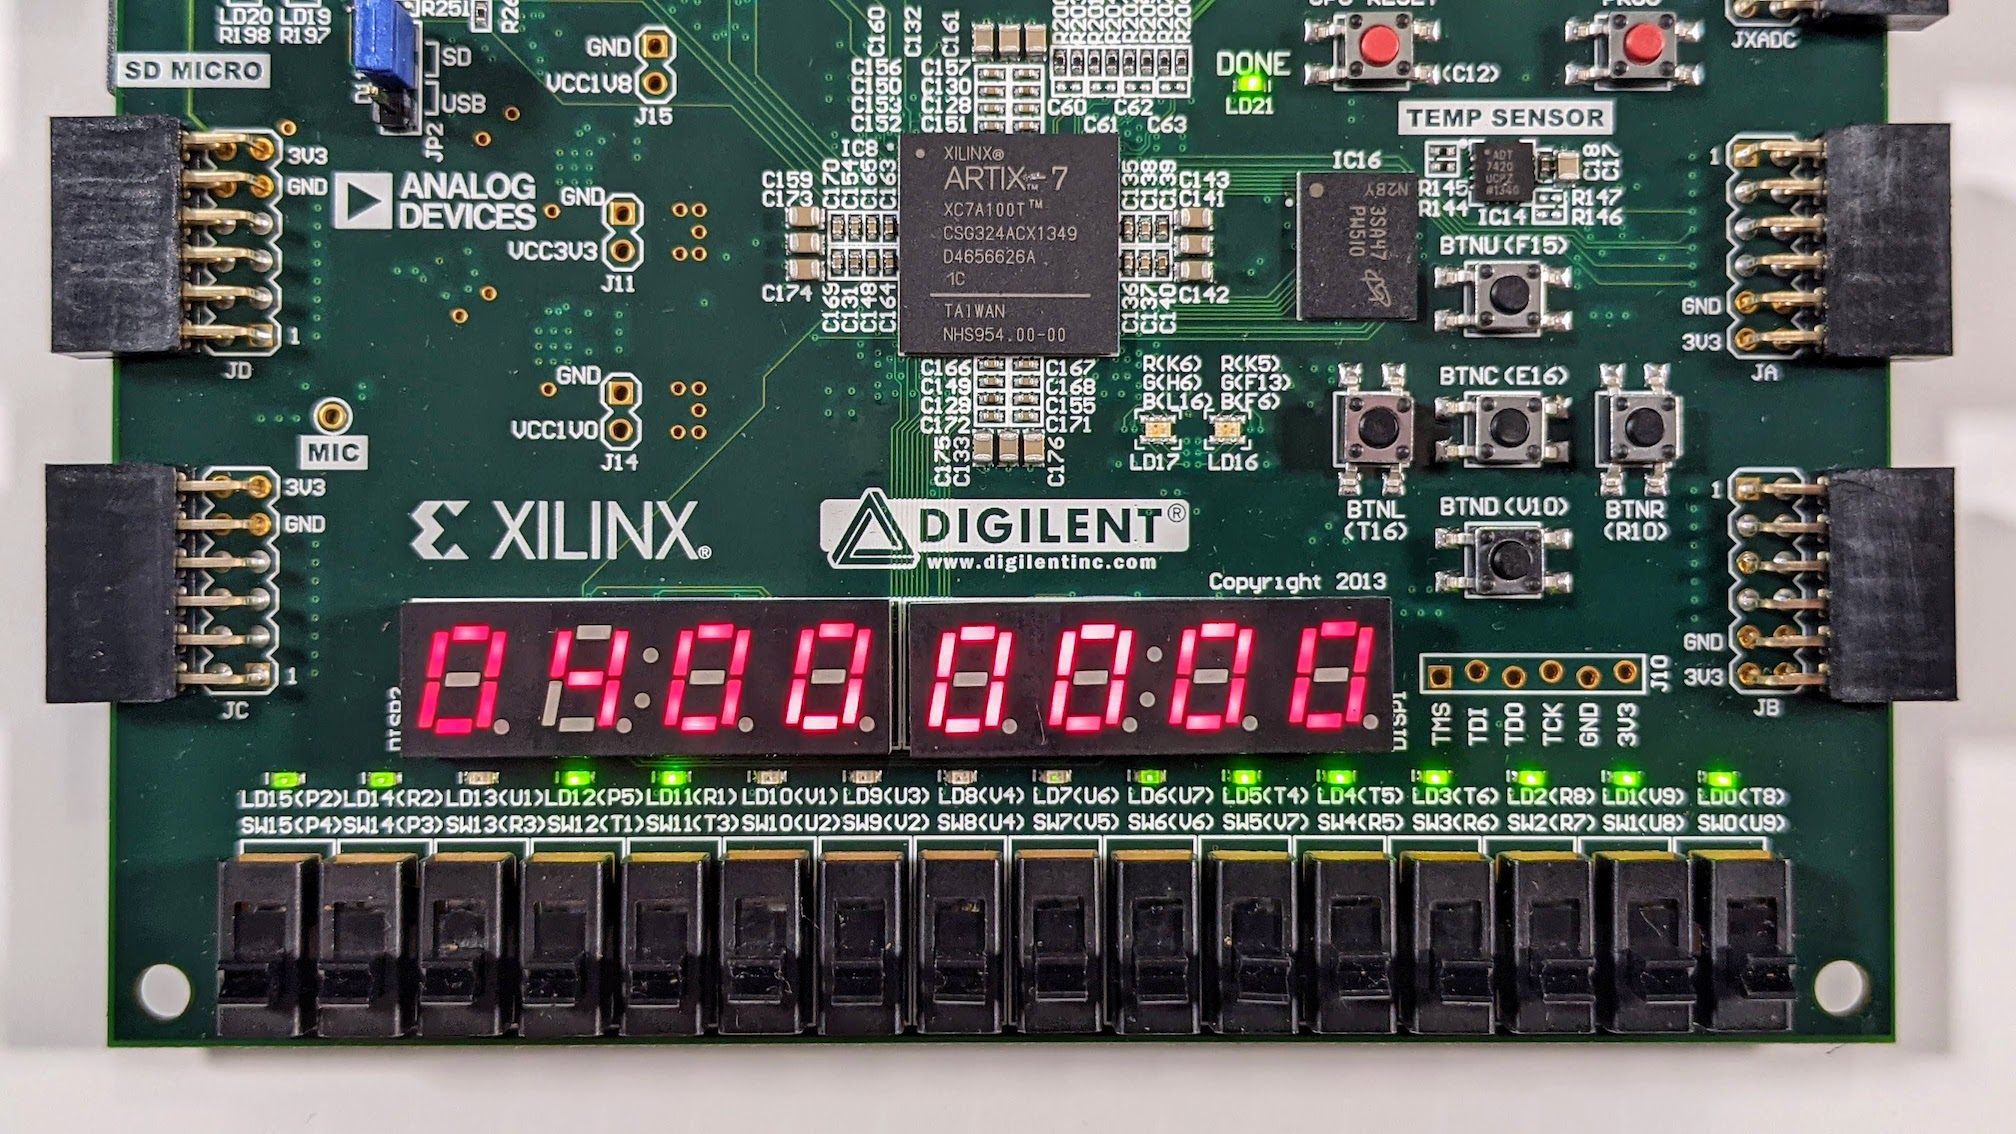
Before installation of the MEGA65 bitstream, test the board to make sure it is operational. To use the on-board Nexys4 self-test, and with the Nexys4 off, move the pin on the external configuration jumper (SD/USB) to USB as shown in the image below:
Turn on the Nexys4 and the self-test will display as shown in the image below:
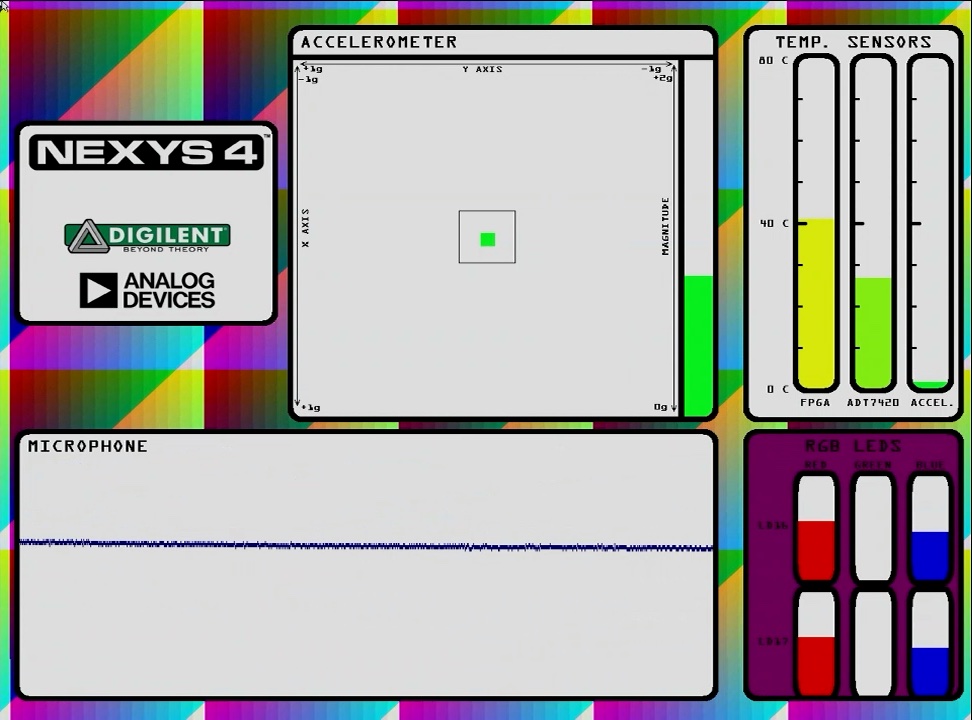
The reference manual lists the self-test functions below:
- The VGA port displays feedback from the onboard microphone, temperature sensors, accelerometer, RGB LEDs, and USB Mouse.
- The user LEDs illuminate when the corresponding user switch is on.
- Some user buttons control the tricolor LEDs. Pressing BTNL, BTNC, or BTNR causes them to illuminate either red, green, or blue, respectively. Pressing BTND cycle through the colors. Repeatedly pressing BTND will turn the two LEDs on or off.
- Pressing BTNU will trigger a 5 second recording from the onboard PDM microphone. A mono audio out port replays the audio. User LEDs display the status of the recording and playback. DDR2 memory is used to store the recordings.
- Connecting a mouse to the USB-HID Mouse port allows the pointer on the VGA display to be controlled. The board only supports mice compatible with the boot mouse HID interface.
- The seven-segment LEDs display a moving snake pattern.
Prepare a microSD Card
With operational hardware, the next step is to prepare a microSD that will boot the Nexys4 with the MEGA65 bitstream. The first step is to format the microSD.
Format a microSD Card
Consult your OS for specific instructions, but below an outline of the process on a Mac computer.
- Insert a microSD card into your Mac.
- Open the Disk Utility application.
- Format the microSD card as a single FAT32 partition.
- The name of the microSD card is unimportant, but consider “NEXYS4-C65”.
- Do not remove the microSD card from the computer.
The microSD can now ready for a bitstream file.
Download the MEGA65 bitstream
A bitstream is the data to load into a field-programmable gate array (FPGA) to configure the Nexys4 hardware as a MEGA65. Download the latest version of the bitstream from the MEGA65 FileHost.
Copy the bitstream to microUSB
Copy the bitstream to the root directory of the microSD card. Ensure there are no other files on the microSD card. Later, we will format this same microSD card and add files to create a boot disk. Keep a copy of the bitstream on the computer. You will need it later.
Boot the bitstream
Use the bitstream to boot the Nexys4 with the instructions below:
- Place the microSD card into the Nexys4 microSD card reader.
- Plug in a USB keyboard.
- Connect a VGA display device.
- Connect a micro USB cable connected to a power supply to the micro USB port.
-
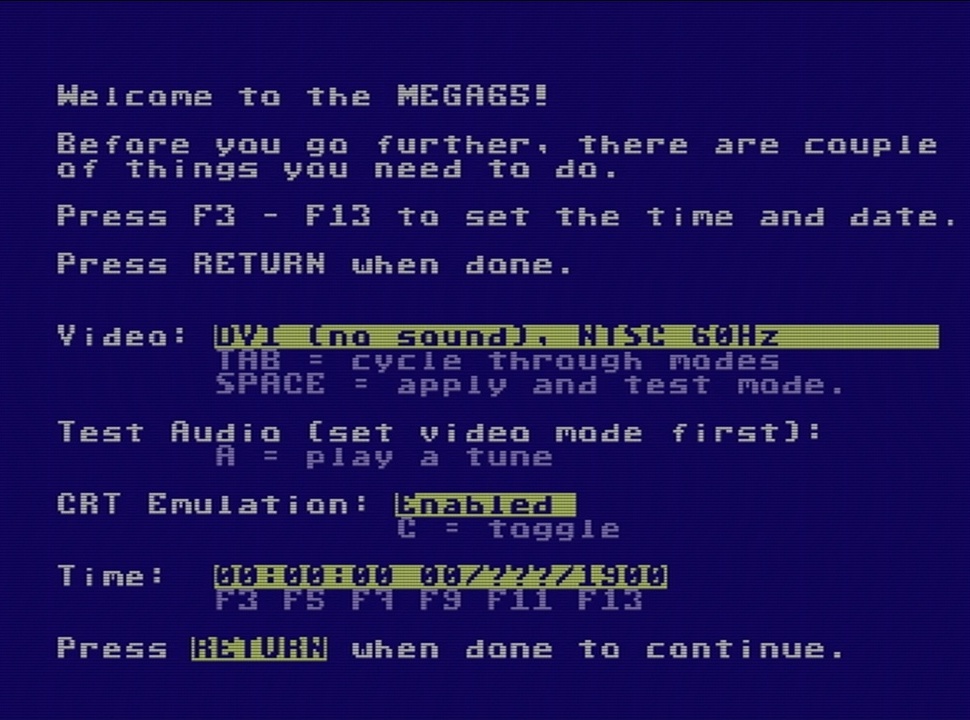
Turn on the Nexys4 and the MEGA65 on-boarding screen below will display. This screen verifies the MEGA65 is operational.
- Turn off the Nexys4.
NOTE: If the screen below appears in a continual loop, try a different microSD.
With an operational MEGA65 Nexys4 bitstream, we can now format the micro SD Card for MEGA65 use.
Format a microSD on the MEGA65
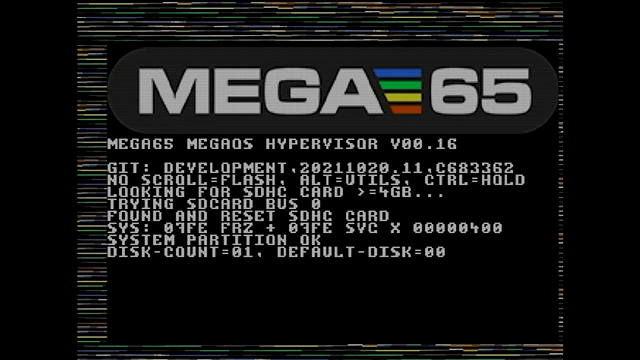
Use the steps below to boot the MEGA65 Utility Menu and format the micro SD card:
- Turn off the Nexys4.
- Hold the ALT key on the keyboard.
- Turn on the Nexys4.
-
Release the ALT key when the Utility menu loads as shown below:
- Select the SD CARD FDISK+FORMAT UTILITY menus option by hitting
2on the keyboard. Type0to select the micro SD card. - Type
DELETE EVERYTHING+⏎to verify the format option - Once the format process is complete, turn off the Nexys4. Ignore the restart options on the menu. The micro SD care can no longer boot the Nexys4 because it is empty and without a bitstream.
- Remove the microSD card from the Nexys4.
The microSD card has two partitions; One hidden and used by the MEGA65 to store configuration files, and another that is user accessible to store SD Card Essentials, a .ROM file, and .D81 disk images.
Copy files to micro SD card
Move to a computer and copy the required files using the steps below:
- Insert the microSD card in a Mac or PC.
-
Download the following files:
- SD Card Essentials
- MEGA65 OPEN ROM or C65-MEGA65 Kernal ROM (Requires Dev Kit or MEGA65 purchase.
- A
.D81disk image. I recommend BASIC.D81 that contains all BASIC examples from the MEGA65 BASIC 65 Command Reference.
- Copy the bitstream downloaded earlier to the root directory of the microSD card.
- Decompress the SD Essentials
.rarfile. - Copy all the files to the root directory of the microSD card.
- Rename the file ROM file to
MEGA65.ROM. - Copy the
MEGA65.ROMfile to the root directory of the microSD card. - Copy the
BASIC.D81file to the root directory of the microSD card. - Eject the microSD card from the computer.
The microSD card is now ready to use in the Nexys4.
Boot the Nexys with the microSD card
Everything is prepared to boot the Nexys4 as a MEGA65 using the steps below:
- Insert the microSD card into the Nexys4 microSD card reader.
- Use the power switch to turn on the Nexys4 FPGA. The Nexys4 will boot and after a few seconds will display the screen below:
Operating the MEGA65 on the Nexys4
Using the MEGA65 isn’t an intuitive experience. There are several hardware controls the new user needs to know to use the MEGA65. I’ll cover these next.
USB-Keyboard Key Mapping
Using a PC keyboard to emulate a Commodore keyboard can be a frustrating experience. This is one reason that the Dev Kit and MEGA65 provide an exceptional user experience that recreates official 1980s computing. There is something you can do to make the experience better.
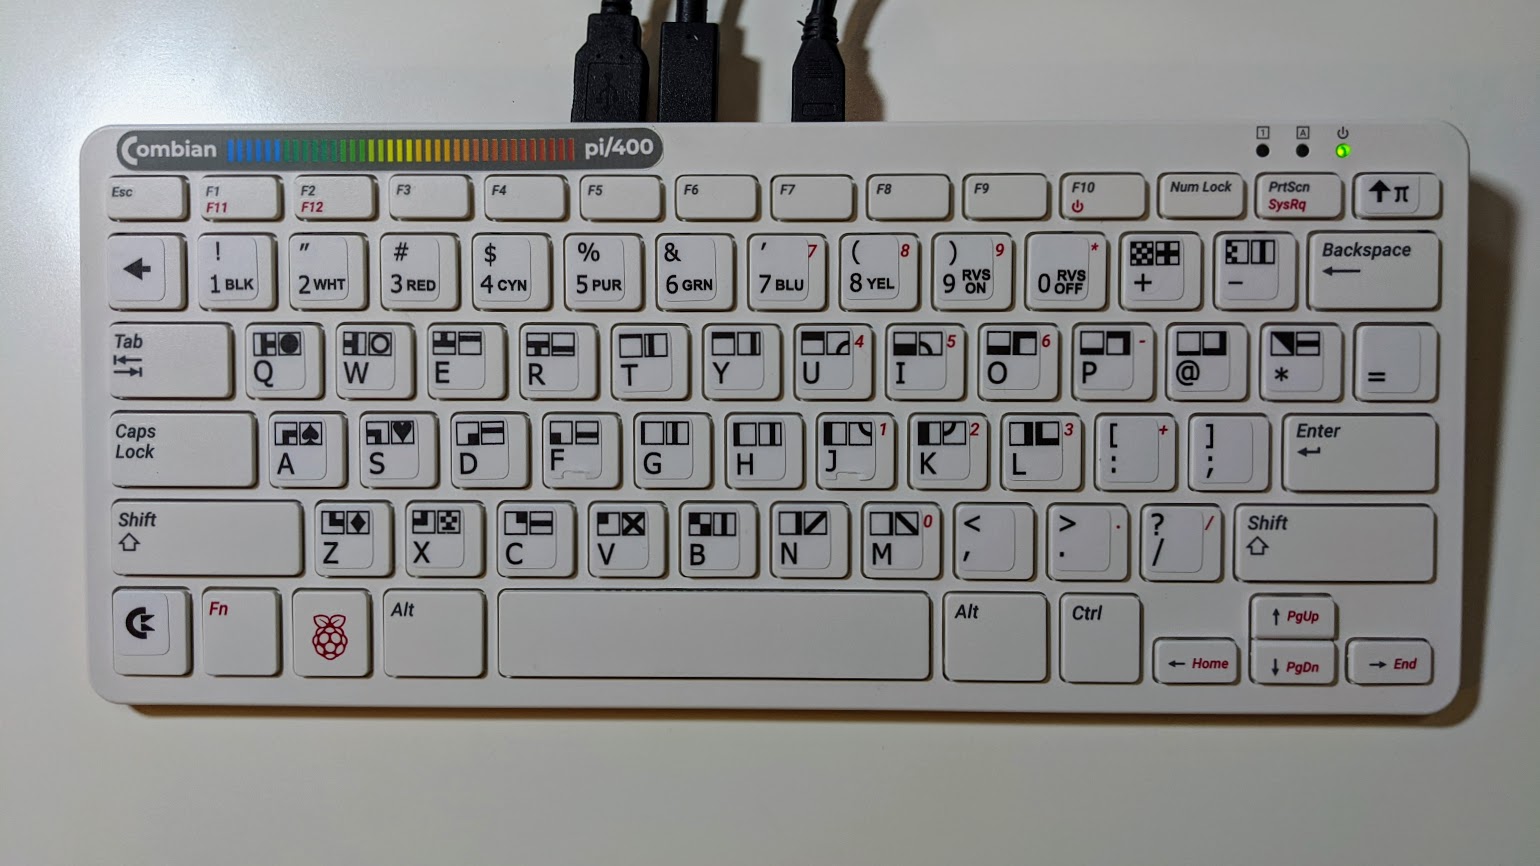
If you plan to use this setup long term. I recommend you purchase these 4Keyboard brand Commodore 64 keyboard stickers. I use them on my Combian pi/400 and they serve as a reminder of the keys needed to use colors/PETSCII or other Commodore functions not found on modern keyboards.
Below are important U.S. keyboard mappings you need to get started using the MEGA65 on the Nexys4 since the original Commodore key mappings are not the same as modern keyboard mappings:
| PC Key | MEGA65 Function |
|---|---|
| PAGE UP | RESTORE |
| ESC | RUN/STOP |
| WINDOWS | MEGA |
| ` | ← |
| @ | ” |
| ^ | & |
| & | ’ |
| * | ( |
| ( | ) |
| = | - |
| [ | @ |
| ] | * |
| \ | = |
| ; | : |
| ’ | ; |
| DEL | ↑ |
| INS | £ |
| F1 | 40/80 Column Mode |
| F3 | Directory |
| Shift-F3 | DIR “*=PRG” |
| F5 | Forward a Word |
| F7 | Back a Word |
| Shift-F7 | Monitor |
| F12 | Delete |
| NUM Lock | Activate WASD Joystick Mode |
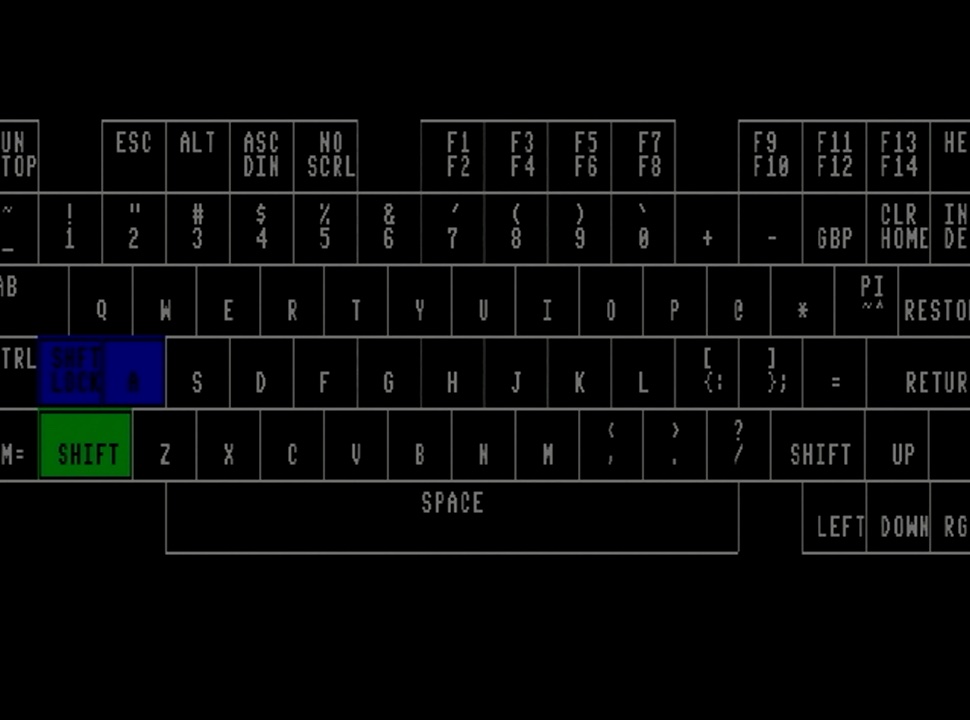
On-screen Keyboard
Useful for the MEGAPhone development, the MEGA65 bitstream includes an on-screen keyboard that is useful for the MEGA65.
 Image Courtesy: MEGA65 Blog Post
The virtual keyboard will display keyboard mappings when you use a U.S. keyboard layout. There are two ways to activate the on-screen keyboard:
Configuration Mode
- Hold the
[ALT]key and turn on the power or press the PROG micro-switch on the Nexys4 board. - Choose option
3when the Configuration Menu displays.
The virtual keyboard shown in the image below will display.
Immediate Mode Keyboard
- Boot the MEGA65 bitstream on the Nexys4.
- Hold the
[MEGA]key (or Windows key on a Dell keyboard) and press[TAB]. The Matrix Mode Debugger will appear. -
Use one of the two commands below to display a semi-transparent virtual keyboard:
s ffd3615 ff+⏎– display the keyboard at the top of the screens ffd3615 ff ff+⏎– display the keyboard at the center of the screen
-
Press
[MEGA]+[TAB]to exit the Matrix Mode Debugger and you will have an overlay of the keyboard as you type, as shown in the image below: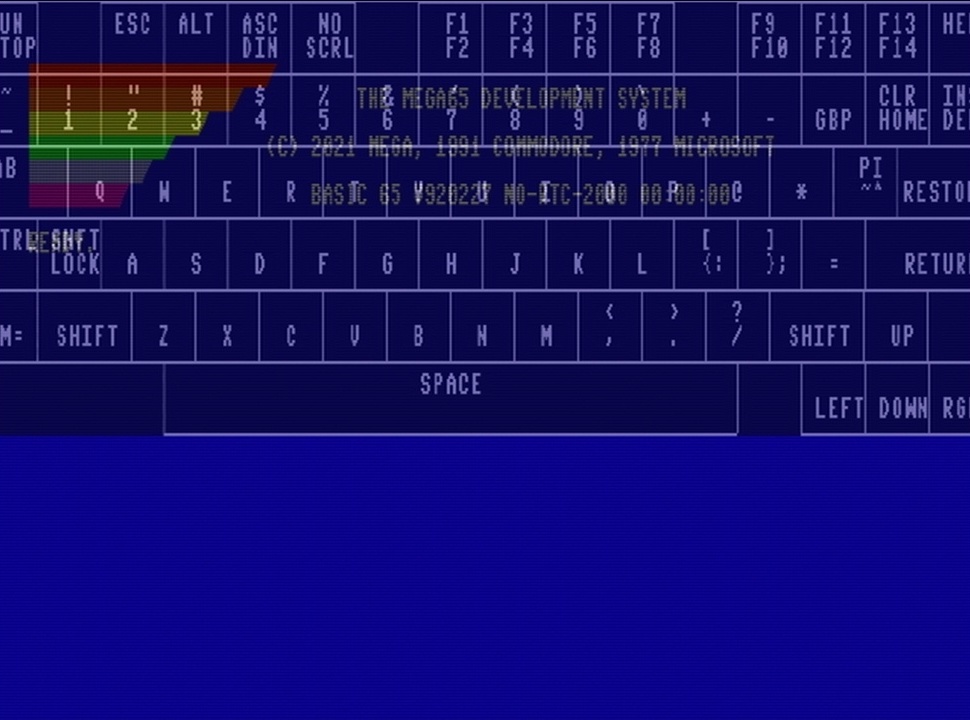
- To hide the virtual keyboard, press
[MEGA]+[TAB]and type the commands ffd3615 7f+⏎followed by another[MEGA]+[TAB]. Huge thanks to Paul for this one!
The virtual keyboard, and the Matrix Mode Debugger have display issues. The screen overlaps the right and left side, as shown in the image above. Checking in with Paul again, he shared:
“Yes, this is a known problem. It was designed for 800 wide on the handheld, not 720 of the desktop.”
FPGA Micro-Switch Controls
There are seven onboard micro-switches and we use the three shown below for the MEGA65 implementation:
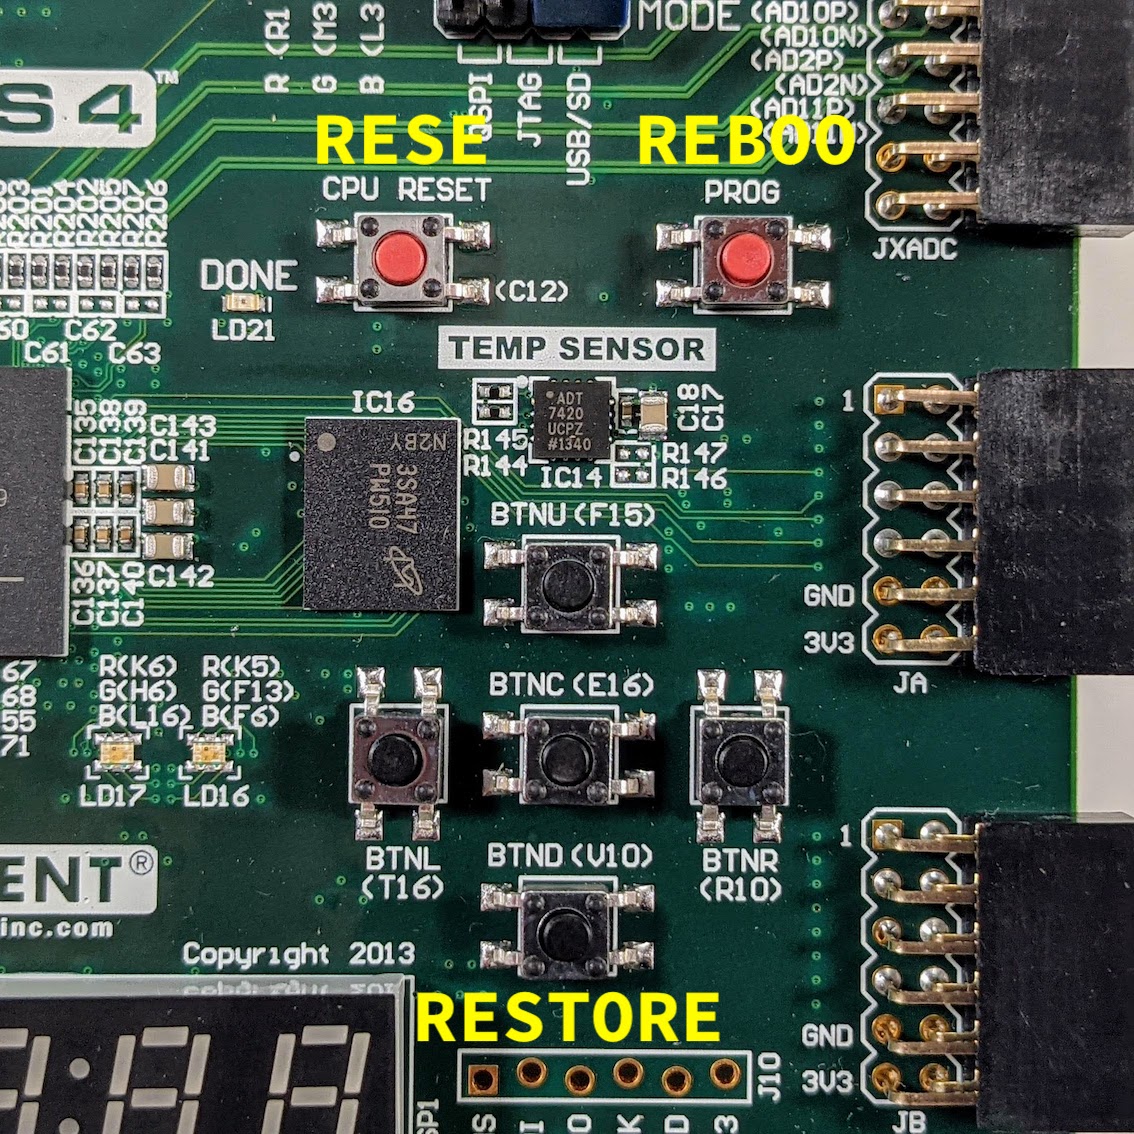
- CPU RESET - Resets the FPGA with the current bitstream and does not clear FPGA memory contents.
- PROG - Resets the FPGA, clears FPGA memory contents, and reloads the current bitstream.
- BTND -
[RESTORE]key alternative
We won’t use the other buttons, but will use these three to operate the MEGA65.
Joystick Emulation
There is no joystick port on the Nexys4, but the bitstream provides joystick emulation via the keyboard using the steps below:
- Press the
[NUM LOCK]key on the keyboard - Joystick #1 controls use the WASD format;
W= ↑,A= ←,S= ↓, andD= →. The left shift key or0on the num pad = fire button. - Joystick #2 uses the cursor keys and the cursor keys on the num pad. Space
␣= fire button.
Basic Nexys4 Use
With a bitstream on the Nexys4 and an understanding of how to operate the device, watch the companion video for a demonstration of ways to use the MEGA65 to run your favorite Commodore 64 software or new MEGA65 software from the FileHost.
Final Thoughts
- If you build your own Nexys4 based MEGA65 and you have questions, please join me over on the MEGA65 Discord on the #nexys channel. I will do my best to answer questions, as will the rest of the community.
- Getting the MEGA65 bitstream working on the Nexys4 was a journey. It started with a YouTube livestream, where I had lots of help troubleshooting the keyboard, to this complete set of instructions and companion video. It’s been a blast.
- What’s next you ask? You didn’t? I have an answer. I have another project planned with this Nexys4. It’s ambitious, but hope to finish it in the coming months.
- The Nexys4, and the MEGA65, have PMOD ports. These ports provide hardware additions and I’d love to see a joystick port addition.
- Why would I install a MEGA65 bitstream on a Nexys4 when I have a MEGA65 Dev Kit and a MEGA65 on the way? You sure are full of questions today! The answer is, to understand the entire hardware experience. The Nexys4 was the original development board. Working through this exercise gives me the full gamut of hardware experiences. A perk for the reader is that users who don’t have a Dev Kit or feel the MEGA65 is not within their financial resources, now have a less expensive hardware option to learn and experiment with while they save or wait for a MEGA65 price drop.
Join the Fun
Don’t miss the retro-computing fun. SUBSCRIBE to my YouTube channel and check out my other posts.
Help make this content better! Leave your comments, corrections, additions, and thoughts in the comments below. You can email me at retrocombs@icloud.com. Thanks for reading and, please let others know about the blog using the hashtag #retroCombs.
🕹️ retroCombs, OUT!