Retro computing with a touch of modern and the home for all things, retroCombs (aka Steven Combs).
Disclosure Statement: When you click on links to various merchants on this site and make a purchase, this can result in this site earning a commission. Affiliate programs and affiliations include, but are not limited to Amazon, the eBay Partner Network, and/or others.

Commodore Plus/4 User’s Manual, Chapter 4 - Getting Started
by Steven B. Combs, Ph.D.
In this Commodore Plus/4 retroCombs episode, I cover chapter 4 of the Commodore Plus/4 user’s manual. In this chapter, Getting Started I, “begin to acquaint you with some of the characteristics and capabilities of the Plus/4, and how to take the first steps toward programming with your computer.” We spend more time learning how to use the keyboard, correcting mistakes, creating simple programs, and then I show you how to use windows on the Plus/4. No, not the operating system, but another unique feature of the Plus/4’s BASIC.
MEMBERSHIP: I now offer retroCombs memberships from $1 (PET level membership) to $20 (MEGA65 level membership) that include levels in between for all budgets (VIC-20, C64, Plus/4, and C128). If you’d like to support my content and get access to my Discord server along with other cool freebies, check out each level at https://www.buymeacoffee.com/retroCombs.
Table of Contents
- Series Information
- Companion Disk Image (In Progress)
- User’s Manual
- YouTube Video: retroCombs: Commodore Plus/4 User’s Guide, Chapter 4 - Getting Started
- Links Mentioned in this Episode:
- Key to Keys
- Episode Errata
- Introduction
- Keyboard Colors
- BONUS TOPIC: Clear the Screen
- Color and Reverse Printing
- Some Simple Programs
- Correcting Typing Mistakes
- Introduction to the Plus/4 Text Screen
- More about PRINTing on the Screen
- Screen Windows
- Random Thoughts
- Join the Fun
Series Information
This episode is a small part of my larger Commodore Plus/4 series. You can read the entire series and view additional resources at:
</plus4>
Companion Disk Image
As I progress through the user’s manual, I enter and execute sample programs. The link below is to a .d81 image that contains every program from each episode. Currently, the image is not complete since we still have several chapters to go.
retroCombs User’s Manual Disk Image - UPDATED AS OF: 2020-11-01
I use the following file name convention to make it easy to locate specific programs:
 Sample Program Name:
 02 RCOMBS SCROLL.PRG
02- The chapter numberRCOMBS SCROLL- my self assigned name for the BASIC program which will be immediately identifiable if you follow along.
User’s Manual
As part of my Commodore Plus/4 YouTube series, I work through each chapter of the Plus/4 manual. I’ve taken the time to scan each chapter so you can read and follow along. Use the link below to view chapter 3:
Below are the links for previous chapters covered:
- Front Matter
- Chapter 1 - Unpacking and Setting Up
- Chapter 2 - Using the Keyboard and the Screen
- Chapter 3 - Using Software
YouTube Video: retroCombs: Commodore Plus/4 User’s Guide, Chapter 4 - Getting Started
In the video below, I work through Chapter 4 of the user’s manual.
Links Mentioned in this Episode:
Below are the links I mention in the video.
Key to Keys
Because the Commodore Plus/4 keyboard is so different from modern keyboards, I devised a modern key nomenclature to identify keystroke combinations as shown in the table below:
| Key | Description | Key | Description |
|---|---|---|---|
⇪ |
Caps Lock | F1 |
Function 1 |
[C=] |
Commodore | F2 |
Function 2 |
⌃ |
Control | F3 |
Function 3 |
⎋ |
Escape | F4 |
Function 4 |
⌂ |
Clear/Home | F5 |
Function 5 |
⌫ |
Insert Delete | F6 |
Function 6 |
⏎ |
Return | F7 |
Function 7 |
[R/S] |
Run/Stop | F8 |
Help |
⇧ |
Shift | ␣ |
Space |
↑ |
Cursor Up | ↓ |
Cursor Down |
→ |
Cursor Right | ← |
Cursor Left |
Episode Errata
THANKS TO EVERYONE FOR THE FEEDBACK!!! It makes this project more fun and I’m (re)learning much. I will add video corrections or additions below.
- In the video I suggested that I could use the
COLORcommand to change the background color, set a screen window and then change the background color again to only affect the screen window area. I was not able to get this to work. TheCOLORchanges the entire background, even the area outside of the screen window. Screen windows continue to bewilder me. - [2021-03-21] Viewer, Ducan Woodward, started a great discussion about how to use Screen Windows using BASIC. This led me to include an example that should have been in the user’s manual. Be sure to check out Duncan’s discussion that sparked it all in the comments section for the video.
Introduction
- Thanks to viewers for feedback.
- .d81 disk will update as we go.
- Proud of the companion website for this episode. Check it out!
- When viewing the YouTube video, don’t forget to subscribe to the channel!
Keyboard Colors
Changes to keyboard character colors are simple on the Plus/4 (and other Commodore computers for that matter). Hold down either the ⌃ or C= modifier key followed by one of the numbers below:
| Number | Modifier ⌃ |
Modifier C= |
|---|---|---|
1 |
Black | Orange |
2 |
White | Brown |
3 |
Red | Yellow-Green |
4 |
Cyan | Pink |
5 |
Purple | Blue-Green |
6 |
Green | Light Blue |
7 |
Blue | Dark Blue |
8 |
Yellow | Light Green |
Once a color is selected, type away!
BONUS TOPIC: Clear the Screen
Before reversing and printing characters in color, clear the screen. There are two ways to do this on the Plus/4:
SCNCLRcommand - Clears screen and displaysREADYprompt.F4(SCNCLRcommand) - Same results as number 1.⇧+CH(Clear/Home) - Clears screen and moves cursor to top left-hand corner (no prompt).
Color and Reverse Printing
They keys below toggle reverse characters:
^+9(Rvs On)^+0(Rvs Off)
Turn reverse on and type characters.
TUTORIAL:
⇧+CHto clear the screen.^+9(Rvs On).␣four times to draw a thick black line.^+3to change the character color to red.␣four times to draw a thick red line.C=+4to change the character color to pink.␣four times to draw a thick pink line.^+1to change the character color to black.- Type
RETRO. ^+0(Rvs Off).- Type
COMBS.
The keystrokes result in the following:
▇▇▇▇▇▇▇▇▇▇▇▇RETROCOMBS
You can draw on the screen, but you cannot save the characters or include them in a basic program. Let’s integrate these codes into a BASIC program statement:
-
F4- clear the screen with aREADYprompt -
Type
PRINT "- remember the second video where I said, “what’s going on?” After the quotation mark, the Plus/4 enters QUOTE mode where some keys work differently. For instance, pressing a cursor key will input a symbol, not move the cursor key. When the program is executed, the cursor will then move. More on this later. -
Finish the line as shown below:
? "{RVS ON}COMMODRE{RVS OFF} PLUS/4"Note my use of the
{and}characters above to specify the keys. You do not type these brackets and you substitute the command for the keystrokes. In this example^+9and^+0respectively. I will use this convention going forward since there are not modern keyboard equivalents.
The keystrokes result in the following:
COMMODORE PLUS/4
Even though we typed a line of BASIC code, that code is not saved because it is not prefaced with a line number. More on this later, but if you use the command LIST you will notice that the line is not stored in the Plus/4’s memory.
Now try the same thing using the flash feature:
-
F4- clear the screen with aREADYprompt -
Type the line below:
? "{FLASH ON}COMMODRE{FLASH OFF} PLUS/4"
The keystrokes result in the following:
COMMODORE PLUS/4
If you the word COMMODORE is not blinking, your browser does not (and should not) support this feature!
Some Simple Programs
All right! Time to program. Clear the screen and type in the following BASIC program:
10 ? "PLUS/4"
20 GOTO 10
💾 On Disk: 04 PLUS4
Notice the line numbers at the beginning of each line? Those lines of code are now saved. Type LIST and the Plus/4 will “list” the program lines.
Type RUN and the Plus/4 will execute the BASIC program. “JANE! STOP THIS CRAZY THING!” is probably what you are thinking. The Plus/4 continues to print the “PLUS/4” characters continuously. It seems any key you typed won’t stop it, except for the RS {Run Stop} key. Tap it to stop the program.
Let’s try another program. We could type the command NEW but there is a one line of code, line 10, that we don’t need to retype. Let’s just replace line 20. At the READY prompt, type the line of code below:
20 COLOR 0,12
LIST the program again and you will have the program below in memory:
10 ? "PLUS/4"
20 COLOR 0,12
💾 On Disk: 04 PINK BGRND
RUN to program. The program prints “PLUS/4” once since there is no loop command (GOTO 10) and the background color changes to pink. We’ll cover the COLOR command in detail later in chapter 7 (page 77), but 0 specifies that the background color will change and 12 specifies the color to use. Can you guess which number will turn the background color back to white? HINT: see my keyboard number color list? What about light-blue?
Correcting Typing Mistakes
We are bound to make mistakes when typing. It happens…a lot! You can do two things to modify a line:
- Completely retype the line.
- Use the cursor keys to move back up to the line and make the corrections on top of the current code.
Here’s how it works. First, use the NEW command to clear out the previous program.
TIP: If you want to save the program, refer to chapter 3)
type the line of code below:
10 COLOR 0.2
20 ? "PLUS/4"
LIST the program. Line 10 has two errors. Can you spot them? RUN the program. The Plus/4 will display:
?SYNTAX ERROR IN 10
Well, of course! Hit the HELP function key and the Plus/4 will display and flash the line of code with the error. This is a great way to step through lines of code that have errors (again, there will be many).
Use the cursor keys to scroll up the the flashing line and replace the line with the one below:
10 COLOR 0,2
Remember to the hit the ⏎ {Return} after you correct the line and RUN the program again. The background will turn white and PLUS/4 will appear.
You can replace line 10 by typing over the command or creating a new line with the same line number. Type the line below:
10 ? "COMMODORE"
LIST the program:
10 ? "COMMODORE"
20 ? "PLUS/4"
💾 On Disk: 04 CMDR PLUS4
RUN the program and the output will be:
COMMODORE
PLUS/4
Replace PLUS/4 with VIC-20 by using the cursor keys to move up to the P in PLUS-4 and replacing the following characters with VIC-20. Don’t worry about moving to the end of the line. Once the changes are made, hit ⏎. You do not have to be at the end of the line to store the entire line.
If you want to remove the PLUS/4 line, just enter a blank line 20 by entering 20 followed by ⏎.
Let’s make more advanced edits on a line of code rather than just typing over characters. Use the NEW command and then type the line below:
10 ? "CORE"
See what I did there? Instead of typing PRINT, I used ?. LIST the program and you will see that the ? is replaced by the command PRINT. Serious time saver.
To change the word CORE to COMMODORE, you can simply type over the words or retype the line; however, let’s use the power of the ⌫ {Inst Del} key. By itself, ⌫ will delete the character one space before the cursor. Use ⇧ + ⌫ to insert a blank character one space to the right of the cursor.
Use cursor key to move on top of the letter O in line 10. Hold ⇧ and press the ⌫ key the number of spaces need to insert the letters ommod, or five times.
TIP: Although not covered in Chapter 4, we did cover a way in Chapter 2 to toggle between insert and overwrite mode. This is especially handy if you don’t want to count or don’t know the number of characters to insert. Tap (don’t hold)
⎋{Escape} followed by theAkey to enter Automatic Insert Mode. Tap⎋followed by theCkey to Cancel Automatic Insert Mode. Try addingPLUS/4after the wordCOMMODOREand before the".
Time to enter a longer program and use our editing skills along the way. Type the program below after you use the NEW command:
10 COLOR 1,6,0
20 ? "A FUNNY THING HAPPENED ";
30 COLOR 1,5,3
40 ? "ON MY WAY TO THE KEYBOARD ";
50 COLOR 1,3,0
60 ? "♥♥♥♥♥♥";
70 COLOR 1,1,0
💾 On Disk: 04 A FUNNY THING
TIP:
⇧+S=♥
Before you use the RUN command, anticipate the output. Now RUN the program. Character placement is different than before. Each new line of text begins next to the previous instead of on a new line thanks to the ; character at the end of the each PRINT statement. We’ll explore that more in just a bit.
Introduction to the Plus/4 Text Screen
Now we will use some programming to learn more about the Plus/4 screen.
Use the NEW command and enter the program below:
10 ? "♥";
20 GOTO 10
RUN the program and the screen will continually print hearts and fill the screen as shown below:
♥♥♥♥♥♥♥♥♥♥♥♥♥♥♥♥♥♥♥♥♥♥♥♥♥♥♥♥♥♥♥♥♥♥♥♥♥♥♥♥
♥♥♥♥♥♥♥♥♥♥♥♥♥♥♥♥♥♥♥♥♥♥♥♥♥♥♥♥♥♥♥♥♥♥♥♥♥♥♥♥
♥♥♥♥♥♥♥♥♥♥♥♥♥♥♥♥♥♥♥♥♥♥♥♥♥♥♥♥♥♥♥♥♥♥♥♥♥♥♥♥
♥♥♥♥♥♥♥♥♥♥♥♥♥♥♥♥♥♥♥♥♥♥♥♥♥♥♥♥♥♥♥♥♥♥♥♥♥♥♥♥
♥♥♥♥♥♥♥♥♥♥♥♥♥♥♥♥♥♥♥♥♥♥♥♥♥♥♥♥♥♥♥♥♥♥♥♥♥♥♥♥
♥♥♥♥♥♥♥♥♥♥♥♥♥♥♥♥♥♥♥♥♥♥♥♥♥♥♥♥♥♥♥♥♥♥♥♥♥♥♥♥
♥♥♥♥♥♥♥♥♥♥♥♥♥♥♥♥♥♥♥♥♥♥♥♥♥♥♥♥♥♥♥♥♥♥♥♥♥♥♥♥
♥♥♥♥♥♥♥♥♥♥♥♥♥♥♥♥♥♥♥♥♥♥♥♥♥♥♥♥♥♥♥♥♥♥♥♥♥♥♥♥
♥♥♥♥♥♥♥♥♥♥♥♥♥♥♥♥♥♥♥♥♥♥♥♥♥♥♥♥♥♥♥♥♥♥♥♥♥♥♥♥
♥♥♥♥♥♥♥♥♥♥♥♥♥♥♥♥♥♥♥♥♥♥♥♥♥♥♥♥♥♥♥♥♥♥♥♥♥♥♥♥
♥♥♥♥♥♥♥♥♥♥♥♥♥♥♥♥♥♥♥♥♥♥♥♥♥♥♥♥♥♥♥♥♥♥♥♥♥♥♥♥
♥♥♥♥♥♥♥♥♥♥♥♥♥♥♥♥♥♥♥♥♥♥♥♥♥♥♥♥♥♥♥♥♥♥♥♥♥♥♥♥
♥♥♥♥♥♥♥♥♥♥♥♥♥♥♥♥♥♥♥♥♥♥♥♥♥♥♥♥♥♥♥♥♥♥♥♥♥♥♥♥
♥♥♥♥♥♥♥♥♥♥♥♥♥♥♥♥♥♥♥♥♥♥♥♥♥♥♥♥♥♥♥♥♥♥♥♥♥♥♥♥
♥♥♥♥♥♥♥♥♥♥♥♥♥♥♥♥♥♥♥♥♥♥♥♥♥♥♥♥♥♥♥♥♥♥♥♥♥♥♥♥
♥♥♥♥♥♥♥♥♥♥♥♥♥♥♥♥♥♥♥♥♥♥♥♥♥♥♥♥♥♥♥♥♥♥♥♥♥♥♥♥
♥♥♥♥♥♥♥♥♥♥♥♥♥♥♥♥♥♥♥♥♥♥♥♥♥♥♥♥♥♥♥♥♥♥♥♥♥♥♥♥
♥♥♥♥♥♥♥♥♥♥♥♥♥♥♥♥♥♥♥♥♥♥♥♥♥♥♥♥♥♥♥♥♥♥♥♥♥♥♥♥
♥♥♥♥♥♥♥♥♥♥♥♥♥♥♥♥♥♥♥♥♥♥♥♥♥♥♥♥♥♥♥♥♥♥♥♥♥♥♥♥
♥♥♥♥♥♥♥♥♥♥♥♥♥♥♥♥♥♥♥♥♥♥♥♥♥♥♥♥♥♥♥♥♥♥♥♥♥♥♥♥
♥♥♥♥♥♥♥♥♥♥♥♥♥♥♥♥♥♥♥♥♥♥♥♥♥♥♥♥♥♥♥♥♥♥♥♥♥♥♥♥
♥♥♥♥♥♥♥♥♥♥♥♥♥♥♥♥♥♥♥♥♥♥♥♥♥♥♥♥♥♥♥♥♥♥♥♥♥♥♥♥
♥♥♥♥♥♥♥♥♥♥♥♥♥♥♥♥♥♥♥♥♥♥♥♥♥♥♥♥♥♥♥♥♥♥♥♥♥♥♥♥
♥♥♥♥♥♥♥♥♥♥♥♥♥♥♥♥♥♥♥♥♥♥♥♥♥♥♥♥♥♥♥♥♥♥♥♥♥♥♥♥
♥♥♥♥♥♥♥♥♥♥♥♥♥♥♥♥♥♥♥♥♥♥♥♥♥♥♥♥♥♥♥♥♥♥♥♥♥♥♥♥
If you take the time to count the hearts, you will find a screen resolution of 40 x 25 characters or 1000 different locations for a character to appear. We can use this information for some creative programming.
Let’s use this information to create a single row of hearts without typing ♥ 40 times in a PRINT statement using the code below:
10 FOR X = 1 to 40
20 ? "♥";
30 NEXT
RUN the program and the line below will appear:
♥♥♥♥♥♥♥♥♥♥♥♥♥♥♥♥♥♥♥♥♥♥♥♥♥♥♥♥♥♥♥♥♥♥♥♥♥♥♥♥
💾 On Disk: 04 LINE OF ♥
Since there are no gaps or overlapping rows of hearts, we know that there are 40 character columns (vertical) on the screen. Let’s now verify the number of rows (horizontal) with the code below:
10 FOR X = 1 to 25
20 ? "♥"
30 NEXT
💾 On Disk: 04 COLUMN OF ♥
Removing the ; at the end of line 20 ensures each new ♥ is printed on a new line. RUN the program and the lines below will appear:
♥
♥
♥
♥
♥
♥
♥
♥
♥
♥
♥
♥
♥
♥
♥
♥
♥
♥
♥
♥
♥
♥
♥

READY
▇
If you count the hearts, you will find three missing. That’s because the computer scrolled beyond three hearts to display the READY prompt.
One last thing about rows and text. Create the NEW program below:
10 ? "I LIKE YOUR TOUCH ON MY KEYBOARD. DO YOU COME HER OFTEN?"
💾 On Disk: 04 CREEPY CMDR
First, that’s a creepy statement straight from the actual user’s manual and second, it demonstrates a feature and limitation. The feature; when you type a LONG line of code, the Plus/4 will automatically wrap the text to the next line. The limitation; the computer will not cleanly break a word between lines and a line of BASIC cannot have more than 80 characters (two full rows).
More about PRINTing on the Screen
Previously we’ve printed characters on the screen that either butt up next to each other or print on the next line. The Plus/4 offers some additional control over how characters are printed on the screen through the use of “zones.”
Specify zones in the PRINT command using the characters , and ;. We already know that using ; will force the next line of text to butt up next to the previous, but what about , ? The , is similar to a tab stop but in this case, the tab is starts at every ten characters (the start of a new zone). A demonstration will better explain. Clear the screen and type the command below.
? "Z1","Z2","Z3","Z4"
RUN the program and the line below will appear:
Z1 Z2 Z3 Z4
Each string will begin at column 1, 11, 21, and 31 which means each zone is 10 characters wide. If you have more than 10 characters in a zone, such as the line below, zone two (Z2) is skipped and the next characters begin in Z3 or character column position 31.
? "!1234567890","Z3","Z4"
Screen Windows
The last concept in Chapter 4 is screen windows. The most interesting feature of screen windows is that they are mentioned once in the manual and never again. I struggle to understand their usefulness, but they are pretty cool.
An example is the best way to describe this feature that confines a specific area of the screen to use as a “work space.” Use the steps below to create a screen window on the Commodore Plus/4:
- Move cursor on the screen to top-left corner of the screen window to create.
- Press
⎋+T. - Move cursor on the screen to bottom-right corner of the screen window to create.
- Press
⎋+B.
Now when you type any commands or code, it will all be contained in the screen window. To remove the screen window, press ⌂ twice. The cursor will then move to the top-left corner of the screen.
Here’s a fun example that combines much of what we’ve learned today:
- Use the
SCNCLRcommand. -
Type the line of code below:
10 FOR X = 1 to 1000 : ? "{PUR}{RVS ON}▇; : NEXT RUNthe code- Using the cursor keys, move to the top-left corner of the screen.
- Move the cursor down 10 characters and to the right 10 characters.
- Press
⎋+T. - Move the cursor down 15 characters and to the right 20 characters.
- Press
⎋+B. SCNCLRto clear the screen.^+2to change to black characters.
The screen will clear, a thick purple border will appears, and you now have a smaller 20 x 15 window to work within. Play around in that window. To clear the screen window:
- Press
⌂twice SCNCLRto clear the screen.
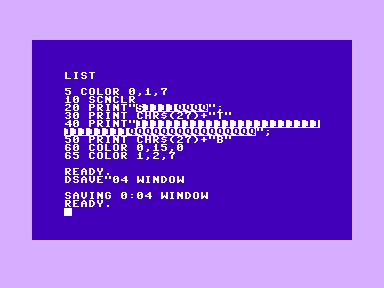
[2021-03-23] The BASIC program below demonstrates how to create a screen window using BASIC.
5 COLOR 0,1,7
10 SCNCLR
20 ? "⌂→→→→↓↓↓↓";
30 ? CHR$(27)+"T"
40 ? "→→→→→→→→→→→→→→→→→→→→→→→→→→→→→→→↓↓↓↓↓↓↓↓↓↓↓↓↓↓↓↓";
50 ? CHR$(27)+"B"
60 COLOR 0,15,0 : COLOR 1,2,7
💾 On Disk: 04 SCREEN WINDOW
Random Thoughts
- This was a fun episode and it was interesting to learn the many things I forgot about Commodore Basic and character control.
- The episode is a bit laborious and I’m sure those with basic Commodore computer experience will find some of the content tedious. Blame the old school teacher in me, but I believe repetition is the best way learn.
- I found myself using the VICE Plus/4 emulator, along with my Plus/4, while writing this post. It was handy to bounce around Atom and VICE to experiment. And I can copy and paste code from my Linux software directly into VICE! I’m becoming much more familiar with VICE and see the advantage. Many of which I’m planning to show in a new series of video and posts. Stay tuned for more but this also works well with my theme of learning how to use retro-computers using modern tools and equipment (see Pi1541 and Tapuino posts/videos).
-
I’ve no idea how to use screen windows in programming.[2021-03-21] See Episode Errata for new solution. I tweeted Bil Herd, tweet below, to see if he might respond and offer an assist.@BilHerd, I'm working on Chapter 4 in the Plus/4 user's manual for my next post/video and wondered if you had insight on "Screen Windows" (pg. 53)? What was their intent and how could they be accessed in code? Other than a novelty, I'm not understanding their intended use.
— Steven Combs (retroCombs)🕹️ (@StevenCombs) August 28, 2020 - This blog post really was fun to produce and in itself was an educational journey for me as I learned how to use CSS to style and color text.
- The next chapter, 5, is all about numbers and calculations. It’s a short chapter, but I’m going to have to break out the math teacher in me to accurately describe and demonstrate features.
Join the Fun
Help make this series better! Post feedback, questions, and ideas. Let me know if you are following along. Let’s make this a community project. For now, Leave your comments and thoughts below or in the comments under the YouTube video.
Thanks for watching and if you are so inclined, please let other Commodore fans know about the series by sharing these videos using #retroCombs.
🕹️ retroCombs, OUT!